Search
Close this search box.

Amigurumilandia PATTERNS

Free patterns for all tastes

Goku Amigurumi Free Pattern

March 24th, 2024

Goku Amigurumi Free Pattern

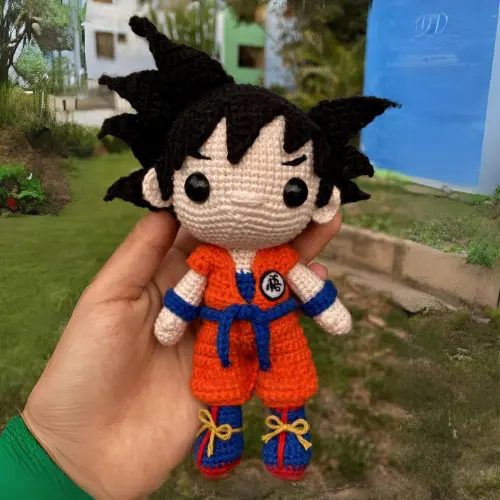
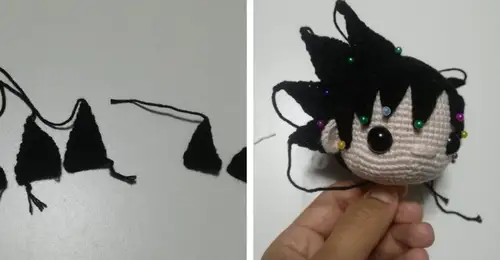
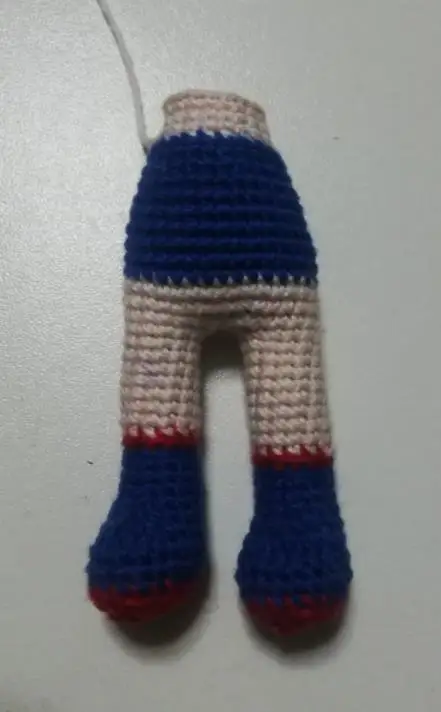
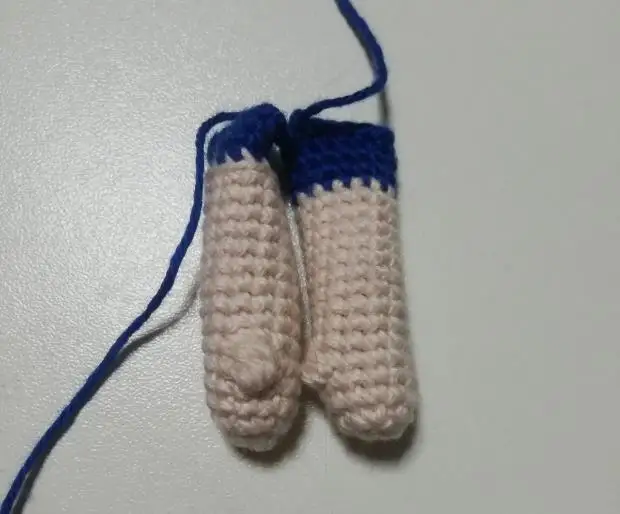
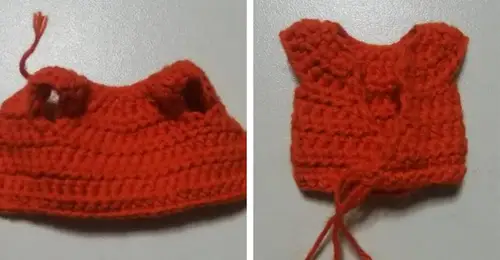
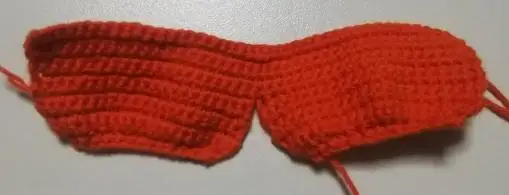
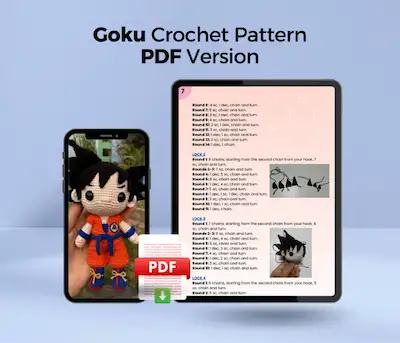
Greetings to the Mighty Crochet Community! We’re thrilled to introduce our incredible pattern, “Goku,” crafted 100% by @siennahandmade_. Standing tall at 19 cm and with a medium difficulty level, this project allows you to crochet the legendary warrior from “Dragon Ball.” Using a vibrant color palette including Black, Light Skin, Orange, Blue, Red, and Mustard, you can recreate Goku’s essence and strength.
Goku, the brave Saiyan warrior, comes to life with every stitch. With his light skin, iconic orange attire, blue boots, and red belt, this pattern captures the essence of the Dragon Ball hero. Goku’s strength and determination are reflected in every detail of your creation. Imagine crocheting Goku in the moment just before unleashing his famous Kamehameha. Each thread is an expression of energy and power. This medium-level project challenges you to capture Goku’s intensity while crafting his imposing figure.

Embark on your journey today with our free amigurumi pattern in English and immerse yourself in the thrilling adventure of crocheting Goku. Share your Saiyan accomplishments on our social media channels and join the crochet warrior community. May your needles be filled with Saiyan energy and spirit as you crochet Goku, the hero of Dragon Ball!

If you prefer, you can optionally acquire the ad-free, printable PDF version of this pattern, which includes additional support and helps us continue creating more wonderful patterns. Your purchase supports Amigurumilandia, ensuring we can keep providing high-quality crochet patterns for enthusiasts around the world. For more information and to find the PDF version, please click here 👈

¡Let's get started!

Marterials
  • Cotton yarn according to the colors you use (black, light skin, orange, blue, red, mustard)
  • Polyester fiberfill
  • Crochet Hook Size 2.5mm
  • White and black felt
  • Needle
  • Scissors
  • Pins
  • Safety eyes size 12.
Abbreviations

AM: magic ring
Pb: single crochet
Aum: increase
Dism: decrease
Cad: chain
Pd: slip stitch
Mpa: half double crochet
Inc – mpa: half double crochet increase
Inc – dc: double crochet increase
Pa: double crochet
Dc: double crochet
Tr: triple crochet
Dtr: double triple crochet
Pop: popcorn stitch
BLO: back loop only

Approximate height: 19cm

Tips for crocheting Amigurumis 😉

  1. 🧵 Choose Quality Materials: The quality of your materials directly impacts the final result. Opt for soft and durable yarns, and needles that suit your knitting style. Remember, your amigurumis deserve the best!
  2. 📏 Know Your Gauge: Before diving into the project, take time to understand your knitting tension. Making a small test square will help you adjust the size and achieve a perfect amigurumi.
  3. 📖 Dive into the Pattern: Before you start knitting, carefully read through the entire pattern. Familiarize yourself with each step and make sure you understand all the instructions. This prior knowledge will make you feel more confident during the process.
  4. 📍 Use Stitch Markers: Marking the beginning of each round with a stitch marker is key. This not only helps you follow the pattern more easily but also prevents errors and confusion.
  5. 🌈 Explore with Colors: The color palette is your canvas! Don’t be afraid to experiment and play with unexpected combinations. Colorful amigurumis are more fun and expressive.
  6. 🧼 Block Your Creations with Care: After completing your amigurumi, blocking is essential. This process smooths out the details and defines the shape, giving a professional touch to your creations. Remember, crochet is more than a hobby; it’s an art form. Enjoy every stitch and create magic with your own hands! 💖✨ Happy knitting! 🌸🌟
Head

Round 1. Magic ring, 6 sc (6)
Round 2. Inc x 6 (12)
Round 3. 1 sc, 1 inc x 6 (18)
Round 4. 2 sc, 1 inc x 6 (24)
Round 5. 3 sc, 1 inc x 6 (30)
Round 6. 4 sc, 1 inc x 6 (36)
Round 7. 5 sc, 1 inc x 6 (42)
Round 8. 6 sc, 1 inc x 6 (48)
Round 9. 7 sc, 1 inc x 6 (54)
Round 10. 8 sc, 1 inc x 6 (60)
Round 11. 9 sc, 1 inc x 6 (66)
Rounds 12 – 20. 66 sc
Round 21. 25 sc, 3 inc, 9 sc, 3 inc, 26 sc (72)
Rounds 22-23. 72 sc
Round 24. 10 sc, 1 dec x 6 (66)
Round 25. 9 sc, 1 dec x 6 (60)
Round 26. 8 sc, 1 dec x 6 (54)
Round 27. 7 sc, 1 dec x 6 (48)
Round 28. 6 sc, 1 dec x 6 (42)
Round 29. 5 sc, 1 dec x 6 (36)
Round 30. 4 sc, 1 dec x 6 (30)
Round 31. 3 sc, 1 dec x 6 (24)
Round 32. 2 sc, 1 dec x 6 (18)
Round 33. 1 sc, 1 dec x 6 (12)
Round 34. 6 dec (6)
PLACE THE EYES BETWEEN ROUNDS 20 AND 21, WITH 10 VISIBLE STITCHES.
EMBROIDER THE NOSE. AND THE EYEBROWS.

Image 1
Ears

Round 1. Chain 2, 6 sc in the first chain, chain and turn
Round 2. 6 increases.
PLACE THEM BETWEEN ROUNDS 17 AND 23, WITH A DISTANCE OF 5 STITCHES FROM THE EYES.

Hair

Round 1. Magic ring, 6 sc (6)
Round 2. 6 inc (12)
Round 3. 1 sc, 1 inc x6 (18)
Round 4. 2 sc, 1 inc x6 (24)
Round 5. 3 sc, 1 inc x6 (30)
Round 6. 4 sc, 1 inc x6 (36)
Round 7. 5 sc, 1 inc x6 (42)
Round 8. 6 sc, 1 inc x6 (48)
Round 9. 7 sc, 1 inc x6 (54)
Round 10. 8 sc, 1 inc x6 (60)
Round 11. 9 sc, 1 inc x6 (66)
Round 12. 10 sc, 1 inc x6 (72)
Rounds 13-22. 72 sc

HERE WE START THE FOREHEAD LOCKS:
Where we finished round 22, we do:
Round 1. 6 chains, sc in the second chain from your hook, 2 hdc, 1 dc, 1 tr, and 2 sc in the next stitches of the base.
Round 2. 6 chains, sc in the second chain from your hook, 2 hdc, 1 dc, 1 tr, skip 3 stitches from the base and sc.
Round 3. 6 chains, sc in the second chain from your hook, hdc, 2 dc, inc – dc, skip 3 stitches from the base and sc.
Round 4. 8 chains, sc in the second chain from your hook, 1 hdc, 2 dc, 1 dtr, 1 trc, skip 6 stitches from the base and sc.
Round 5. 6 chains, sc in the second chain from your hook, hdc, 2 dc, inc – dc, skip 3 stitches from the base and sc.
Round 6. 6 chains, sc in the second chain from your hook, hdc, 2 dc, and 1 dtr, skip 3 stitches from the base and sc.
Round 7. 5 chains, sc in the second chain from your hook, hdc, 2 dc, sc.
FASTEN OFF AND LEAVE THREAD FOR SEWING.

Spikes (hair)

STARTING FROM THE LEFT SIDE FACING YOU, THERE ARE 4 IN TOTAL ON THAT SIDE.

LOCK 1
Round 1: 9 chains, starting from the second chain from your hook, 8 sc, chain and turn.
Round 2: 6 sc, 1 dec, chain and turn.
Round 3: 7 sc, chain and turn.
Round 4: 5 sc, 1 dec, chain and turn.
Round 5: 6 sc, chain and turn.
Round 6: 4 sc, 1 dec, chain and turn.
Round 7: 5 sc, chain and turn.
Round 8: 3 sc, 1 dec, chain and turn.
Round 9: 4 sc, chain and turn.
Round 10: 2 sc, 1 dec, chain and turn.
Round 11: 3 sc, chain and turn.
Round 12: 1 dec, 1 sc, chain and turn.
Round 13: 2 sc, chain and turn.
Round 14: 1 dec, 1 chain.

LOCK 2
Round 1: 8 chains, starting from the second chain from your hook, 7 sc, chain and turn.
Rounds 2-3: 7 sc, chain and turn.
Round 4: 1 dec, 5 sc, chain and turn.
Round 5: 6 sc, chain and turn.
Round 6: 1 dec, 4 sc, chain and turn.
Round 7: 5 sc, chain and turn.
Round 8: 1 dec, 1 sc, 1 dec, chain and turn.
Round 9: 3 sc, chain and turn.
Round 10: 1 dec, 1 sc, chain and turn.
Round 11: 1 dec, chain.

LOCK 3
Round 1: 7 chains, starting from the second chain from your hook, 6 sc, chain and turn.
Rounds 2-3: 6 sc, chain and turn.
Round 4: 1 dec, 4 sc, chain and turn.
Round 5: 5 sc, chain and turn.
Round 6: 1 dec, 3 sc, chain and turn.
Round 7: 4 sc, chain and turn.
Round 8: 1 dec, 2 sc, chain and turn.
Round 9: 3 sc, chain and turn.
Round 10: 1 dec, 1 sc, chain and turn.

LOCK 4
Round 1: 6 chains, starting from the second chain from your hook, 5 sc, chain and turn.
Round 2: 5 sc, chain and turn.
Round 3: 1 dec, 1 sc, 1 dec, chain and turn.
Round 4: 1 dec, 1 sc, chain and turn.
Round 5: 1 dec, chain.

Image 2

NOW WE’LL DO THE STRANDS ON THE RIGHT SIDE FACING YOU, THERE ARE 3 IN TOTAL.
STRAND 1
Round 1: 7 chains, starting from the second chain from your hook, 6 sc, chain and turn.
Rounds 2-3: 6 sc, chain and turn.
Round 4: 1 dec, 4 sc, chain and turn.
Round 5: 5 sc, chain and turn.
Round 6: 1 dec, 3 sc, chain and turn.
Round 7: 4 sc, chain and turn.
Round 8: 1 dec, 2 sc, chain and turn.
Round 9: 3 sc, chain and turn.
Round 10: 1 dec, 1 sc, chain and turn.
Round 11: 1 dec, chain.

STRAND 2
Round 1: 6 chains, starting from the second chain from your hook, 5 sc, chain and turn.
Round 2: 5 sc, chain and turn.
Round 3: 1 dec, 1 sc, 1 dec, chain and turn.
Round 4: 1 dec, 1 sc, chain and turn.
Round 5: 1 dec, chain.

STRAND 3
Round 1: 5 chains, starting from the second chain from your hook, 4 sc, chain and turn.
Round 2: 4 sc, chain and turn.
Round 3: 1 dec, 2 sc, chain and turn.
Round 4: 1 dec, 1 sc, chain and turn.
Round 5: 1 dec, chain.
ALL STRANDS ARE FROM BIGGEST TO SMALLEST, AFTER FINISHING EACH STRAND, PULL THE YARN TIGHTLY TO FORM A POINT. SEW THE STRANDS TO THE HEAD, I RECOMMEND USING PINS TO GUIDE YOU, FOR A BETTER EFFECT THEY CAN BE OVERLAPPED, NOT CONSECUTIVE. NOW WE WILL START WITH THE LEGS AND THUS THE BODY.

Image 3
Legs and Body

WITH RED COLOR:
Round 1: 7 chains, 5 sc, 3 sc in the same stitch, 6 sc.
Round 2: 1 inc, 4 sc, 4 inc, 4 sc, 1 inc.
Round 3: BLO, SWITCH TO BLUE, 20 sc.
Round 4: 20 sc.
Round 5: 7 sc, 5 hdc, 8 sc.
Round 6: 6 sc, 4 dec, 6 sc.
Round 7: 5 sc, 3 dec, 5 sc.
Round 8: 5 sc, 1 dec, 6 sc.
Rounds 9-11: 12 sc.
Round 12: BLO; SWITCH TO RED, 12 sc.
Round 13: BLO, SWITCH TO SKIN COLOR, 12 sc.
Rounds 14-20: 12 sc.
MAKE LEG 2 UNTIL ROUND 20, THEN CONTINUE:
Round 21: 4 sc, 2 ch, sl st in leg 1, 12 sc, 2 sc in the 2 chains, 12 sc, and 2 sc in the 2 chains. (28)
Round 22: 4 sc, 1 inc, 6 sc, 1 inc, 2 sc, 1 inc, 5 sc, 1 inc, 7 sc (32)
Rounds 23-24: 32 sc.
Round 25: SWITCH TO BLUE COLOR, 32 sc.
Rounds 26-28: 32 sc.
Round 29: 5 sc, 1 dec, 15 sc, 1 dec, 8 sc (30)
Rounds 30-31: 30 sc.
Round 32: 3 sc, 1 dec x6 (24)
Round 33: 24 sc.
Round 34: BLO; SWITCH TO SKIN COLOR, 2 sc, 1 dec x 6 (18)
Rounds 35-37: 18 sc.

Image 4
Arms

Round 1: Magic ring, 6 sc (6)
Round 2: Inc x6 (12)
Rounds 3-4: 12 sc
Round 5: 5 sc, 1 popcorn stitch, 6 sc
Rounds 6-14: 12 sc
Round 15: BLO, SWITCH TO BLUE, 12 sc
Rounds 16-18: 12 sc

Image 5
Onesie

THE GOKU ONESIE IS DIVIDED INTO 2 PARTS, WE’LL CALL THEM UPPER PART AND LOWER PART. EACH ROUND WILL END WITH A CHAIN AND WE’LL TURN THE WORK TO CONTINUE TO THE NEXT.
UPPER PART:
In each round we’ll end with a chain and turn.
ROUND 1: 17 chains, starting from the second chain from your hook, make 1 sc, then (1 inc, 1 sc) x7 , 1 inc (24)
ROUND 2: 2 hdc, 1 inc-hdc x8 (32)
ROUND 3: 3 hdc, 1 inc-hdc x8 (40)
ROUND 4: 3 hdc, 1 inc-hdc, skip 10 stitches, 1 inc-hdc, 10 hdc, 1 inc-hdc, skip 10 stitches, 1 inc-hdc, 3 hdc (24)
ROUND 5: 23 hdc, 1 inc-hdc (25)
ROUND 6: 24 hdc, 1 inc-hdc (26)
ROUND 7: 1 inc – hdc, 24 hdc, 1 inc-hdc (28)
ROUND 9: 1 inc-hdc, 28 hdc, 1 inc-hdc (32)
ROUND 10: 1 inc-hdc, 30 hdc, 1 inc-hdc (34)
PLACE IT ON THE BODY, AND JOIN BOTH ENDS, PLACE THEM ON TOP OF EACH OTHER AND MAKE SURE 4 POINTS MATCH, THEN SEW TOGETHER.

Image 6
Lower part

Round 1: 15 chains, starting from the second chain from your crochet, 14 sc, chain and turn.
Round 2: BLO, 1 sc, 1 inc x7
Round 3-7: 21 sc
Finish off and cut yarn. FROM THIS PIECE, WE WILL MAKE ANOTHER ONE JUST LIKE IT, BUT THIS TIME WE DO NOT CUT THE YARN.
Round 8: Work 21 sc, sc in the other piece, 20 sc.
Round 9-10: 42 sc
LEAVE LONG TAIL TO SEW, PLACE THE PIECE ON THE BODY AND START SEWING AT THE BACK AND THEN SEW THE CROTCH.
NOW WE WILL JOIN THE UPPER PART WITH THE LOWER ONE. IT DOESN’T MATTER IF THEY DON’T FIT TOGETHER, YOU CAN SEW 2 STITCHES OF THE PANTS TO 1 OF THE JACKET TO FIT IT, DON’T WORRY, IT WON’T LOOK BAD.

Image 7
Belt

50 chains, starting from the second chain from your crochet, make 1 sl st, 48 sc, 1 sl st, fasten off and cut yarn.

Wristbands

Round 1: 14 chains, join with a sl st.
Rounds 2-3: 13 sc, join with a sl st.
Fasten off and cut yarn.

Some notes
  • For the suit badge, I opted to use black and white felt. The letters are embroidered. I recommend cutting the circle in the white felt, doing the embroidery, and then gluing it onto the black felt.
  • For the shoelaces, I used mustard-colored thread and made a simple bow.

Congratulations! You did it! The Goku pattern is complete. Thank you for your support! I hope you enjoyed crafting the Amigurumilandia's patterns.

Support us by buying a PDF pattern to keep our free content coming

Goku Crochet Pattern PDF Version

Unlock the full potential of your crafting journey with the Goku Crochet Pattern PDF Version, offering convenience and accessibility for your crochet projects.
$9.99
$ 4
99 USD
One-time payment
  • Ad-free Experience: Enjoy a distraction-free crafting session with our PDF version, free from the clutter of advertisements commonly found on webpages.
  • Offline Access: Access your pattern anytime, anywhere, even without internet connection, allowing you to craft on-the-go without interruptions.
  • Printable Format: Easily print the pattern for quick reference or mark up your progress directly on the document, enhancing your crafting experience.
  • Lifetime Ownership: Secure your pattern for a one-time payment, ensuring lifetime access without worrying about subscription fees or recurring charges.
  • Dedicated Support: Receive personalized assistance from Amigurumilandia's support team for any access issues or pattern-related inquiries, ensuring a seamless crafting experience.
Popular
Swan Amigurumi Free Crochet Pattern

Swan

Free| Unlimited Access
Size: 40cm| Nivel: Medium
Lionel Messi Amigurumi Free Pattern

Lionel Messi

Free| Unlimited Access

Size: 13cm| Nivel: Medium

Harry Potter Amigurumi Free Pattern

Harry Potter

Free| Unlimited Access

Size: 14cm| Nivel: Advanced

Swan Amigurumi Free Crochet Pattern

Swan

Free| Unlimited Access
Size: 40cm| Nivel: Medium

Leave a Reply

Your email address will not be published. Required fields are marked *

Share your creations with us!

Send us pictures of your creations and we’ll provide you with our professional opinion!

We value your opinion

Send us a suggestion or comment to amigurumilandia1@gmail.com

© 2024 AmigurumiLandia

All rights reserved

error: The content of this page is protected