Search
Close this search box.

Amigurumilandia PATTERNS

Free patterns for all tastes

Angelica Pickles By Rugrats Toy Amigurumi Free Pattern

April 18th, 2024

Angelica Pickles by Rugrats Free Crochet Pattern

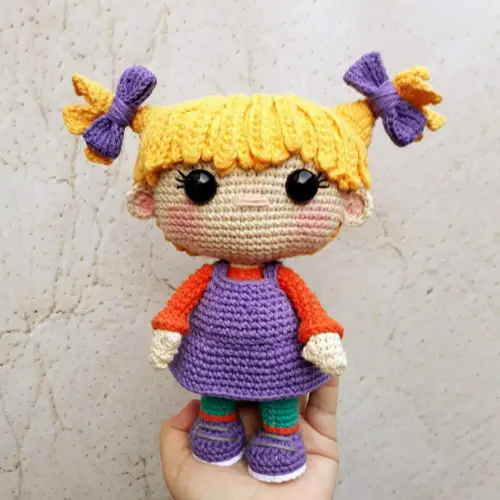
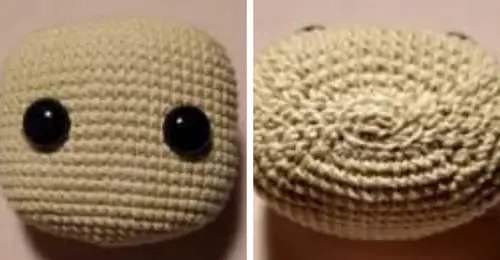
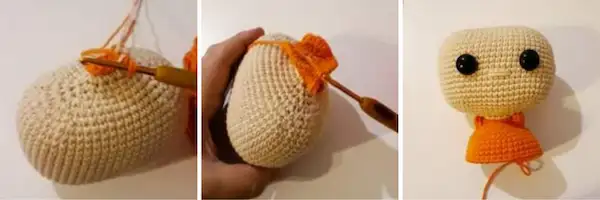
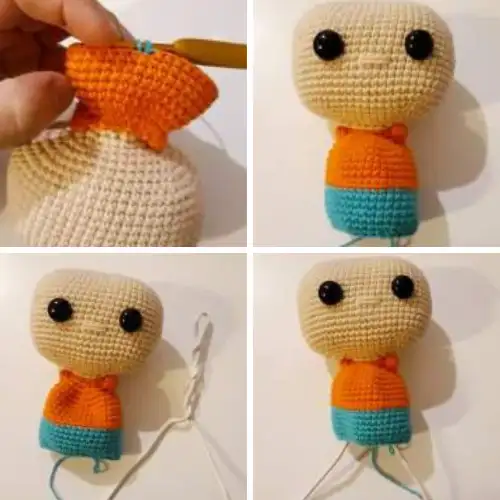
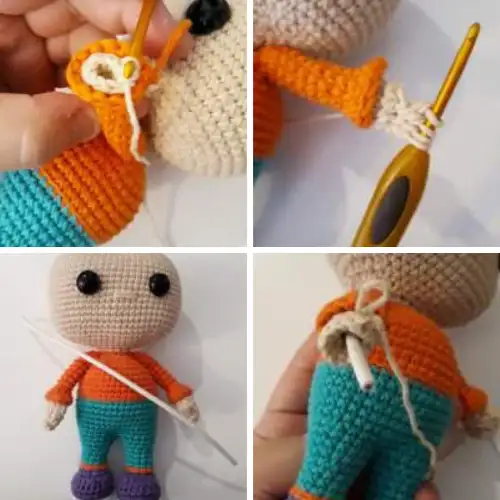
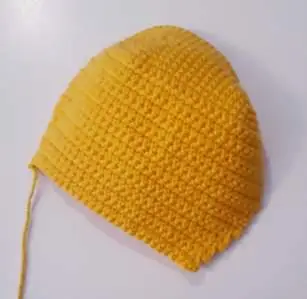
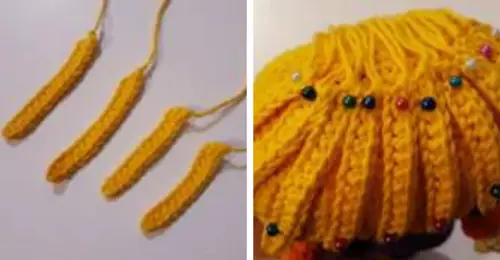
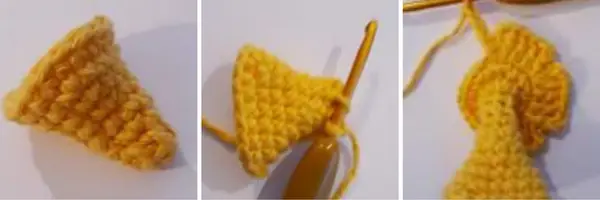
Bring Angelica Pickles, the iconic yet mischievous character from the beloved Rugrats series, to life with this delightful amigurumi pattern crafted by @creandoilusioness_! Standing at a charming 20 cm tall, this crochet doll captures Angelica’s essence with precision and care, making it a must-have for any Rugrats enthusiast. With its easy-to-follow instructions and basic difficulty level, this pattern is suitable for crocheters of all skill levels, ensuring a fun and rewarding crafting experience. Angelica Pickles, with her vibrant personality and signature yellow dress, has been a cornerstone of Rugrats since its inception, captivating audiences with her antics and adventures. Known for her strong-willed nature and penchant for mischief, Angelica brings a unique energy to the Rugrats gang, making her a fan favorite among viewers of all ages.
Crocheting Angelica is not just about creating a doll; it’s about reliving cherished memories of childhood and celebrating the enduring legacy of Rugrats. As you stitch each detail of Angelica’s character into existence, you’ll find yourself immersed in the whimsical world of Tommy, Chuckie, and the rest of the gang, rediscovering the joy and wonder of the iconic ’90s cartoon. This amigurumi pattern offers a delightful opportunity to pay homage to one of the most beloved characters in animation history while indulging in a creative and relaxing hobby. Whether you’re a seasoned crocheter looking for your next project or a Rugrats fan eager to add a touch of nostalgia to your collection, crocheting Angelica is sure to bring a smile to your face and warmth to your heart.

Start your crochet adventure today with our free Angelica Pickles amigurumi pattern and join the fun of Rugrats. Embrace the nostalgia, creativity, and joy of bringing this iconic character to life with your own two hands.

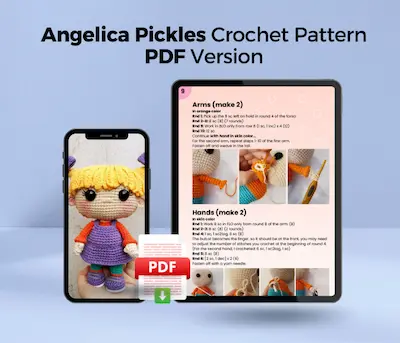
If you prefer, you can optionally acquire the ad-free, printable PDF version of this pattern, which includes additional support and helps us continue creating more wonderful patterns. Your purchase supports Amigurumilandia, ensuring we can keep providing high-quality crochet patterns for enthusiasts around the world. For more information and to find the PDF version, please click here 👈

¡Let's get started!

Marterials
  • Cotton thread 8/6
  • One color for skin, yellow, orange, purple, turquoise, white
  • Silicone filling
  • Crochet hook size 3 mm
  • Yarn needle
  • Scissors
  • Stitch marker
  • Wrapped wire
  • Safety eyes n° 16
  • Black and gray embroidery thread
Abbreviations

MR: Magic Ring
ch: Chain
sc: Single crochet
sl st: Slip stitch
hdc: Half double crochet
dc: Double crochet
blo: Back loop only
flo: Front loop only
dec: Decrease
inc: Increase
bub st: Bubble stitch (4 double crochets closed together)

Approximate height: 20cm

Tips for crocheting Amigurumis 😉

  1. 🧵 Choose Quality Materials: The quality of your materials directly impacts the final result. Opt for soft and durable yarns, and needles that suit your knitting style. Remember, your amigurumis deserve the best!
  2. 📏 Know Your Gauge: Before diving into the project, take time to understand your knitting tension. Making a small test square will help you adjust the size and achieve a perfect amigurumi.
  3. 📖 Dive into the Pattern: Before you start knitting, carefully read through the entire pattern. Familiarize yourself with each step and make sure you understand all the instructions. This prior knowledge will make you feel more confident during the process.
  4. 📍 Use Stitch Markers: Marking the beginning of each round with a stitch marker is key. This not only helps you follow the pattern more easily but also prevents errors and confusion.
  5. 🌈 Explore with Colors: The color palette is your canvas! Don’t be afraid to experiment and play with unexpected combinations. Colorful amigurumis are more fun and expressive.
  6. 🧼 Block Your Creations with Care: After completing your amigurumi, blocking is essential. This process smooths out the details and defines the shape, giving a professional touch to your creations. Remember, crochet is more than a hobby; it’s an art form. Enjoy every stitch and create magic with your own hands! 💖✨ Happy knitting! 🌸🌟
Head

In the color of the skin.
It’s crocheted in spiral.
Rnd 1: 13 chains
Rnd 2: Insert hook in second chain from hook: 1 inc, 10 sc, 4 sc in last chain, 10 sc on the back of chains, 1 inc (28)
Rnd 3: 2 inc, 10 sc, 4 inc, 10 sc, 2 inc (36)
Rnd 4: [1 sc, 1 inc] x2, 10 sc, [1 sc, 1 inc] x4, 10 sc, [1 sc, 1 inc] x2 (44)
Rnd 5: [2 sc, 1 inc] x2, 10 sc, [2 sc, 1 inc] x4, 10 sc, [2 sc, 1 inc] x2 (52)
Rnd 6: [3 sc, 1 inc] x2, 10 sc, [3 sc, 1 inc] x4, 10 sc, [3 sc, 1 inc] x2 (60)
Rnd 7-21: 60 sc (15 rounds)
Rnd 22: [3 sc, 1 dec] x 2, 10 sc, [3 sc, 1 dec] x 4, 10 sc, [3 sc, 1 dec] x 2 (52)
Rnd 23: [2 sc, 1 dec] x 2, 10 sc, [2 sc, 1 dec] x 4, 10 sc, [2 sc, 1 dec] x2 (44)
Rnd 24: [1 sc, 1 dec] x2, 10 sc, [1 sc, 1 dec] x 4, 10 sc, [1 sc, 1 dec] x 2 (36)
Rnd 25: 2 dec, 10 sc, 4 dec, 10 sc, 2 dec (28)
Rnd 26: 2 dec, 6 sc, 4 dec, 6 sc, 2 dec (20)
Fill the head
Rnd 27: 2 dec, 2 sc, 4 dec, 2 sc, 2 dec (12)
Rnd 28: Work 6 dec in FLO only
Do not fasten off with needle
Through this opening, insert the covered wire.

Image 1

The eyes are placed between rounds 13 and 14 of the head. With 12 stitches of separation.

Image 2

Embroider the nose between rounds 15 and 16, taking 5 stitches.

Neck

In skin color, pick up the front loops of round 27 of the head: insert the hook right in the middle of the neck.
Rnd 1: 12 sc
Switch to orange color. Color changes are always made before closing the stitch.

Trunk

In orange color.
Rnd 1: Work 12 sc in BLO only (12)
Rnd 2: Work 12 inc in FLO from round 1 of the neck (24)
Rnd 3: 24 inc (48)
Rnd 4: Separation of sleeves and body: Leave 16 sc for the back, 16 sc for the front, and 8 unworked stitches on each side (which will be put on hold for later to make the arms). Work necessary sc to reach one side, I worked 8 sc. Skip 8 base stitches, 16 sc, skip 8 base stitches, 8 sc (32)
Rnd 5: [3 sc, 1 inc] x 8 (40)
Rnd 6-10: 40 sc (40) (5 rounds)
Switch to turquoise color for the pants.

Image 3
Pants

In turquoise color
Rnd 1: Work 40 sc in FLO from round 10 of the torso (40)
Rnd 2-6: 40 sc (40) (5 rounds)
Rnd 7: [3 sc, 1 dec] x 8 (32)
Fill the trunk and insert the covered wire.
Cut 50 cm of wire and fold it in half.
Crochet necessary sc to reach the middle of the back, in line with the eyes.
Do not cut the yarn. Continue to the legs…

Image 4

The wire enters through the opening left in the head, and the division is left for each leg.

Legs (make 2)

Continue in turquoise color
Rnd 1: Skip 16 base stitches and insert hook in stitch number 17: 16 sc
Rnd 2: 16 sc (16)
Rnd 3: [2 sc, 1 dec] x 4 (12)
Rnd 4-6: 12 sc (12) (3 rounds)
Stuff
Switch to orange color for the stockings.
Rnd 7: Work 12 sc in BLO only
Cut the yarn and weave in the tail.

Image 5

For the second leg, in turquoise color:
Cast on 16 stitches into the opening left from row 1 of the first leg.
Repeat steps from round 1 to 7 of the first leg. Don’t forget to sew the crotch opening.

Shoes (make 2)

In violet color, insert hook in the middle of the back of the leg.
Rnd 1: Work 12 sc in FLO only from round 7 of the legs.
Next, you’re going to form the instep, so the increases you make should be at the front.
Rnd 2: 3 sc, 6 inc, 3 sc (18)
Rnd 3: 6 sc, [1 hdc, 1 inc hdc] x 3, 6 sc (21)
Rnd 4-5: 21 sc (21) (2 rounds)
Cut the excess wire.
Stuff the leg and the shoe. Switch to white color.

SOLE:
Rnd 6: Work 21 sc in BLO only from round 5 (21)
Rnd 7: Work in FLO only from round 5: [1 sc, 1 dec] x 7 (14)
Finish stuffing.
Rnd 8: 7 dec.
Fasten off with a yarn needle.
For the second shoe, repeat steps from round 1-8 of the first shoe.

Image 6
Arms (make 2)

In orange color
Rnd 1: Pick up the 8 sc left on hold in round 4 of the torso:
Rnd 2-8: 8 sc (8) (7 rounds)
Rnd 9: Work in BLO only from row 8 (1 sc, 1 inc) x 4 (12)
Rnd 10: 12 sc
Continue with hand in skin color…

For the second arm, repeat steps 1-10 of the first arm.
Fasten off and weave in the tail.

Hands (make 2)

In skin color
Rnd 1: Work 8 sc in FLO only from round 8 of the arm: (8)
Rnd 2-3: 8 sc (8) (2 rounds)
Rnd 4: 1 sc, 1 sc2tog, 6 sc (8)
The bub.st becomes the finger, so it should be at the front, you may need to adjust the number of stitches you crochet at the beginning of round 4. (For the second hand, I crocheted: 6 sc, 1 sc2tog, 1 sc)
Rnd 5: 8 sc (8)
Rnd 6: [2 sc, 1 dec] x 2 (6)
Fasten off with a yarn needle.

Image 7

Measure the wire, cut it, and thread it through the trunk. Cut off the excess and close the second arm.

Ears (make 2)

In skin color.
It’s crocheted in rows.
Rnd 1: Work 6 sc inside a magic ring, ch 1 and turn.
Rnd 2: 6 inc (12)
Don’t close the magic ring completely so that a semicircle is formed.
Leave a long tail for sewing.
The ears are sewn between rounds 16 and 19.

Dress

In violet color, pick up the front loops of round 1 of the pants:
Insert hook right in the middle back.
Rnd 1: 40 sc (40)

BODICE:
Rnd 1: Work 40 sc in BLO of slip stitch (40)
Rnd 2-5: 40 sc (40) (4 rounds)
Rnd 6: [3 sc, 1 dec] x 8 (32)
Rnd 7: 32 sc (32)
Rnd 8: For the straps, crochet stitches
Needed to reach one side: make 10 ch, skip 6 base stitches and insert hook with sc, crochet 10 sc on the front and repeat the 10 ch, skip 6 base stitches and insert hook with sc.
Crochet around the neckline one round of sc also in the chains of the strap.

SKIRT:
Rnd 1: Work 40 sc in FLO of slip stitch (40)
Rnd 2: [4 sc, 1 inc] x 8 (48)
Rnd 3: 48 sc (48)
Rnd 4: [5 sc, 1 inc] x 8 (56)
Rnd 5-7: 56 sc (56) (3 rounds)
Fasten off with slip stitch and weave in the tail.

Hair

In yellow color:
Rnd 1: 13 chains
Rnd 2: Insert hook in the second chain from the hook: 1 inc, 10 sc, 4 sc in last chain, 10 sc on the back of the chains, 1 inc (28)
Rnd 3: 2 inc, 10 sc, 4 inc, 10 sc, 2 inc (36)
Rnd 4: [1 sc, 1 inc] x2, 10 sc, [1 sc, 1 inc] x4, 10 sc, [1 sc, 1 inc] x2 (44)
Rnd 5: [2 sc, 1 inc] x2, 10 sc, [2 sc, 1 inc] x4, 10 sc, [2 sc, 1 inc] x2 (52)
Rnd 6: [3 sc, 1 inc] x2, 10 sc, [3 sc, 1 inc] x4, 10 sc, [3 sc, 1 inc] x2 (60)
Rnd 7-9: 60 sc (3 rounds)
From round 10, crochet in rows:
Row 10: 32 sc, ch 1 and turn (32)
Row 11: In this row, crochet 32 sc from round 10 and 2 sc more at the end of the row, ch 1 and turn (34) so that the 34 sc are centered
Row 12-16: 34 sc, ch 1 and turn (34) (5 rows)
Row 17: 1 dec, 30 sc, 1 dec, ch 1 and turn (32)
Row 18-20: 32 sc (32) (3 rows)
Row 21: 1 dec, 28 sc, 1 dec, ch 1 and turn (30)
Row 22: 30 sc, ch 1 and turn (30)
Row 23: 1 dec, 26 sc, 1 dec, ch 1 and turn (28)
Row 24: 28 sc, ch 1 and turn (28)
Row 25: 1 dec, 24 sc, 1 dec, ch 1 and turn (26)
Row 26: 26 sc, ch 1 and turn (26)
Fasten off with slip stitch, leaving a long tail to sew to the head.

Image 8

For the bangs:
Rnd 1: 13 chains
Rnd 2: Starting from the second chain from the hook, make 12 sc. Make as many strips as you consider necessary for the bangs, I made 20 strips. Then sew them onto the yellow helmet.

Image 9
Hair combs (make 2)

In yellow color:
Rnd 1: 6 sc in magic ring (6)
Rnd 2: Work 6 sc in FLO (6)
Rnd 3: [1 sc, 1 inc] x 3 (9)
Rnd 4: 9 sc (9)
Rnd 5: [2 sc, 1 inc] x 3 (12)
Rnd 6: [3 sc, 1 inc] x 3 (15)
Rnd 7: [4 sc, 1 inc] x 3 (18)
Rnd 8-9: 18 sc (18) stuff (2 rounds)
Fasten off and leave a long tail to sew onto the head.
Pick up the front loops of round 1:
Rnd 1: 6 sc (6)
Rnd 2: Work 6 inc (12)
Rnd 3: [1 sc, 1 inc] x 6 (18)
Rnd 4: [4 ch, 3 dc, 4 ch, 1 sl st] x 6

Image 10
Bow (make 2)

In violet color. It’s crocheted in rows through back loop only (BLO).
Row 1: 26 chains, join by making the first sc in the first chain to form a ring.
Rows 2-4: Work 26 sc in FLO only (26) (3 rows)
Fasten off with slip stitch and leave a long tail. In the center of the bow, make several tight rounds, then sew to the pigtails.

Image 11
Finishing
  • Embroider eyelashes.
  • Sew the hair to the head.
  • Attach the pigtails and bows.
  • Add laces to the shoes.

Congratulations! You did it! The Angélica Pickles pattern is complete. Thank you for your support! I hope you enjoyed crafting the Amigurumilandia's patterns.

Support us by buying a PDF pattern to keep our free content coming

Ángelica Pickles Crochet Pattern PDF Version

Unlock the full potential of your crafting journey with the Ángelica Crochet Pattern PDF Version, offering convenience and accessibility for your crochet projects.
$9.99
$ 4
99 USD
One-time payment
  • Ad-free Experience: Enjoy a distraction-free crafting session with our PDF version, free from the clutter of advertisements commonly found on webpages.
  • Offline Access: Access your pattern anytime, anywhere, even without internet connection, allowing you to craft on-the-go without interruptions.
  • Printable Format: Easily print the pattern for quick reference or mark up your progress directly on the document, enhancing your crafting experience.
  • Lifetime Ownership: Secure your pattern for a one-time payment, ensuring lifetime access without worrying about subscription fees or recurring charges.
  • Dedicated Support: Receive personalized assistance from Amigurumilandia's support team for any access issues or pattern-related inquiries, ensuring a seamless crafting experience.
Popular
Bella Princess Amigurumi Free Pattern

Bella

Free| Unlimited Access

Size: 18cm| Nivel: Advanced

Lionel Messi Amigurumi Free Pattern

Lionel Messi

Free| Unlimited Access

Size: 13cm| Nivel: Medium

Goku Amigurumi Free Pattern

Goku

Free| Unlimited Access

Size: 19cm| Nivel: Medium

Harry Potter Amigurumi Free Pattern

Swan

Free| Unlimited Access

Size: 14cm| Nivel: Advanced

Leave a Reply

Your email address will not be published. Required fields are marked *

Share your creations with us!

Send us pictures of your creations and we’ll provide you with our professional opinion!

We value your opinion

Send us a suggestion or comment to amigurumilandia1@gmail.com

© 2024 AmigurumiLandia

All rights reserved

error: The content of this page is protected