Search
Close this search box.

Amigurumilandia PATTERNS

Free patterns for all tastes

Bella Princess Amigurumi Free Pattern

March 04th, 2024

Bella Princess Amigurumi Free Pattern

Designer: @azuliecroche

Immerse yourself in the enchanting world of “Beauty and the Beast” with our Bella Princess Amigurumi Free Pattern! Crafted by @azuliecroche, this project stands 18cm tall and offers an advanced challenge, rewarding every stitch. Perfect for seasoned crafters seeking an exciting and gratifying project! Bella, the beloved Disney character, comes to life in this crocheted version. With her signature skin tones, yellow dress, brown hair, and white accents, this charming amigurumi captures the essence of the courageous and kind-hearted heroine who has captured hearts worldwide.
Beyond being an iconic and beloved character, Bella is celebrated for her intelligence, bravery, and kindness. Her story portrays her as a courageous and determined young woman willing to sacrifice her freedom for the love and happiness of her family. Crafting your own Bella amigurumi will not only provide hours of fun and creativity but also allow you to delve into the magical world of Disney in a unique and personal way. Whether adorning your home, gifting to a loved one, or adding to collection of disney princess amigurumi patterns free, Bella is sure to bring charm to your life.
Don’t miss the chance to have this crocheted doll, the brave heroine of “Beauty and the Beast,” in your life. Begin your journey today with our Amigurumi Disney Princess Pattern and discover the joy of creating your own crocheted doll version of this Disney icon. With detailed instructions and a complete list of necessary materials, crocheting Bella has never been easier or more exciting. Start your project today and let Bella’s tale as old as time inspire your creativity!

¡Let's get started!

Marterials
  • Yarn in the following colors of your choice: Skin, Yellow, Brown, Mustard, and White
  • Safety eyes No. 12
  • Crochet hook size 2.0 mm and 2.5 mm
  • Tapestry needle
  • Doll needle
  • Scissors
  • Stuffing
  • Silicone glue
  • Brown thread
  • Pink blush
Abbreviations

Ch: chain
MR: magic ring
St: stitch
Sl st: slip stitch
Sc: single crochet
Sc2tog: single crochet 2 together (decrease)
Hdc: half double crochet
Dc: double crochet
BLO: back loop only
FLO: front loop only
Bobble: bobble stitch
Inc: increase
Dec: decrease
Tr-inc: triple increase
Picot: picot stitch

Height of 18cm and an approximate working time of 6 hours.

Tips for crocheting Amigurumis 😉

  1. 🧵 Choose Quality Materials: The quality of your materials directly impacts the final result. Opt for soft and durable yarns, and needles that suit your knitting style. Remember, your amigurumis deserve the best!
  2. 📏 Know Your Gauge: Before diving into the project, take time to understand your knitting tension. Making a small test square will help you adjust the size and achieve a perfect amigurumi.
  3. 📖 Dive into the Pattern: Before you start knitting, carefully read through the entire pattern. Familiarize yourself with each step and make sure you understand all the instructions. This prior knowledge will make you feel more confident during the process.
  4. 📍 Use Stitch Markers: Marking the beginning of each round with a stitch marker is key. This not only helps you follow the pattern more easily but also prevents errors and confusion.
  5. 🌈 Explore with Colors: The color palette is your canvas! Don’t be afraid to experiment and play with unexpected combinations. Colorful amigurumis are more fun and expressive.
  6. 🧼 Block Your Creations with Care: After completing your amigurumi, blocking is essential. This process smooths out the details and defines the shape, giving a professional touch to your creations. Remember, crochet is more than a hobby; it’s an art form. Enjoy every stitch and create magic with your own hands! 💖✨ Happy knitting! 🌸🌟
Head

Use skin-colored yarn.
Rnd 1: 8sc in a magic ring (8)
Rnd 2: inc in each stitch around (16)
Rnd 3: (2inc, 2sc) 4 times (24)
Rnd 4: 1sc, 2inc, (4sc, 2inc) 3 times, 3sc (32)
Rnd 5: 2sc, 2inc, (6sc, 2inc) 3 times, 4sc (40)
Rnd 6: 3sc, 2inc, (8sc, 2inc) 3 times, 5sc (48)
Rnd 7: 4sc, 2inc, (10sc, 2inc) 3 times, 6sc (56)
Rnd 8: 5sc, 2inc, (12sc, 2inc) 3 times, 7sc (64)
Rnd 9-22: 64sc (64) – 14 rounds
Rnd 23: 7sc, 2dec, (12sc, 2dec) 3 times, 5sc (56)
Rnd 24: 6sc, 2dec, (10sc, 2dec) 3 times, 4sc (48)
Rnd 25: 5sc, 2dec, (8sc, 2dec) 3 times, 3sc (40)
Rnd 26: 4sc, 2dec, (6sc, 2dec) 3 times, 2sc (32)
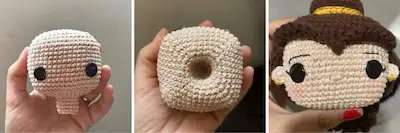
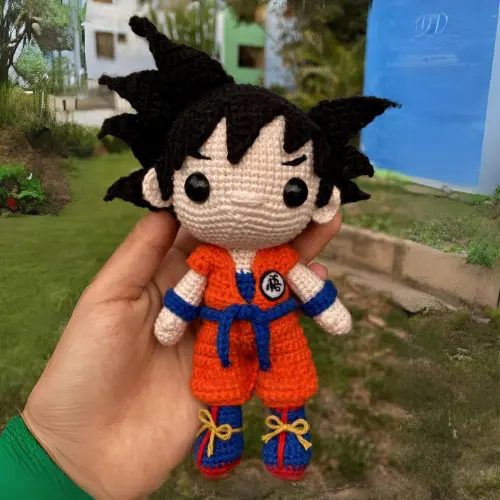
Place the eyes between rounds 17 and 18, with a visible distance of 10 stitches.

Stuff. Pay attention to the corners to maintain the square shape of the head.
Rnd 27: 3sc, 2dec, (4sc, 2dec) 3 times, 1sc (24)
Rnd 28: (2dec, 2sc) 4 times (16)
Rnd 29-33: 16sc (16) – 5 rounds
Rnd 34: (2sc, dec) 4 times (12)
Finish with a slip stitch. Cut and fasten off the yarn.
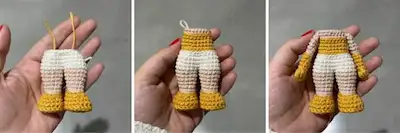
Place this tube inside the head.

Image 1
Arms (make 2)

With mustard-colored yarn
Rnd 1: 7sc in the magic ring (7)
Rnd 2: 7sc (7)
Rnd 3: 3sc, 1puff stitch, 3sc (7)
Rnds 4-7: 7sc (7) – 4 rounds
Switch to skin color
Make 7 slip stitches in the front loops and do not count this round
Rnd 8: 7sc in the front loops (7)
Rnds 9-11: 7sc (7) – 3 rounds

Image 2

Place a bit of stuffing into the mustard part and close with 3sc, fasten off.

Foot and Legs

With mustard-colored yarn:
Rnd 1: 6sc in a magic ring (6)
Rnd 2: Inc in each st around (12)
Rnd 3: (1sc, inc) 6 times (18)
Rnd 4: 18sc in the back loops only BLO (18)
Rnd 5-6: 18sc (18) – 2 rounds
Rnd 7: 3sc, 6 dec, 3sc (12)
Switch to skin color
Make 12sc in the front loops only, do not count this round
Rnd 8: 12sc in the front loops only FLO (12)
Rnd 9-10: 12sc (12) – 2 rounds
Rnd 11: (3sc, inc) 3 times (15)
Rnd 12-13: 15sc (15) – 2 rounds

Switch to white color
Rnd 14: 15sc (15)
Join the second leg at the 4th st of the first leg with 1sc and make 14sc more (15)
Now the beginning of the row will be at the back. Stuff the leg and the body as you crochet.
With a tapestry needle, pass the long tail you left at the beginning through the legs, pull to form a gap in the soles, and tie in the middle of the leg junction.
Rnd 15-17: 30sc (30) – 3 rounds
Rnd 18: (3sc, dec) 6 times (24)

Image 3
Body

Switch to mustard color
Make 24sc in the back loops only, do not count this round
Rnd 19: 24sc (24)
Rnd 20: (6sc, dec) 3 times (21)
Rnd 21-22: 21sc (21) – 2 rounds
Switch to skin color
Rnd 23: 21sc in the back loops only (21)
Rnd 24: 5sc, 3sc joining the arm, 8sc, 3sc joining the other arm, 2sc (21)
Rnd 25: (5sc, dec) 3 times (18)
Rnd 26: (1sc, dec) 6 times (12)
Rnd 27-32: 12sc (12) – 6 rounds
Rnd 33: Dec (6)
Cut and fasten off the yarn.

Image 4
Neck

Using yellow yarn
The stitches will be worked on the chains from round 23.
Rnd 1: 5sc, 6 chains over the arm, 8sc, 6 chains over the arm, 2sc (27)
Rnd 2: 5hdc, 6dc, 3hdc, 2sc, 3hdc, 6dc, 2hdc, slip stitch, cut and weave in the yarn end.

Image 5
Skirt

Insert a new yellow yarn into the white loops (BLO) of round 18.
Only work in the back loops of the stitches indicated by the abbreviation.
Rnd 1: (3sc, inc) 6 times (30)
Rnd 2: (inc, BLO 1sc, 1ch, BLO 1sc) 10 times (50)
Rnd 3: (2sc, BLO 1sc, skip 1ch, BLO 1sc) 10 times (40)
Rnd 4: (2sc, BLO 2sc) 10 times (40)
Rnd 5: (2inc, BLO 1sc, 1ch, BLO 1sc) 10 times (70)
Rnd 6: (4sc, BLO 1sc, skip 1ch, BLO 1sc) 10 times (60)
Rnd 7: (4sc, BLO 1sc, 1ch, BLO 1sc) 10 times (70)
Rnd 8: (4sc, BLO 1sc, skip 1ch, BLO 1sc) 10 times (60)
Rnd 9: (4sc, BLO 1sc, 1ch, BLO 1sc) 10 times (70)
Rnd 10: (4sc, BLO 1sc, skip 1ch, BLO 1sc) 10 times (60)
Rnd 11: all in BLO (5sc, 1ch, 1sc) 10 times (70)
Rnd 12: (4sc, BLO 1sc, skip 1ch, BLO 1sc) 10 times (60)
Rnd 13: (4sc, BLO 1sc, 1ch, BLO 1sc) 10 times (70)
Rnd 14: (4sc, BLO 1sc, skip 1ch, BLO 1sc) 10 times (60)
Rnd 15: (4sc, BLO 1sc, 1ch, BLO 1sc) 10 times (70)
Rnd 16: (4sc, BLO 1sc, skip 1ch, BLO 1sc) 10 times (60)
Rnd 17: 60sc in FLO (60).
Finish with a slip stitch, cut the yarn, and fasten off.
Insert a white yarn into the loops of round 17 and make 60hdc.
Finish with a slip stitch, cut the yarn, and fasten off.

Image 6
Skirt Ruffle

Insert a mustard yarn into the loops of round 11 of the skirt.
Make 2sc, (1hdc, 2inc in hdc, 1hdc, 2sc). Repeat the sequence in parentheses around. Cut the yarn and fasten off.

Image 7
Hair

Using brown amigurumi yarn and a 2.5 mm hook.
Rnd 1: 8sc in the magic ring (8)
Rnd 2: Inc in each st around (16)
Rnd 3: (2inc, 2sc) 4 times (24)
Rnd 4: 1sc, 2inc, (4sc, 2inc) 3 times, 3sc (32)
Rnd 5: 2sc, 2inc, (6sc, 2inc) 3 times, 4sc (40)
Rnd 6: 3sc, 2inc, (8sc, 2inc) 3 times, 5sc (48)
Rnd 7: 4sc, 2inc, (10sc, 2inc) 3 times, 6sc (56)
Rnd 8-10: 56sc (56)
Place the wig on the head to check the fit, if necessary, add another round of 56sc.
Rnd 11: 39sc, 1hdc, 1dc, picot st, 1dc, 1hdc, 10sc (53)

LOCKS
After finishing each lock, skip 1 base st and make a sl st to start the new lock.
17 locks: 30 chains, skip 2 chains, work back making 28hdc.

Once the locks are done, now we will make the bangs lock. In the part where 2sc are requested, do it without taking the tip of the picot stitch.
1sc, 1hdc, 6dc, 1hdc, 1sc, 2sc, 1sc, 1hdc, 6dc, 1hdc, 1sc, 1sl st.

Image 8
Hairstyle

Using brown amigurumi yarn.
Rnd 1: 8sc in the magic ring (8)
Rnd 2: Inc in each st around (16)
Rnd 3: (1sc, inc) 8 times (24)
Rnd 4: (2sc, inc) 8 times (32)
Rnd 5-6: 32sc (32)
Switch to mustard yarn.
Make 32sl st in the back loop only and do not count this round.
Rnd 7: 32sc in the back loop only (32)
Finish with a slip stitch and leave a long tail to sew onto the top of the head according to the photo.

Image 9
Ears (make 2)

Using skin color yarn, make 5sc into the magic ring.
Leave a long tail and sew it between rounds 16 and 18, with a distance of 5sc from the eyes. With mustard color, make the earrings by passing the yarn back and forth 2 times, tie off, cut, and hide the yarn.

Hair Assembly

Position the hair on the head so that the tip of the picot stitch aligns with round 14, centered on the nose. Glue only the top part of the hair with liquid silicone. I did not glue the strands because I wanted the option for Bella to have her hair loose or tied up. To secure it, cut a 15 cm piece of brown yarn, arrange the strands according to the photo, and tie them. If necessary, put some glue on the crown to keep it in a vertical position.

Image 10

Congratulations! You did it! The Bella pattern is complete. Thank you for your support! I hope you enjoyed crafting the Amigurumilandia's patterns.

This might interest you

Cinderella Princess Amigurumi Free Pattern

Cinderella

Free| Unlimited Access

Size: 17,5cm| Nivel: Medium

Lionel Messi Amigurumi Free Pattern

Lionel Messi

Free| Unlimited Access

Size: 13cm| Nivel: Medium

Goku Amigurumi Free Pattern

Goku

Free| Unlimited Access

Size: 19cm| Nivel: Medium

Harry Potter Amigurumi Free Pattern

Swan

Free| Unlimited Access

Size: 14cm| Nivel: Advanced

Leave a Reply

Your email address will not be published. Required fields are marked *

Share your creations with us!

Send us pictures of your creations and we’ll provide you with our professional opinion!

We value your opinion

Send us a suggestion or comment to amigurumilandia1@gmail.com

© 2024 AmigurumiLandia

All rights reserved

error: The content of this page is protected