Search
Close this search box.

Amigurumilandia PATTERNS

Free patterns for all tastes

Free Crochet Rapunzel Doll Pattern

April 30th, 2024

Free Crochet Rapunzel Doll Pattern

Designer: @chiacrafts

Greetings to the Enchanting Crochet Community! We are delighted to introduce our magical Free Crochet Rapunzel Doll Pattern, meticulously crafted by @chiacrafts. Standing gracefully at a height of 13 cm, this charming amigurumi pattern invites you to embark on a journey to crochet the beloved Disney princess with your own hands. Drawing inspiration from the enchanting world of Disney’s “Tangled,” this pattern captures the essence of Rapunzel’s whimsical charm and adventurous spirit. With a color palette reminiscent of the vibrant hues of the kingdom of Corona, our pattern features Peach for Rapunzel’s radiant skin, Mustard for her signature cascading locks, Pink, Antique Pink, and Violet for her iconic dress, White for intricate dress details, and Gray for the trusty frying pan that accompanies her on her escapades. Each stitch in this pattern is imbued with the magic of storytelling, allowing you to weave Rapunzel’s tale of courage, resilience, and self-discovery.
As you crochet Rapunzel, immerse yourself in the captivating world of Disney princesses, where tales of bravery, love, and adventure come to life. Reflect on the timeless allure of Disney’s animated classics and the enduring appeal of characters like Cinderella, Ariel, and Belle, who have captured the hearts of generations with their grace, kindness, and unwavering determination. Experience the joy of crocheting amigurumi dolls as you bring Rapunzel and her whimsical world to life stitch by stitch. Whether you’re a seasoned crocheter or embarking on your first amigurumi adventure, our free pattern offers a delightful blend of creativity and relaxation, allowing you to escape into a world of magic and imagination.
Join us on a journey of creativity and wonder as you crochet Rapunzel, the Disney princess who dares to dream and discovers the true power of love and friendship. Let your crochet hooks dance with joy as you breathe life into this beloved character, and may your handmade creation bring joy and inspiration to all who behold it.
Begin your enchanting crochet adventure with our Free Crochet Rapunzel Doll Pattern and embark on a magical journey where dreams come true, one stitch at a time!

¡Let's get started!

Marterials
  • 2.0 mm crochet hook
  • Tapestry needle
  • 8 mm black safety eyes
  • Stuffing (polyfiber filling or other)
  • Yarn, all in the same size, in the following colors: Peach (skin), Mustard (hair), Pink (dress), Antique Pink (dress), Violet (dress), White (dress), Gray (pan), and Small amounts of black for eye embroidery.
Abbreviations

R = Round (continuous or joined)
Row = row
MR = Magic Ring
st = stitch
sk = skip
sc = single crochet
inc = single crochet increase (invisible sc increase, i.e., 1st sc in FL, 2nd through both loops when working in rounds, [2 sc] through both loops when working in rows)
dec = single crochet decrease (invisible sc decrease when working in rounds sc2tog when working in rows)
DC = double crochet
HDC = half double crochet
ch = chain
SL = slip stitch
tr = treble crochet
BLO = back loop only (corresponds to inner loop when working in rounds)
FLO = front loop only (corresponds to outer loop when working in rounds)
{} = means stitches should be worked into the same loop or stitch
CY-PO = cut yarn and pull through stitch
IJ = Invisible Join
FO = fasten off (CY-PO + IJ)
STSC = Standing Single Crochet
tch = turning chain
ch-sp = chain space

Some recommendations:
  • YU vs YO Stitches: Some parts in this pattern are worked YU (Yarn Under), meaning using the “X” stitch. Others are worked YO (Yarn Over), meaning using the “V” stitch.
  • Tip: Measure the dimensions of your stitches or compare them with those of the rest of the project to understand if you’re progressing well. For example: Are the stitches of the wig smaller than those of the head, despite the instructions stating to work them with the same tension? It probably won’t fit.
  • Note on eyes: The correct size of safety eyes depends on the dimensions of the doll! Don’t buy 8 mm eyes if you’re not sure your doll’s dimensions will be similar to mine. My advice is to buy a box with many different sizes and use the one that fits your doll best. Generally, safety eyes should be about 2.5 stitches wide.
  • Note on yarn: I used YarnArt Jeans, which is a yarn designed to be worked with a 3 or 3.5 mm hook (it comes only in 1 size, so you can’t go wrong). As is common when working amigurumi, I used a hook 1 size smaller than indicated to achieve a tighter body, thus avoiding holes where stuffing would be visible or fall out. You should get a good result with this pattern as long as you stick to a yarn brand/size, work the body tight with a hook 1 size smaller than indicated, and scale the other hooks accordingly.
Height: Approximately 13 cm, made with the same material and tight stitching.

Tips for crocheting Amigurumis 😉

  1. 🧵 Choose Quality Materials: The quality of your materials directly impacts the final result. Opt for soft and durable yarns, and needles that suit your knitting style. Remember, your amigurumis deserve the best!
  2. 📏 Know Your Gauge: Before diving into the project, take time to understand your knitting tension. Making a small test square will help you adjust the size and achieve a perfect amigurumi.
  3. 📖 Dive into the Pattern: Before you start knitting, carefully read through the entire pattern. Familiarize yourself with each step and make sure you understand all the instructions. This prior knowledge will make you feel more confident during the process.
  4. 📍 Use Stitch Markers: Marking the beginning of each round with a stitch marker is key. This not only helps you follow the pattern more easily but also prevents errors and confusion.
  5. 🌈 Explore with Colors: The color palette is your canvas! Don’t be afraid to experiment and play with unexpected combinations. Colorful amigurumis are more fun and expressive.
  6. 🧼 Block Your Creations with Care: After completing your amigurumi, blocking is essential. This process smooths out the details and defines the shape, giving a professional touch to your creations. Remember, crochet is more than a hobby; it’s an art form. Enjoy every stitch and create magic with your own hands! 💖✨ Happy knitting! 🌸🌟
Legs (make 2)

Hook: 2.0 Tight work YU
Start with peach yarn
Rnd 1: 6 sc in magic ring (6)
Rnd 2-13: 6 sc (6)

Make 2 legs
The legs do not need stuffing!
CY-PO after completing the first leg. Leave a long tail in case some sewing is needed.
Do not cut the yarn after making the second leg; instead, you’ll continue working from there to join the legs.

Image 1

Hook: 2.0 Tight work YU
Work from the 2nd leg made. Change color to antique pink.
Join the legs:
Rnd 14: 3 sc in the 2nd leg, ch2, 6 sc in the 1st leg, 2 sc in the back loop of the chain, 3 sc in the 2nd leg (16) (Start working in the 1st leg from the 1st of Rnd 13!)
Rnd 15: 16 sc (16)
Now we are expanding to create the booty!
Rnd 16: 2 sc, (inc, 2 sc) x 2, 8 sc (18)
Rnd 17: 18 sc (18)
Rnd 18: 18 sc BLO (18)
It’s important to work Rnd 18 BLO, the skirt will be worked in the left FLs!
Rnd 19: 2 sc, (dec, 2 sc) x 2, 8 sc (16)
Booty finished 🙂
Rnd 20: 16 sc (16)
Rnd 21: (6 sc, dec) x 2 (14)
Rnd 22: (5 sc, dec) x 2 (12)
Rnd 23: 2 sc, 1 sc changing to peach, 1 sc, dec, 4 sc dec (10) (the color change should fall in the back)
Wait before stuffing the body.
Rnd 24: (3 sc, dec) x 2 (8)

Image 2

Stop to work a row of white surface slip stitches between Rnd 22 and Rnd 23, in addition to the color change. Make these sl before stuffing up to that point! Work using a 2.0 hook, but very loosely.
Continue this way along the color change line, ending with an IJ:

Image 3

Then, stuff the body.
Then continue working in peach color:
Rnd 25: (2 sc, dec) x 2 (6) Now 2 rounds for the neck Rnd 26-27: 6 sc (6)
Neck done, now we start the head
Rnd 28: 6 inc (12)
Rnd 29: (1 sc, 1 inc) x 6 (18)
Rnd 30: (2 sc, 1 inc) x 6 (24)
Rnd 31: (1 sc, 1 inc) x 12 (36)
This is how your work should look so far: it should be a flat disk.

Image 4

In Rnd 32, we’re going to work some increases in the front and single crochet in the back. Mark 20 sc on the back of the doll. In the back, you’re going to work 20 sc, from one stitch marker to the other. In the front, you’re going to work some increases placed at a distance of 4 sc. You may need to change how you distribute these increases before and after the end of the round based on where you are at the end of Rnd 31.

Image 5

Like this:
Rnd 31: 1 sc, 1 inc, (4 sc, 1 inc) x 2, 20 sc, 1 inc, 3 sc (40)
Here’s an example of a possible adaptation.
Rnd 32: 1 sc, 1 inc, (4 sc, 1 inc) x 2, 20 sc, 1 inc, 3 sc 4 SC, 1 INC (40)
Rnd 33-34: 40 sc (40)
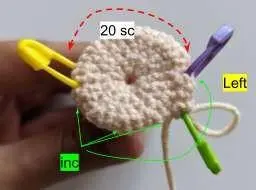
Your work should look like in the following picture. Mark two points at a distance of 7 stitches (1st stitch marker on the 1st, second on the 7th). This distance will correspond to the distance between the eyes.

You’re going to work sc until just before the 1st stitch marker, then 1 dec, then 7 sc, then 1 dec, then finish the round with sc. In my case, the pattern ended up being:
Rnd 35: 3 sc, 1 dec, 7 sc, 1 dec, 26 sc (38)
Rnd 36-41: 38 sc (38)
Rnd 42: (17 sc, 1 dec) x 2 (36)
Stop and place the safety eyes between Rnd 36 and Rnd 37 (count 6 rounds from the top, it will be easier) 7 sc apart

Image 6

TIP: while stuffing the head, the eyes might tilt outward. It’s a good trick to straighten them and bleed them using some skin-colored yarn passing inside the head! I advise you to place them now, before adding the eyes.
Cut two long threads and pass them as in the following picture, at 1st distance from the hole where you’re going to place the eye (always on the inside!).
Then proceed to place the eyes and do the eye embroidery.

Image 7
  • The peach threads will be used to bleed the eyes. For now, take them out from the back of the doll. Stuff below the bleeding threads.
  • First, I pull out the threads, and I stuff the bottom of the head, then I put the threads back in (from the back of the doll), and I stuff the rest while closing the head.
  • The top of the head should be filled firmly: do not neglect the last rounds.
  • The bottom of the head ends up being a little lighter than the top, as it is filled as just shown, while, as I close the top, I keep pushing the filling with my scissors until the surface is well stretched (the right stuffing can increase the height of your doll’s forehead by up to 1 cm!).
Image 8

Continue working on the head:
Rnd 43: (4 sc, 1 dec) x 6 (30)
Rnd 44: (3 sc, 1 dec) x 6 (24)
Stuff while closing the head! It should be filled firmly, do not neglect the last rounds.
Rnd 45: (2 sc, 1 dec) x 6 (18)
Rnd 46: (1 sc, 1 dec) x 6 (12)
Rnd 47: 6 dec (6)
CY-PO leaving a long tail for sewing. Using a tapestry needle, pass the tail through all FL of the last round and pull. Make a knot and hide the thread inside the doll’s body.
Lastly, pull the peach threads to bleed the eyes, secure them with a knot behind the head, and hide the tails inside the head.

Image 9
Skirt

Hook: 2.0 Work Work freely YU
Start with violet yarn, you’ll also need white and a bit of pink
Start working on one of the remaining FLs in R17, on the back of the doll. Keep the body upside down and work clockwise
Rnd 1: 1 stsc, 17 sc (18)
Rnd 2: (1 sc, inc) x 9 (27)
Rnd 3-6: 27 sc (27)
Rnd 7: (8 sc, 1 inc) x 3 (30)
Rnd 8-11: 30 sc (30)
Rnd 12: Work FLO: 30 sc (30)
Rnd 13: 30 sl (30)
Using white yarn and a 2.0 hook, make a round parallel to Rnd 12, working in the left BLs.
Rnd 12//: stsc, (ch 3, sc in the next BL) x 30
Then I added two simple lines in pink to make a decoration on the dress:

Image 10
Arms (make 2)

Hook: 2.0 Tight work YU
Start with peach yarn, you’ll also need pink and antique pink
Rnd 1: 5 sc in magic ring (5)
Rnd 2-3: 5 sc (5)
Change to pink
Rnd 4: 5 sc (5)
Rnd 5: 5 sc BLO (5)
Rnd 6-9: 5 sc (5)
Change to antique pink
Rnd 10: 5 sc BLO (5)
Rnd 11: 1 sc, 1 popst, 1 sl, CY-PO (5)
The popcorn stitch (popst) is made of 4 incomplete dc, then YO and pull through 5 loops on your hook. Work extremely loosely and pull the stitch once complete.
The arms do not need stuffing.

Make 2.
Using white yarn, work in the left FLs: (ch 2, 1 sl) x 5
Then sew or glue them to the body.

Image 11
Hair

Hook: 2.0 Work freely Work YO
Work with mustard yarn
Work in rows (don’t forget the tch!):
Row 1: chain 41 (40)
Row 2: 40 hdc (40)
The strand you’ve just made should be approximately as long as the wrist. Adjust your gauge or make it longer if necessary!

Image 12

Row 3-Row 13: Work BLO: 40 hdc (40)
This piece should be long enough to cover the back of the head from side to side (later you’ll add a single crochet row more).
If needed, add more rows, but pay attention to keep your number odd.
Then, turn at the base and work 13 sc towards the end of Row 1. From here, work:
CH 41, working into this chain: 20 HDC, 20 SC
Then work
40 sc on the side, until you meet near the initial tail.
Without cutting the yarn, work the next part in rows (don’t forget the tch!):
Row 1: ch 21 (20)
Row 2: 20 sc (20)
Row 3: (2 sc, 1 dec) x 5 (15)
Row 4: (3 sc, 1 dec) x 3 (12)
Row 5: (2 sc, 1 dec) x 3 (9)
Row 6: (1 sc, 1 dec) x 3 (6)
Row 7: 3 dec (3), do not make a tch Row 8: sk 1, 1 dec (1)
CY-PO
This creates this crescent-shaped part:

Image 13

Work the stitches until you meet at the beginning or in Row 1 of this piece.
Here’s how the wig looks:

Image 14
  • Using a tapestry needle, pass through 13 small loops at the top (1 per row you worked).
  • Pass the needle through to the end, keeping a small loop at the beginning.
  • Then pass the tapestry needle inside this loop to close the wig and pull tight.
  • Glue or sew it on top of the head.
Image 15
Mirror

Hook: 2.0 Tight work YU
Start with gray yarn
Rnd 1: 6 sc in MR (6)
Rnd 2: 6 inc (12)
Rnd 3: (1 sc, inc) x 6 (18)
Rnd 4: 18 sc BLO (24)
Rnd 5: ch 11, 10 sc from the second loop from the hook of the ch you just made, sl in the next sc from Rnd 4, FO

Image 16

Congratulations! You did it! The Rapunzel pattern is complete. Thank you for your support! I hope you enjoyed crafting the Amigurumilandia's patterns.

This might interest you

Bella Princess Amigurumi Free Pattern

Bella

Free| Unlimited Access

Size: 18cm| Nivel: Advanced

Cinderella Princess Amigurumi Free Pattern

Cinderella

Free| Unlimited Access

Size: 17,5cm| Nivel: Medium

Angelica Pickles by Rugrats Free Crochet Pattern

Angelica Pickles

Free| Unlimited Access

Size: 20cm| Nivel: Basic

Tommy Pickles

Free| Unlimited Access

Size: 17cm| Nivel: Basic

Leave a Reply

Your email address will not be published. Required fields are marked *

Share your creations with us!

Send us pictures of your creations and we’ll provide you with our professional opinion!

We value your opinion

Send us a suggestion or comment to amigurumilandia1@gmail.com

© 2024 AmigurumiLandia

All rights reserved

error: The content of this page is protected