Search
Close this search box.

Amigurumilandia PATTERNS

Free patterns for all tastes

Harry Potter Amigurumi Free Pattern

March 30th, 2024

Harry Potter Amigurumi Free Pattern

Designer: @crocheniacs

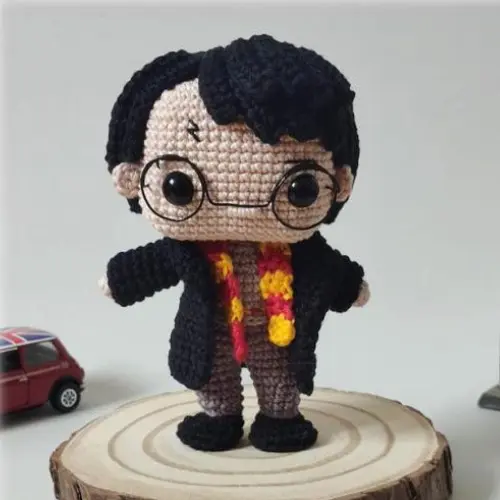
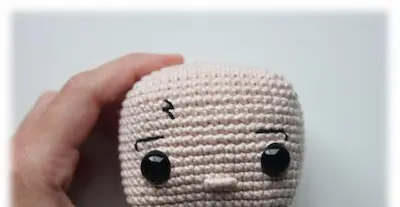
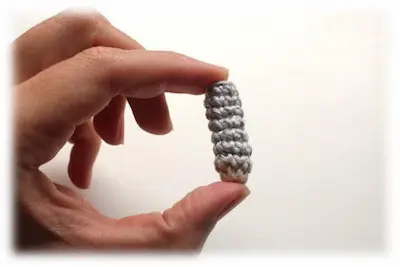
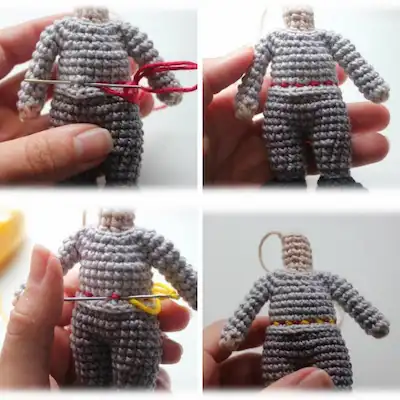
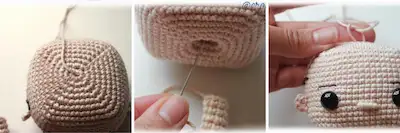
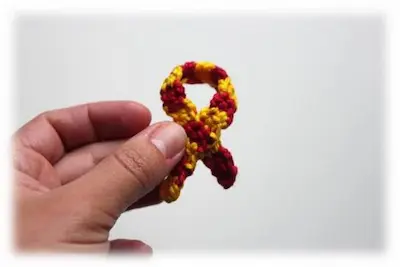
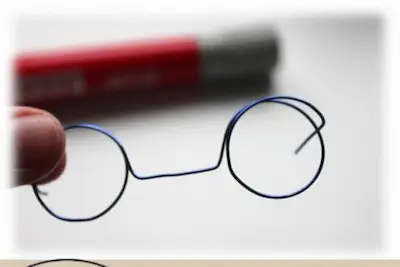
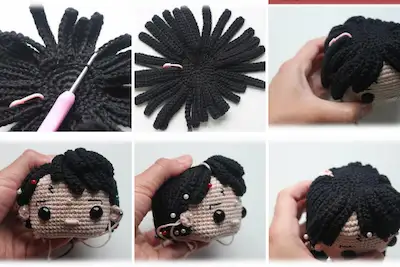
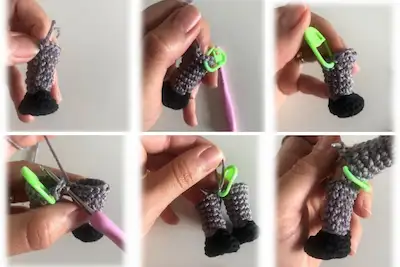
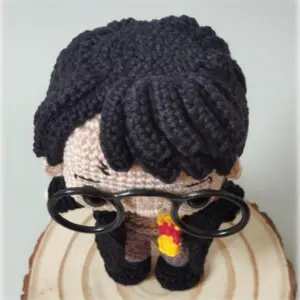
Step into a magical adventure with our Free Harry Potter Amigurumi Pattern! (Project made by: @crocheniacs). Standing at 14cm tall and rated as an advanced-level project, this charming pattern is perfect for experienced crafters seeking an exciting challenge. Harry Potter, the famous wizard from the magical world, comes to life in this crocheted version. Sporting his iconic Hogwarts uniform in shades of tan, yellow, red, light grey, dark grey, and black, this adorable amigurumi captures the essence of the beloved character from the saga, ready to accompany you on your daily adventures or add a touch of magic to your space.
Beyond being an iconic figure from literature and film, Harry Potter symbolizes courage, friendship, and determination. His story has inspired millions of people worldwide and continues to be a source of inspiration for all ages. Crafting your own Harry Potter amigurumi will provide you with hours of entertainment and creative satisfaction. With detailed and clear instructions, along with a list of necessary materials, crocheting this project will be a rewarding and exciting experience.
Once completed, your crocheted Harry Potter step by step can become the perfect companion to decorate your home, gift to a loved one, or become part of a collection of crocheted characters. His charm and personality will surely add a special touch to any space. Don’t miss the opportunity to create your own Free Harry Potter Amigurumi and bring a piece of the magical world into your home.
Begin your journey today with our free pattern and immerse yourself in the magic of crochet as you bring this beloved character to life. Turn crochet time into moments of joy and creativity while crafting Harry Potter with your own hands.

If you prefer, you can optionally acquire the ad-free, printable PDF version of this pattern, which includes additional support and helps us continue creating more wonderful patterns. Your purchase supports Amigurumilandia, ensuring we can keep providing high-quality crochet patterns for enthusiasts around the world. For more information and to find the PDF version, please click here 👈

¡Let's get started!

Marterials
  • Yarn of your preference in the following colors: Skin, Yellow, Red, Light Grey, Dark Grey, and Black
  • Tulip Crochet Hook 2.5mm
  • Two pins
  • Tapestry needle
  • Stitch marker
  • Glue (I recommend
  • Super Bonder Ultra or Tekbond 3)
  • Craft wire (or amigurumi glasses)
  • Synthetic fiberfill for stuffing the amigurumi
  • 2 safety eyes, 12mm
Abbreviations

Ch: chain
St: stitch
Sc: single crochet
Sc2tog: single crochet two together (decrease)
Hdc: half double crochet
Dc: double crochet
Tr: treble crochet
FLO: front loop only
BLO: back loop only
Inc: increase
Dec: decrease
Dc2tog: double crochet two together (decrease)
Tr2tog: treble crochet two together (decrease)

Final size of the doll

Working with a 2.5mm hook and my gauge, it measured 14 cm in height. This size may vary depending on your gauge and the hook size used.

Tips for crocheting Amigurumis 😉

  1. 🧵 Choose Quality Materials: The quality of your materials directly impacts the final result. Opt for soft and durable yarns, and needles that suit your knitting style. Remember, your amigurumis deserve the best!
  2. 📏 Know Your Gauge: Before diving into the project, take time to understand your knitting tension. Making a small test square will help you adjust the size and achieve a perfect amigurumi.
  3. 📖 Dive into the Pattern: Before you start knitting, carefully read through the entire pattern. Familiarize yourself with each step and make sure you understand all the instructions. This prior knowledge will make you feel more confident during the process.
  4. 📍 Use Stitch Markers: Marking the beginning of each round with a stitch marker is key. This not only helps you follow the pattern more easily but also prevents errors and confusion.
  5. 🌈 Explore with Colors: The color palette is your canvas! Don’t be afraid to experiment and play with unexpected combinations. Colorful amigurumis are more fun and expressive.
  6. 🧼 Block Your Creations with Care: After completing your amigurumi, blocking is essential. This process smooths out the details and defines the shape, giving a professional touch to your creations. Remember, crochet is more than a hobby; it’s an art form. Enjoy every stitch and create magic with your own hands! 💖✨ Happy knitting! 🌸🌟
Head

Start with skin color yarn
Rnd 1) 8 sc in magic ring
Rnd 2) 8 inc – 16 sc
Rnd 3) (2 inc, 2 sc) x 4 – 24 sc
Rnd 4) 1 sc, 2 inc, (4 sc, 2 inc) x 3, 3 sc – 32 sc
Rnd 5) 2 sc, 2 inc, (6 sc, 2 inc) x 3, 4 sc – 40 sc
Rnd 6) 3 sc, 2 inc, (8 sc, 2 inc) x 3, 5 sc – 48 sc
Rnd 7) 4 sc, 2 inc, (10 sc, 2 inc) x 3, 6 sc – 56 sc
Rnd 8) 5 sc, 2 inc, (12 sc, 2 inc) x 3, 7 sc – 64 sc
Rnd 9 – 22) 64 sc
Rnd 23) 5 sc, 2 dec, (12 sc, 2 dec) x 3, 7 sc – 56 sc
Rnd 24) 4 sc, 2 dec, (10 sc, 2 dec) x 3, 6 sc – 48 sc
Rnd 25) 3 sc, 2 dec, (8 sc, 2 dec) x 3, 5 sc – 40 sc
Rnd 26) 2 sc, 2 dec, (6 sc, 2 dec) x 3, 4 sc – 32 sc
Rnd 27) 1 sc, 2 dec, (4 sc, 2 dec) x 3, 3 sc – 24 sc
Rnd 28) (2 sc, 2 dec) x 4 – 16 sc
Rnd 29) (2 sc, 1 dec) x 4 – 12 sc
Rnd 30 – 34) 12 sc Leave a long tail.
NOTE: Insert eyes between rounds 17 and 18 with 11 sc between them.

Image 1

Crochet the nose on round 18, leaving a distance of 3 sc from the eyes.
Pass the yarn horizontally 2 times over a distance of 3 sc.
Then, pass the same yarn vertically several times and secure it.

Image 2

Use black Clea yarn to make Harry’s eyebrows and scar. Use 3 sc wide, one row above the eyes for the eyebrows. Make the scar between rounds 11 and 12, above Harry’s right eye. Push the neck inward with the help of the needle handle, and the head will look like in image 2.

Arms (make 2)

Start with skin color:
Rnd 1) 7 sc in magic ring
Rnds 2 to 8) Switch to light grey color: 7 sc

Image 3
Body

For the first leg, make it and fasten off, then begin again with the second leg (rounds 1 to 12). Start with the black color.
Rnd 1) 6 sc in magic ring
Rnd 2) 6 inc – 12 sc
Rnd 3) (3 sc, 1 inc) x 3 – 15 sc
Rnd 4) BLO 15 sc
Rnd 5) 15 sc
Rnd 6) 5 sc, 2 triple dec, 4 sc – 11 sc
Rnd 7) Switch to Dark Grey color: FLO 11 sc
Rnd 8) BLO 11 sc
Rnd 9 – 10) 11 sc
Rnd 11) 10 sc, 1 inc – 12 sc
Rnd 12) (3 sc, 1 inc) x 3 – 15 sc
Rnd 13) 15 sc – (Make another 3 sc with the second leg)
Rnd 14) 15 sc (joining to the first leg), 1 sl st in the same st where you started the round, 15 sc – 30 sc
Rnd 15 – 17) 30 sc
Rnd 18) (3 sc, 1 dec) x 6 – 24 sc
Rnd 19) Switch to light grey color: 24 sc
Rnd 20 – 22) 24 sc
Rnd 23) 6 sc, 7 sc (joining the arm), 12 sc, 7 sc (joining the arm), 6 sc – 38 sc
Rnd 24) (2 sc, 1 dec) x 4, 2 dec, (2 sc, 1 dec) x 4, 1 dec – 27 sc
Rnd 25) 27 sc
Rnd 26) (1 sc, 1 dec) x 9 – 18 sc
Rnd 27) Switch to skin color: FLO 9 dec – 9 sc
Rnd 28) – 32) 9 sc
To make the shirt edge, insert the needle between rounds 18 and 19 (Image 4) and sc around the body.
Tip: Do not overstuff the foot to keep it concave, so your amigurumi will stand on its own.

Image 4

To make the shirt details, insert the tapestry needle between rounds 19 and 20 (Image 5) between each sc as if you were sewing the piece. The body will look like in the second image of box 5. Fasten off the red yarn and, using the yellow yarn, follow the same procedure to cover the empty spaces (Image 5). The body will look like in the lower images of box 5.

Image 5

With the tapestry needle, pass the remaining yarn from the head and the remaining yarn from the body towards the center of the magic ring where you started the head, as indicated in the images below. Pull both threads to adjust the head to the body, make a knot, and cut the yarn. This way, the head will be articulated.

Image 6
Ears (make 2)

Rnd 1) 6 sc in magic ring
Sew the ears between rounds 17 and 18 (same line as the eyes), at a distance of 5 sc from the eyes.

Scarf

Start with 3 chains, and make 2 single crochets starting from the second chain. Alternate between red and yellow, changing color every 2 rounds until round 32.

Image 7
Glasses

If you don’t have amigurumi glasses, make them with craft wire. The size used was the thickness of a whiteboard marker. Leave a small piece on the sides to attach the glasses to the face (Image 8).

Image 8
Coat

Using black yarn:
Rnd 1) Begin with 26 chains.
Make 25 sc, chain 1, turn.
Rnd 2) 1 inc, 3 sc, chain 5 and skip 4 sc, (2 sc, 1 inc) x 3, chain 5 and skip 4 sc, 3 sc, 1 inc – 32 sc
Rnd 3) 5 sc, (1 sc, 1 dec) x 2, 10 sc, (1 sc, 1 dec) x 2, 5 sc – 28 sc
Rnd 4) 5 sc, 1 dec, 14 sc, 1 dec, 5 sc – 26 sc
Rnd 5 – 13) 26 sc
Make 9 sc on the side as shown in image 9. On the 10th stitch, make 1 hdc, and on the 11th stitch, make 1 inc in hdc.
Make 25 hdc in the upper loops to create the collar of the coat. Continue making hdc until reaching the other end of the coat.
When you reach the opposite end, make 1 inc in hdc, 1 hdc, 9 sc up to the corner of the coat (Image 9). Fasten off.

Image 9
Sleeves

Insert the hook into the loops of the “hole” of the coat to create the sleeves. Make a slip stitch and 1 sc in the same stitch.
Rnd 1- 7) 12 sc

Hair

With black yarn,
Rnd 1) 8 sc in magic ring
Rnd 2) 8 inc – 16 sc
Rnd 3) (2 inc, 2 sc) x 4 – 24 sc
Rnd 4) 1 sc, 2 inc, (4 sc, 2 inc) x 3, 3 sc – 32 sc
Now you’ll work around the 32 stitches from round 4.

*Repeat 15 times: 15 chains, 14 hdc from the second chain, sc in the next stitch.
*Repeat 6 times FLO: 10 chains, 9 hdc from the second chain, sc in the next stitch.
*Once: 12 chains, 11 hdc from the second chain, sc in the next stitch.
*1 sc in the next stitch. (Here’s a space to expose Harry’s scar).
*Once: 14 chains, 13 hdc from the second chain, 1 sc in the next stitch.
*Repeat 6 times: 15 chains, 14 hdc from the second chain, 1 sc in the next stitch.
*1 sl st in the next stitch and fasten off.

In the 6 back loops, make: 12 chains, 11 sc from the second chain, 1 sc in the next stitch. Repeat this sequence 3 times (Image 10).
NOTE: The marker indicates the beginning of the hair strands.

Image 10

Place the hair on the head so that the opposite side of the magic ring is exposed. Note that the start of the hair strands is on the left side of the head (Image 10). The strands made with the front loops are Harry’s bangs, and the strands from the back loops are below. The space to show the scar on the forehead is where 1 sc was made without any hair strands (Last image at the bottom).

Image 11

Note where the Round ends on the second leg (1st Image above). By making another 3 sc, the second leg will look like the 2nd photo.
In the third photo, we have the picture of the first leg, and the marker indicates the start of the last round made on this leg.
Join the two legs with 1 sc by inserting the hook into the second-to-last stitch of the first leg (1st Image at the bottom). This will be the first stitch from now on. If you observe, the marker is exactly in the middle of the little body (2nd Image at the bottom).
In round 15, you should make the sc in the same starting point of the row (3rd Image at the bottom), and skip it in the final count. That is, in round 16, you will skip this sc. This way, the little body will be symmetrical.

Image 12

Congratulations! You did it! The Harry Potter pattern is complete. Thank you for your support! I hope you enjoyed crafting the Amigurumilandia's patterns.

Support us by buying a PDF pattern to keep our free content coming

Harry Potter Crochet Pattern PDF Version

Unlock the full potential of your crafting journey with the Harry Potter Crochet Pattern PDF Version, offering convenience and accessibility for your crochet projects.
$9.99
$ 4
99 USD
One-time payment
  • Ad-free Experience: Enjoy a distraction-free crafting session with our PDF version, free from the clutter of advertisements commonly found on webpages.
  • Offline Access: Access your pattern anytime, anywhere, even without internet connection, allowing you to craft on-the-go without interruptions.
  • Printable Format: Easily print the pattern for quick reference or mark up your progress directly on the document, enhancing your crafting experience.
  • Lifetime Ownership: Secure your pattern for a one-time payment, ensuring lifetime access without worrying about subscription fees or recurring charges.
  • Dedicated Support: Receive personalized assistance from Amigurumilandia's support team for any access issues or pattern-related inquiries, ensuring a seamless crafting experience.
Popular
Swan Amigurumi Free Crochet Pattern

Swan

Free| Unlimited Access
Size: 40cm| Nivel: Medium
Lionel Messi Amigurumi Free Pattern

Lionel Messi

Free| Unlimited Access

Size: 13cm| Nivel: Medium

Goku Amigurumi Free Pattern

Goku

Free| Unlimited Access

Size: 19cm| Nivel: Medium

Swan Amigurumi Free Crochet Pattern

Swan

Free| Unlimited Access
Size: 40cm| Nivel: Medium

Leave a Reply

Your email address will not be published. Required fields are marked *

Share your creations with us!

Send us pictures of your creations and we’ll provide you with our professional opinion!

We value your opinion

Send us a suggestion or comment to amigurumilandia1@gmail.com

© 2024 AmigurumiLandia

All rights reserved

error: The content of this page is protected