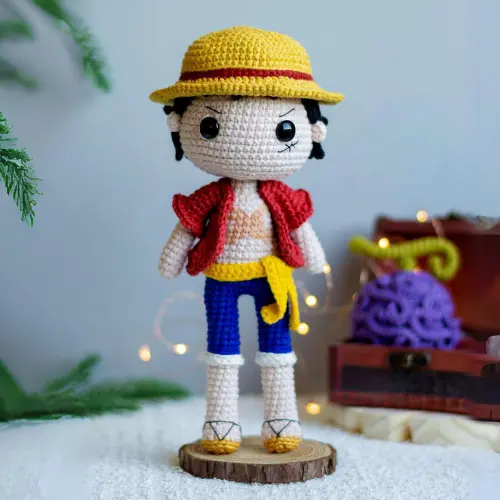
Dive into the vibrant world of anime and manga with our exclusive Luffy Amigurumi Crochet Pattern from the renowned series “One Piece.” Crafted by the talented @thamireskaled, this pattern blends creativity and nostalgia for fans of Japanese pop culture. Designed for intermediate crocheters, this 24 cm tall Luffy Amigurumi invites you to embark on a thrilling crochet adventure. Monkey D. Luffy, the fearless captain of the Straw Hat Pirates, is beloved by millions worldwide. With his iconic straw hat, boundless optimism, and rubber-like stretching abilities, embodies freedom, friendship, and adventure. As he searches for the legendary One Piece treasure, his journey is filled with excitement, danger, and heartfelt moments that resonate with fans of all ages. But Luffy is just one star in the anime and manga galaxy. From classics like “Naruto” and “Dragon Ball” to modern hits like “My Hero Academia” and “Attack on Titan“, Japanese animation offers rich characters, stories, and themes captivating global audiences. Whether you love action-packed battles, heartwarming friendships, or epic quests for justice, there’s an anime or manga series for everyone. Amigurumi, the Japanese art of crocheting small stuffed toys, is a popular pastime for anime fans. With our free Luffy Amigurumi crochet pattern, you can craft a charming miniature version of the beloved pirate captain. Whether you’re seasoned or a novice crocheter, our detailed instructions and tips will help you bring Luffy to life with every stitch. Set sail on your crochet adventure today and join fellow anime enthusiasts and crafters celebrating the magic of “One Piece” with handmade creations. Whether for yourself or as a gift for a fellow fan, our Luffy Amigurumi Crochet Pattern is sure to delight and inspire.
¡Let's get started!
Marterials
Crochet hook of 2.0 or 2.5 mm
Stuffing
Stitch marker
Tapestry needle
12 mm black safety eyes
Silicone glue
Wire
Clean black wire
Beige fabric paint
Universal glue
Rhinestones
Thread in the following colors: Whitish, Blue, Beige, Yellow, Black, Mustard, and Red
Abbreviations
MR– magic ring Inc– increase IncT– triple increase Rnd– row Ch– chain Dec– decrease HDC– half double crochet sc– single crochet dc– double crochet sl st– slip stitch BLO– back loop only FLO– front loop only BPsc– Back Post single Crochet
Height: 24cm
Tips for crocheting Amigurumis 😉
🧵 Choose Quality Materials: The quality of your materials directly impacts the final result. Opt for soft and durable yarns, and needles that suit your knitting style. Remember, your amigurumis deserve the best!
📏 Know Your Gauge: Before diving into the project, take time to understand your knitting tension. Making a small test square will help you adjust the size and achieve a perfect amigurumi.
📖 Dive into the Pattern: Before you start knitting, carefully read through the entire pattern. Familiarize yourself with each step and make sure you understand all the instructions. This prior knowledge will make you feel more confident during the process.
📍 Use Stitch Markers: Marking the beginning of each round with a stitch marker is key. This not only helps you follow the pattern more easily but also prevents errors and confusion.
🌈 Explore with Colors: The color palette is your canvas! Don’t be afraid to experiment and play with unexpected combinations. Colorful amigurumis are more fun and expressive.
🧼 Block Your Creations with Care: After completing your amigurumi, blocking is essential. This process smooths out the details and defines the shape, giving a professional touch to your creations. Remember, crochet is more than a hobby; it’s an art form. Enjoy every stitch and create magic with your own hands! 💖✨ Happy knitting! 🌸🌟
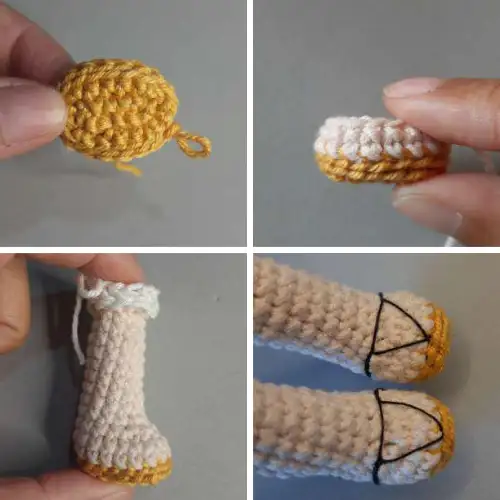
Foot and Legs (make 2)
Start with mustard yarn. Make 6 chains. Rnd 1:Working back into the second chain from hook, sc 4, sc3tog in last stitch, continue on the other side of the chain, sc 3, 2 sc in last stitch (12) Rnd 2:2 sc in each st around (18) Rnd 3:BLO: 18 sc Switch to beige. Rnd 4:BLO: 18 sc (18) Rnd 5:18 sc (18) Rnd 6:Sc 5, dec 4 times, sc 5 (14) Rnd 7:Sc 5, dec 2 times, sc 5 (12) Rnd 8-15:12 sc (8 rounds) Switch to off white. Rnd 16:FLO: (2 sc, 1 inc) repeat 4 times (16) Rnd 17:16 Bpsc (16) Switch to Blue. Work 1 round of sc in BLO without counting stitches. Rnd 18:BLO: (2 sc, dec) repeat 4 times (12) Rnd 19-25:12 sc (7 rounds) Cut yarn and fasten off after completing the first leg. For the second leg, do not cut the yarn as you will continue with the body. Embroider the shoe strip on the feet with black embroidery floss.
Image 1
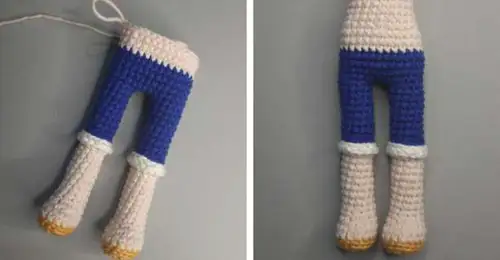
Body
Continue with blue yarn. For the second leg, make 6 more stitches, 3 chains, and secure with 1 sc in the first leg, ensuring that the feet are facing forward. Rnd 26:Sc 11 in the first leg, 3 sc in the chain, sc 12 in the second leg, 3 sc in the chain (30) Rnd 27-30:30 sc (4 rounds) Switch to beige yarn. Rnd 31-33:30 sc (3 rounds) Rnd 34:(Sc 3, dec) repeat 6 times (24) Rnd 35-41:24 sc (7 rounds) Here you can insert wire or hot glue tube to secure the neck. Rnd 42:Dec 12 (12) Rnd 43-50:12 sc (8 rounds) Rnd 51:Dec 6 (6) Cut yarn and fasten off.
Image 2
Arms (make 2)
With beige yarn. Rnd 1:10 sc in MR (10) Rnd 2-16:10 sc (15 rounds) Close the arm by decreasing stitches on both sides of the piece with 5 sc. Cut yarn leaving a tail for sewing. Sew the arms to round 42 of the body
Image 3
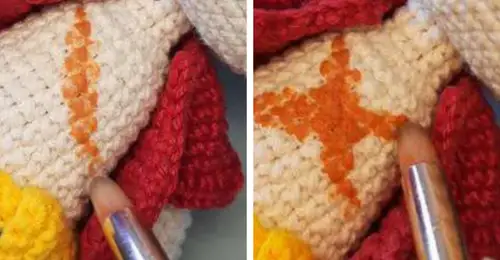
Chest Painting
Using light brown fabric paint and a brush, paint an X on Luffy’s chest
Image 4
Belt
With yellow yarn. Make 61 chains. Rnd 1:Starting from the second chain, sc 60, ch 1 and turn (60) Rnd 2:60 sc (60) Cut yarn and fasten off. Wrap the belt around Luffy’s waist and tie a knot. Apply some glue to secure the knot in place.
Image 5
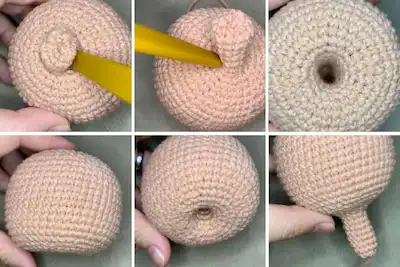
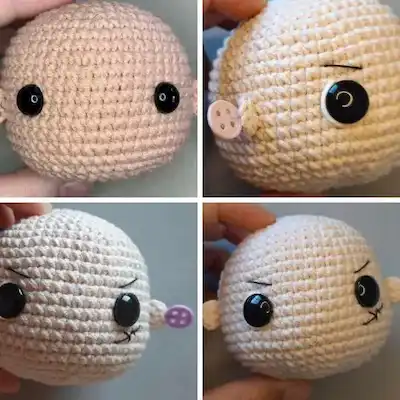
Head
With beige yarn. Rnd 1:6 sc in MR (6) Rnd 2:6 inc (12) Rnd 3:(1 sc, inc) repeat 6 times (18) Rnd 4:(2 sc, inc) repeat 6 times (24) Rnd 5:(3 sc, inc) repeat 6 times (30) Rnd 6:(4 sc, inc) repeat 6 times (36) Rnd 7:(5 sc, inc) repeat 6 times (42) Rnd 8:(6 sc, inc) repeat 6 times (48) Rnd 9:(7 sc, inc) repeat 6 times (54) Rnd 10-20:54 sc (11 rounds) Place the eye between rows 15 and 16, with 8 sc between the eyes. Rnd 21:(7 sc, dec) repeat 6 times (48) Rnd 22:(6 sc, dec) repeat 6 times (42) Rnd 23:(5 sc, dec) repeat 6 times (36) Rnd 24:(4 sc, dec) repeat 6 times (30) Rnd 25:(3 sc, dec) repeat 6 times (24) Rnd 26:(2 sc, dec) repeat 6 times (18) Stuff firmly and make sure to leave the center of the head with a “hole” in the stuffing so we can push the neck through. Rnd 27:(1 sc, dec) repeat 6 times (12) Rnd 28-35:12 sc (8 rounds) Rnd 36:6 dec (6) Cut yarn and fasten off. Push the neck inward using a needle or a pen.
Image 6
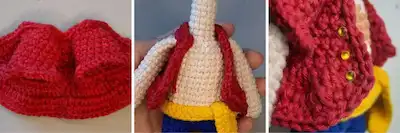
Shirt
With red yarn. Starting from round 2, always begin with 1 ch and turn. Make 21 chains. Rnd 1:Starting from the second chain, sc 20, ch 1 and turn (20) Rnd 2:Sc 2, make 6 chains, skip 6 sts, secure in the 7th with 1 sc, make 3 sc more, make 6 chains, skip 6 sts, secure in the 7th with 1 sc, make 1 sc more (20) Rnd 3:20 sc Rnd 4:1 inc, 18 sc, 1 inc (22) Rnd 5:1 inc, 20 sc, 1 inc (24) Rnd 6:24 sc (24) Rnd 7:1 inc, 22 sc, 1 inc (26) Rnd 8:26 sc (26) Rnd 9:Ch 1, turn, 1 sl st, 22 sl st of sc, skip 1 sc, 1 sl st (46) Rnd 10:Ch 1, turn, 1 sl st, 1 sc, 1 hdc, 39 dc, 1 hdc, 1 sc, 2 sl st (46) Work sl sts around the entire piece, cut yarn and fasten off.
Image 7
Sleeve
With red yarn. Attach the yarn in the gap we left for the sleeve. Rnd 1:sc 14 (6 sc up, 6 sc down, and 1 on each side) (14) Rnd 2-6:14 sc (5 rounds) Rnd 7:(inc, dec) repeat 7 times (35) Cut yarn and fasten off. Repeat the same for the other sleeve.
Details
Glue 3 rhinestones or embroidery on the right side of the blouse to make the buttons
Ears
With beige yarn. Rnd 1:6 sc in MR (6) Cut yarn leaving a tail for sewing. Sew the ears at eye level with a distance of 5 stitches between the eyes.
Image 8
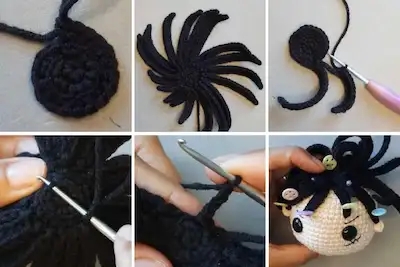
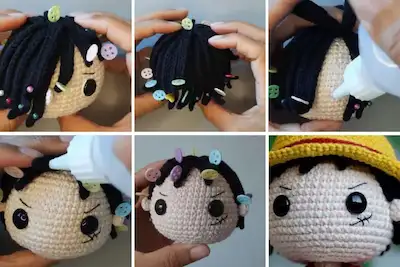
Hair
With black yarn. Rnd 1:6 sc in MR (6) Rnd 2:6 inc (12) Rnd 3:BLO: (1 sc, inc) repeat 6 times (18)
-Now we’ll make the hair strands. I divided it into parts for better understanding, but I’ll do everything in the same round. Rnd 4:(22 ch, starting from the second sc, sc 2, sc 2, 17 hdc, sl st in the next stitch) repeat 13 times
13 ch, starting from the second sc, sc 2, sc 2, 8 hdc, sl st in the next stitch.
(9 ch, starting from the second sc, sc 2, sc 2, 4 hdc, sl st in the next stitch) repeat 3 times
13 ch, starting from the second sc, sc 2, sc 2, 8 hdc, sl st in the next stitch.
-Now we’ll make the top part of the hair. Insert the hook into the 1st stitch of round 3 and make:
(20 ch, starting from the second sc, sc 2, sc 2, 15 hdc, skip 1 st, sl st in the next stitch) repeat 4 times
(9 ch, starting from the second sc, sc 2, sc 2, 4 hdc, sl st in the next stitch) repeat 2 times. Cut yarn and fasten off. Glue the hair to Luffy’s head. All strands longer than 20 chains should be placed behind the ears.
Image 9
Image 10
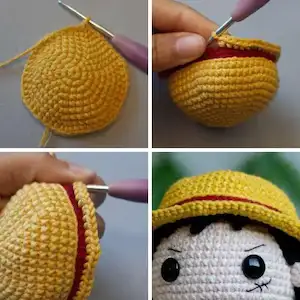
Hat
With mustard yarn. Rnd 1:6 sc in MR (6) Rnd 2:6 inc (12) Rnd 3:(1 sc, inc) repeat 6 times (18) Rnd 4:(2 sc, inc) repeat 6 times (24) Rnd 5:(3 sc, inc) repeat 6 times (30) Rnd 6:(4 sc, inc) repeat 6 times (36) Rnd 7:(5 sc, inc) repeat 6 times (42) Rnd 8:(6 sc, inc) repeat 6 times (48) Rnd 9:(7 sc, inc) repeat 6 times (54) Rnd 10:(8 sc, inc) repeat 6 times (60) Rnd 11-13:60 sc (3 rounds) Switch to red. Rnd 14:BLO: 54 hdc (54) Rnd 15:BLO: 54 sc (54) Switch to mustard. Rnd 16:FLO: (4 sc, inc) repeat 12 times (72) Rnd 17-18:72 sc (2 rounds) Rnd 19:(5 sc, inc) repeat 12 times (84) Rnd 20: (6 sc, inc) repeat 12 times (96) Cut yarn and fasten off with a tapestry needle and place it on Luffy’s head!
Image 11
Congratulations! You did it! The Luffy pattern is complete. Thank you for your support! I hope you enjoyed crafting the Amigurumilandia's patterns.


