
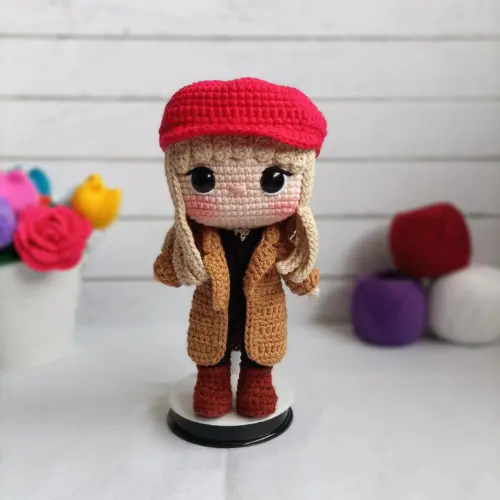
Designer: @daisuki.craftgt
Welcome to Amigurumilandia! Today, we present a very special project: the Taylor Swift Doll Crochet Pattern (created by @daisuki.craftgt). This version of the iconic global music star stands at 18 cm tall and is of advanced difficulty, perfect for those with some crochet experience. Using skin-tone, beige, black, red, fuchsia, and tobacco yarn, you can capture Taylor’s winter essence with her stylish red beret, long tobacco coat, and fuchsia shoes. This casual yet chic ensemble reflects Taylor Swift’s unparalleled fashion sense.
Taylor Swift, born in 1989 in Reading, Pennsylvania, is one of the most influential artists of our time. She began her career in country music but quickly expanded into other genres, including pop, rock, and folk. With multiple Grammy awards and a legion of fans worldwide, she has left an indelible mark on the music industry. Her songs, known for their emotive lyrics and personal narratives, have resonated with millions. Taylor is renowned for her ability to reinvent herself with each album and her significant impact on pop culture. Besides her musical career, she has been a vocal advocate for artists’ rights and has supported various social causes.
Among her most successful albums are “Fearless,” “1989,” “Reputation,” and “Folklore.” Her versatility and connection with her audience have made her a global phenomenon.
This Taylor Swift Doll Crochet Pattern is an excellent way to pay tribute to this artist. The doll is perfect for Swifties of all ages, whether as a toy, a decorative piece for a collection, or for those who appreciate handmade and personalized gifts.
Our detailed, step-by-step tutorial guides you through the process of creating this doll. From the first stitches to the final details, our instructions ensure that every part of your Taylor Swift crochet doll is perfectly crafted. You can add a special touch by including additional accessories or personalizing the outfit with different colors and patterns.
In summary, if you’re looking for a crochet project that combines creativity, a passion for music, and admiration for her, our Taylor Swift Doll Crochet Pattern is the perfect choice.
If you prefer, you can optionally acquire the ad-free, printable PDF version of this pattern, which includes additional support and helps us continue creating more wonderful patterns. Your purchase supports Amigurumilandia, ensuring we can keep providing high-quality crochet patterns for enthusiasts around the world. For more information and to find the PDF version, please click here 👈
¡Let's get started!
Marterials
- Cotton yarn in the following colors: Skin, Beige, Black, Red, Fuchsia, and Tobacco
- Crochet hooks: 2mm and 2.5mm
- 14mm safety eyes
- Yarn needle
- Wire (optional, only if you want to articulate the arms)
- Stuffing
- Blush for the cheeks
- Short strands of white, black, and beige yarn for facial details
Abbreviations
Row – Row
Rnd – Round
MR – Magic ring
ch – Chain
sc – Single crochet
hdc – Half double crochet
dc – Double crochet
sl st – Slip stitch
inc – Increase
hdc inc – Half double crochet increase
dc inc – Double crochet increase
tri-inc – Triple increase
dec – Decrease (dec)
S – Strand
BLO – Back loop only
FLO – Front loop only
Important
- The finished doll will have an approximate height of 18 centimeters, but this may vary depending on the type of yarn and crochet hook you use for crocheting.
- It is crocheted IN SPIRAL unless otherwise stated.
Tips for crocheting Amigurumis 😉
- 🧵 Choose Quality Materials: The quality of your materials directly impacts the final result. Opt for soft and durable yarns, and needles that suit your knitting style. Remember, your amigurumis deserve the best!
- 📏 Know Your Gauge: Before diving into the project, take time to understand your knitting tension. Making a small test square will help you adjust the size and achieve a perfect amigurumi.
- 📖 Dive into the Pattern: Before you start knitting, carefully read through the entire pattern. Familiarize yourself with each step and make sure you understand all the instructions. This prior knowledge will make you feel more confident during the process.
- 📍 Use Stitch Markers: Marking the beginning of each round with a stitch marker is key. This not only helps you follow the pattern more easily but also prevents errors and confusion.
- 🌈 Explore with Colors: The color palette is your canvas! Don’t be afraid to experiment and play with unexpected combinations. Colorful amigurumis are more fun and expressive.
- 🧼 Block Your Creations with Care: After completing your amigurumi, blocking is essential. This process smooths out the details and defines the shape, giving a professional touch to your creations. Remember, crochet is more than a hobby; it’s an art form. Enjoy every stitch and create magic with your own hands! 💖✨ Happy knitting! 🌸🌟

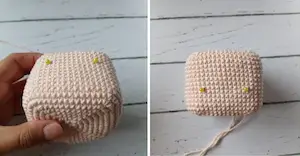
Head
Skin color yarn and 2 mm crochet hook.
Rnd 1: Make a magic ring, crochet 8 sc in ring (8).
Rnd 2: 2 sc in each st around (16).
Rnd 3: (2 sc in next st, 1 sc in next 2 sts) repeat 4 times (24).
Rnd 4: 1 sc in next st, 2 sc in next st, (1 sc in each of next 4 sts, 2 sc in next st) repeat 3 times, 3 sc in next st (32).
Rnd 5: 2 sc in next st, 2 sc in next st, (1 sc in each of next 6 sts, 2 sc in next st) repeat 3 times, 4 sc in next st (40).
Rnd 6: 3 sc in next st, 2 sc in next st, (1 sc in each of next 8 sts, 2 sc in next st) repeat 3 times, 5 sc in next st (48).
Rnd 7: 4 sc in next st, 2 sc in next st, (1 sc in each of next 10 sts, 2 sc in next st) repeat 3 times, 6 sc in next st (56).
Rnd 8: 5 sc in next st, 2 sc in next st, (1 sc in each of next 12 sts, 2 sc in next st) repeat 3 times, 7 sc in next st (64).
Rnd 9 – Rnd 22: 64 sc around (64) (14 rounds).
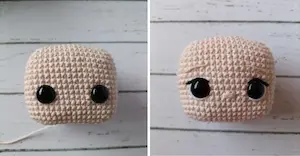
Place safety eyes between Rnd 17 and Rnd 18 with 10 stitches of separation. There should be 7 sc visible between each eye.
To ensure the eyes are centered, you can use the increases from Rnd 8, with the head turned upside down (as it is being crocheted).
For the right eye, place it along the line of the first sc after the increase in Rnd 8.
For the left eye, find the last sc before the 2 increases, then move 2 sts to the right and place the eye along that line. (Refer to Image 1 for guidance).
Rnd 23: 7 sc, dec 2 times, (1 sc in each of next 12 sts, dec 2 times) repeat 3 times, 5 sc (56).
Rnd 24: 6 sc, dec 2 times, (1 sc in each of next 10 sts, dec 2 times) repeat 3 times, 4 sc (48).
Rnd 25: 5 sc, dec 2 times, (1 sc in each of next 8 sts, dec 2 times) repeat 3 times, 3 sc (40).
Rnd 26: 4 sc, dec 2 times, (1 sc in each of next 6 sts, dec 2 times) repeat 3 times, 2 sc (32).
Rnd 27: 3 sc, dec 2 times, (1 sc in each of next 4 sts, dec 2 times) repeat 3 times, 1 sc (24).
Rnd 28: 2 sc, dec 2 times (16). Stuff the head.
Sl st to join and fasten off, leaving a long tail for sewing to the body.
Add eye details.
Embroider the nose between Rnd 18 and Rnd 19.
Using beige yarn, embroider the eyebrows between Rnd 13 and Rnd 15, taking 5 sts wide.
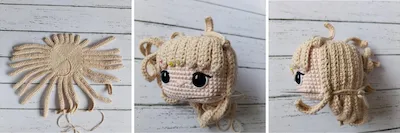
Hair
Beige yarn and 2 mm crochet hook.
Rnd 1: Make a magic ring, crochet 8 sc in ring (8).
Rnd 2: 2 sc in each st around (16).
Rnd 3: (2 sc in next st, 1 sc in each of next 2 sts) repeat 4 times (24).
Rnd 4: 1 sc in next st, 2 sc in next st, (1 sc in each of next 4 sts, 2 sc in next st) repeat 3 times, 3 sc in next st (32).
Rnd 5: 2 sc in next st, 2 sc in next st, (1 sc in each of next 6 sts, 2 sc in next st) repeat 3 times, 4 sc in next st (40).
Rnd 6: 3 sc in next st, 2 sc in next st, (1 sc in each of next 8 sts, 2 sc in next st) repeat 3 times, 5 sc in next st (48).
Rnd 7: 4 sc in next st, 2 sc in next st, (1 sc in each of next 10 sts, 2 sc in next st) repeat 3 times, 6 sc in next st (56).
Rnd 8: 5 sc in next st, 2 sc in next st, (1 sc in each of next 12 sts, 2 sc in next st) repeat 3 times, 7 sc in next st (64).
Next, we will start working on the strands.
S1: 32ch, starting from the 3rd ch, make 30sc, when reaching the base, skip 1 st and join with sl st in the next. Make 2 more strands. (3)
S4: 30ch, starting from the 3rd ch, make 28sc, when reaching the base, skip 1 st and join with sl st in the next. Make 2 more strands. (3)
S7: 28ch, starting from the 3rd ch, make 26sc, when reaching the base, skip 1 st and join with sl st in the next. Make 1 more strand. (2)
S9: 26ch, starting from the 3rd ch, make 24sc, when reaching the base, skip 1 st and join with sl st in the next. Make 1 more strand. (2)
S11: 9ch, starting from the 3rd ch, make 7sc, when reaching the base, skip 2 sts and join with sl st in the next. (1)
S12: 8ch, starting from the 3rd ch, make 6sc, when reaching the base, skip 2 sts and join with sl st in the next. Make 4 more strands. (5)
S17: 9ch, starting from the 3rd ch, make 7sc, when reaching the base, skip 2 sts and join with sl st in the next. (1)
S18: 26ch, starting from the 3rd ch, make 24sc, when reaching the base, skip 1 st and join with sl st in the next. Make 1 more strand. (2)
S20: 28ch, starting from the 3rd ch, make 26sc, when reaching the base, skip 1 st and join with sl st in the next. Make 1 more strand. (2)
S22: 30ch, starting from the 3rd ch, make 28sc, when reaching the base, skip 1 st and join with sl st in the next. Make 2 more strands. (3)
S25: 32ch, starting from the 3rd ch, make 30sc, when reaching the base, skip 1 st and join with sl st in the next. Make 3 more strands. (4)
Finish and leave a long tail for sewing onto the head or if you prefer you can glue it with silicone, whichever works best for you. Since the hair is symmetrical, I sew it onto the head backwards (image 3).
Arms (make 2)
Skin color yarn and 2mm crochet hook.
Rnd 1: MR with 4sc (4).
Rnd 2: 4inc (8).
Rnd 3 – Rnd 5: 8sc (8).
Change to black color yarn.
Rnd 6 – Rnd 15: 8sc (8).
Sl st and finish off.
The arms are NOT stuffed.
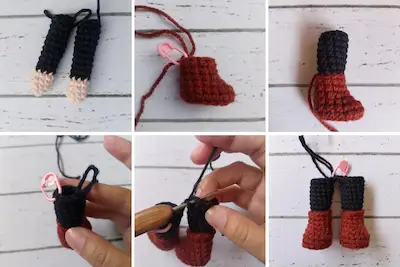
Legs (make 2)
With fuchsia color yarn and a 2 mm crochet hook,
6ch, starting from the 2nd ch, crochet:
Rnd 1: 4sc, inc-tr, 3sc, 1inc (12)
Rnd 2: 1inc, 3sc, 3inc, 3sc, 2inc (18)
Rnd 3: BLO 18sc (18)
Rnd 4: 18sc (18)
Rnd 5: 5sc, 4dec, 5sc (14)
Rnd 6: 5sc, 2dec, 5sc (12)
Rnd 7 – Rnd 8: 12sc (12)
Change to black color yarn
Rnd 9: BLO 12sc (12)
Rnd 10 – Rnd 15: 12sc (12)
Finish the first leg with a sl st
Remember to keep stuffing as you crochet
In Rnd 3 and Rnd 9 of the legs with fuchsia color, make sl st around (3rd image of chart 4)
Crochet the second leg. Upon reaching Rnd 15, we will continue with the joining to the first leg as follows (refer to the images below chart 4):
Rnd 16: Make 4sc more on the 2nd leg, make 2ch, join to the 1st leg with 1sc 2 stitches behind where you finished (this will be the new start of the rnd), 11sc, 2sc on one side of the 2ch, 12sc, 2sc on the other side of the 2ch (28).
Rnd 17: 6sc, 1inc, 13sc, 1inc, 7sc (30).
Rnd 18 – Rnd 21: 30sc (30).
Rnd 22: (3sc, 1dec)x6 (24).
Rnd 23: BLO 24sc (24).
Rnd 24 – Rnd 25: 24sc (24).
Rnd 26: (2sc, 1dec)x6 (18).
Rnd 27 – Rnd 29: 18sc (18).
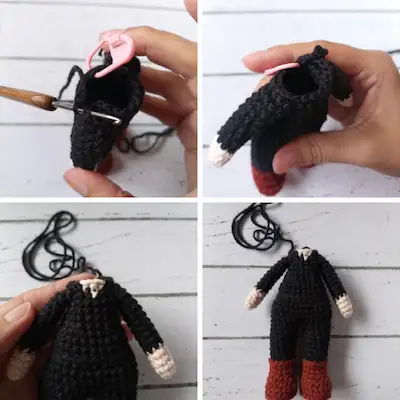
Next, we will join the arms to the body (refer to the top images of chart 5)
Rnd 30: 4sc, join 1st arm to the body with 4sc, 5sc, join 2nd arm to the body with 4sc, 1sc (18).
In Rnd 31, the front will change to skin color.
Rnd 31: 4sc, 4sc of the arm, 2sc, (skin color 1sc), 2sc, 4sc of the arm, 1sc (18).
Rnd 32: 5sc, 1dec, 2sc, (skin color 3sc), 2sc, 1dec, 2sc (16).
Sl st and finish off.
Attach the head to the body.
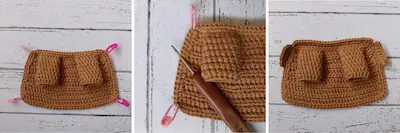
Coat
Tobacco color yarn and 2 mm crochet hook.
The piece will be worked in rows, meaning at the end of each row, chain and turn the work.
27 ch, starting from the 2nd ch, make:
Row 1: 3hdc, 6ch, skip 6ch from the base, 8hdc, 6ch, skip 6ch from the base, 3hdc (26).
Row 2 – Row 3: 26hdc (26).
Row 4: 8hdc, 1hdc inc, 8hdc, 1hdc inc, 8hdc (28).
Row 5: 28hdc (28).
Row 6: 9hdc, 1hdc inc, 8hdc, 1hdc inc, 9hdc (30).
Row 7: 30hdc (30).
Row 8: 10hdc, 1hdc inc, 8hdc, 1hdc inc, 10hdc (32).
Row 9 – Row 12: 32hdc (32).
Make sc around the entire piece (18sc on one side, 26sc on top, 18sc on the other side).
Sl st and finish off, hide the remaining yarn.
Sleeves
Tobacco color yarn and 2 mm crochet hook.
Here, you will work in rounds, meaning at the end of each round, you will make a sl st in the first st, ch 1 to begin the next round, and make a hdc in the same st.
In the space left open in the coat for the arms, you will make:
Rnd 1: 15hdc (15).
Rnd 2 to Rnd 7: 15hdc (15).
Sl st and finish off, hide the remaining yarn.
Lapels
Tobacco color yarn and 2 mm crochet hook.
Locate the 18sc on each side of the coat (refer to image 6).
Counting from bottom to top, at st 11, yarn over, and do the following working only in the FRONT LOOP:
Rnd 1: 2ch, in the same st make 1sc, 1sc, 6dc, 3ch, make a tr in the 6th dc, (tr in the next st, 2ch, 1sc in the same st), 25sc, 2ch, make a tr in the 25th st, (tr in the next st, 3ch, 1dc in the same st), 5dc, 2sc, 2ch, and sl st in the 2nd sc.
Sl st and finish off, hide the remaining yarn.
Beret
Red color yarn and 2.5 mm crochet hook or 0.5 mm larger than the hook you have been using. (For example, if you used a 3 mm hook for the body, use a 3.5 mm hook for the beret.)
This is so the beret fits the head properly, so don’t crochet too tightly.
Rnd 1: MR with 8sc (8).
Rnd 2: 8inc (16).
Rnd 3: (1sc, 1inc) x8 (24).
Rnd 4: (2sc, 1inc) x8 (32).
Rnd 5: (3sc, 1inc) x8 (40).
Rnd 6: (4sc, 1inc) x8 (48).
Rnd 7: (5sc, 1inc) x8 (56).
Rnd 8: (6sc, 1inc) x8 (64).
Rnd 9: (7sc, 1inc) x8 (72).
Rnd 10 – Rnd 13: 72sc (72).
Rnd 14: 72hdc (72).
Rnd 15: (7sc, 1dec) x8 (64).
Rnd 16: (6sc, 1dec) x8 (56).
Rnd 17: FLO 2sl st, 2sc, 2hdc, (1dc, 1dc inc)x7, 2hdc, 2sc, 2sl st.
Sl st and finish off, hide the remaining yarn.
When crocheting the rounds, the increases should align, creating a spiral pattern in the work. Highlight this by running your nail or finger over it, referring to images 28 and 29.

With the blush, make rosy cheeks for Taylor; you can also apply a little on the nose.
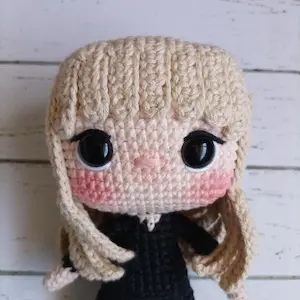
Congratulations! You did it! The Taylor Swift Doll Crochet Pattern is complete. Thank you for your support! I hope you enjoyed crafting the Amigurumilandia's patterns.


Taylor Swift Crochet Pattern PDF Version
Unlock the full potential of your crafting journey with the Taylor Swift Crochet Pattern PDF Version, offering convenience and accessibility for your crochet projects.-
Ad-free Experience: Enjoy a distraction-free crafting session with our PDF version, free from the clutter of advertisements commonly found on webpages.
-
Offline Access: Access your pattern anytime, anywhere, even without internet connection, allowing you to craft on-the-go without interruptions.
-
Printable Format: Easily print the pattern for quick reference or mark up your progress directly on the document, enhancing your crafting experience.
-
Lifetime Ownership: Secure your pattern for a one-time payment, ensuring lifetime access without worrying about subscription fees or recurring charges.
-
Dedicated Support: Receive personalized assistance from Amigurumilandia's support team for any access issues or pattern-related inquiries, ensuring a seamless crafting experience.
This might interest you
Share your creations with us!
Send us pictures of your creations and we’ll provide you with our professional opinion!
We value your opinion
Send us a suggestion or comment to amigurumilandia1@gmail.com
© 2024 AmigurumiLandia
All rights reserved
2 Responses
Have been reading through the above pattern before deciding about purchase and notice there is nothing about crocheting the BODY. Will that information be in the PDF pattern. Do not want to buy a pattern with nothing about making the body
Hello. Thank you for this pattern.
I’ve started trying to make the head, however in row 3, if I follow your instructions I come to 20 stitches with 1 left unworked and you have calculated 24 stitches.
What am I missing? Thank you 😊