Search
Close this search box.

Amigurumilandia PATTERNS

Free patterns for all tastes

Free Naruto Crochet Pattern

April 30th, 2024

Free Naruto Crochet Pattern

Designer: @lhylaranha

Step into the captivating world of crochet and immerse yourself in Japanese pop culture with our latest creation: the Free Naruto Crochet Pattern in amigurumi form, skillfully crafted by @lhylaranha. Standing at a proud 18 cm tall and offering a moderate difficulty level, this project beckons you to bring to life the daring ninja from the Hidden Leaf Village. Meticulously chosen yarn colors perfectly capture Naruto’s essence, from his sun-kissed complexion to the iconic orange hue of his outfit, the white that highlights his determined gaze, and the vibrant yellow that mirrors his boundless energy. Our complimentary pattern presents an exciting opportunity to recreate this charismatic character with each carefully executed stitch. Naruto, celebrated for his unwavering resolve, deep bonds of friendship, and relentless pursuit of becoming the Hokage, can now grace your amigurumi collection as an endearing miniature. This endeavor not only challenges your crochet skills but also allows you to pay homage to one of manga and anime’s most beloved icons. Naruto Uzumaki, with his signature headband and indomitable spirit, serves as a powerful symbol of perseverance, friendship, and the pursuit of dreams in the face of adversity.
As you embark on this crochet journey, you join a vibrant community of enthusiasts who celebrate the artistry and creativity of amigurumi. Delve deeper into the rich tapestry of Japanese animation and explore other beloved characters and manga titles that have captured the hearts of fans worldwide. From the timeless classics like Dragon Ball and Sailor Moon to modern hits like My Hero Academia and Attack on Titan, the world of anime offers endless inspiration for crochet enthusiasts seeking their next project.

With our Free Naruto Crochet Pattern in English, you not only gain access to an engaging and fulfilling crafting experience but also become part of a global community united by their love for crochet, anime, and all things kawaii. Join us as we celebrate creativity, friendship, and the magic of bringing beloved characters to life, one stitch at a time!

¡Let's get started!

Marterials
  • Cotton yarn color: One color for skin, orange, white, yellow, black.
  • Black embroidery thread.
  • White felt fabric.
  • 12mm safety eyes.
  • 2.00mm crochet hook.
  • Polyfill or synthetic cotton.
  • Yarn needle.
  • Scissors.
  • Row marker.
  • Pins.
Abbreviations

MR: magic ring
Ch: chain
sl st: slip stitch
sc: single crochet
hdc: half double crochet
dc: double crochet
tr: treble crochet
inc: increase of sc
inc-hdc: increase of hdc
inc-tr: increase of tr
inc3…: triple increase (three sts in one)
dec: decrease
dec3: triple decrease
…: work everything within the asterisks in the same stitch.
BLO: back loop only
FLO: front loop only
Rnd: round
Rnd: row
CyV: chain and turn the work.

Tips for crocheting Amigurumis 😉

  1. 🧵 Choose Quality Materials: The quality of your materials directly impacts the final result. Opt for soft and durable yarns, and needles that suit your knitting style. Remember, your amigurumis deserve the best!
  2. 📏 Know Your Gauge: Before diving into the project, take time to understand your knitting tension. Making a small test square will help you adjust the size and achieve a perfect amigurumi.
  3. 📖 Dive into the Pattern: Before you start knitting, carefully read through the entire pattern. Familiarize yourself with each step and make sure you understand all the instructions. This prior knowledge will make you feel more confident during the process.
  4. 📍 Use Stitch Markers: Marking the beginning of each round with a stitch marker is key. This not only helps you follow the pattern more easily but also prevents errors and confusion.
  5. 🌈 Explore with Colors: The color palette is your canvas! Don’t be afraid to experiment and play with unexpected combinations. Colorful amigurumis are more fun and expressive.
  6. 🧼 Block Your Creations with Care: After completing your amigurumi, blocking is essential. This process smooths out the details and defines the shape, giving a professional touch to your creations. Remember, crochet is more than a hobby; it’s an art form. Enjoy every stitch and create magic with your own hands! 💖✨ Happy knitting! 🌸🌟
Body

We’ll start with the legs.
FIRST LEG:
With black yarn, chain 6 and from the second chain from the hook, work:
Rnd 1: 4 sc, 3 inc, -then on the other end of the chains- 3 sc, 1 inc (12)
Rnd 2: 1 inc, 3 sc, 3 inc, 3 sc, 2 inc (18)
The next round will be worked in the BLO, considering the color changes.
Rnd 3: BLO 5 sc, change to skin color and work 6 sc, change to black and work 7 sc (18)
Rnd 4: 5 sc, change to skin color and work 6 sc, change to black and work 7 sc (18)
Continue with black color.
Rnd 5: 2 sc, 6 dec, 4 sc (12)
Rnd 6: 2 sc, 3 dec, 4 sc (9)
Rnd 7: 9 sc (9)
Change to skin color.
Rnd 8: BLO 9 sc (9)
Rnd 9: (2 sc, 1 inc) x 3 (12)
Change to orange color.
Rnd 10: BLO 12 sc (12)
Rnd 11 – Rnd 16: 12 sc (9)
Cut the yarn leaving a small tail that you will weave in later when joining the legs.

SECOND LEG AND BODY:
Crochet the second leg in the same way as the first one, but with a color change to make the white stripe.
Crochet as usual until Rnd 13, then:
Change to white color.
Rnd 14 – Rnd 15: 12 sc (12)
Change to orange color.
Rnd 16: 12 sc (12)
This time, DO NOT cut the yarn and crochet 3 additional sc, it’s time to join the legs. Attach the second leg to the first one counting two stitches back from the sc where we ended the first leg (in that sc, we’ll work the first sc of Rnd 17). Refer to the pictures for guidance.

Image 1
Image 2

Continue with orange color:
Rnd 17: 12 sc on the first leg, 12 sc on the second leg (24)
Rnd 18 – Rnd 19: 24 sc (24)
Change to black color.
Rnd 20: BLO 24 sc (24)
Change to orange color:
Rnd 21 – Rnd 25: 11 sc, change to black and crochet 2 sc, change to orange and crochet 11 sc (24)
Change to black color.
Rnd 26: 24 sc (24)
Rnd 27: 1 sc, 1 dec, (2 sc, 1 dec) x 5, 2 sc (18)
Rnd 28: 3 sc, 1 dec, 8 sc, 1 dec, 3 sc (16)
Cut the yarn leaving a long tail for sewing the body to the head.

SHOE EDGE:
Attach black yarn to the FLO of Rnd 8 that are free and make 9 sl st.

Image 3

PANTS EDGE:
Attach black yarn to the FLO of Rnd 10 that are free and make 12 sl st.

JACKET EDGE:
Attach black yarn to the FLO of Rnd 20 that are free and make 24 sl st.

Image 4
Head

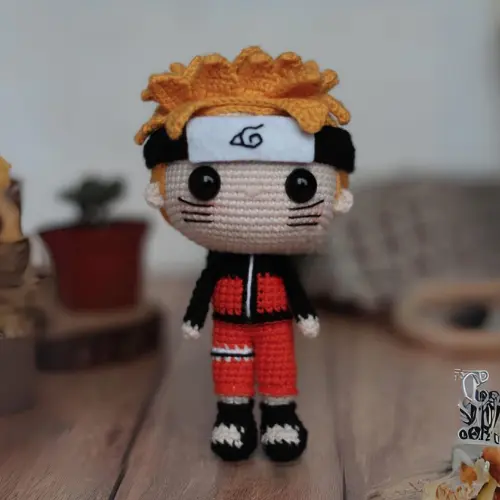
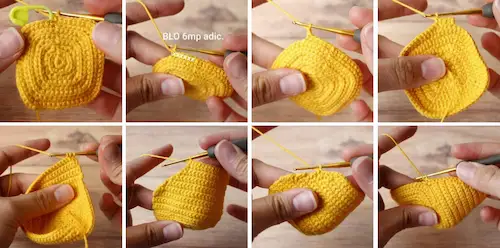
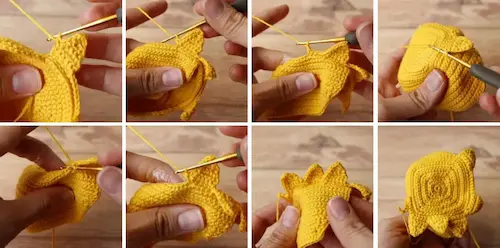
The head of Naruto is cube-shaped, so we will start by crocheting a square base.
With the light skin color:
Rnd 1: MR 8 sc (8)
Rnd 2: 8 inc (16)
Rnd 3: (2 inc, 2 sc) x 4 (24)
Rnd 4: 1 sc, 2 inc, (4 sc, 2 inc) x 3, 3 sc (32)
Rnd 5: 2 sc, 2 inc, (6 sc, 2 inc) x 3, 4 sc (40)
Rnd 6: 3 sc, 2 inc, (8 sc, 2 inc) x 3, 5 sc (48)
Rnd 7: 4 sc, 2 inc, (10 sc, 2 inc) x 3, 6 sc (56)
Rnd 8: 5 sc, 2 inc, (12 sc, 2 inc) x 3, 7 sc (64)
Rnd 9: 6 sc, 2 inc, (14 sc, 2 inc) x 3, 8 sc (72)
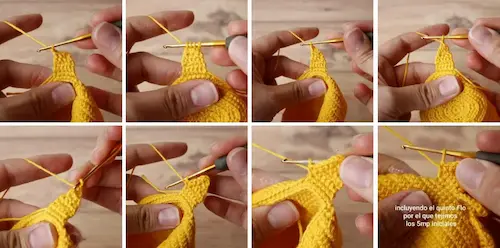
Rnd 10 – Rnd 25: 72 sc (72)

*PLACE THE SAFETY EYES ON Rnd 15 ON ONE OF THE FACES OF THE CUBE WITH 12 SC APART, WELL CENTERED.
Rnd 26: 6 sc, 2 dec, (14 sc, 2 dec) x 3, 8 sc (64)
Rnd 27: 5 sc, 2 dec, (12 sc, 2 dec) x 3, 7 sc (56)
Rnd 28: 4 sc, 2 dec, (10 sc, 2 dec) x 3, 6 sc (48)
Rnd 29: 3 sc, 2 dec, (8 sc, 2 dec) x 3, 5 sc (40)
Rnd 30: 2 sc, 2 dec, (6 sc, 2 dec) x 3, 4 sc (32)
Rnd 31: 1 sc, 2 dec, (4 sc, 2 dec) x 3, 3 sc (24)
Rnd 32: (2 dec, 2 sc) x 4 (16)
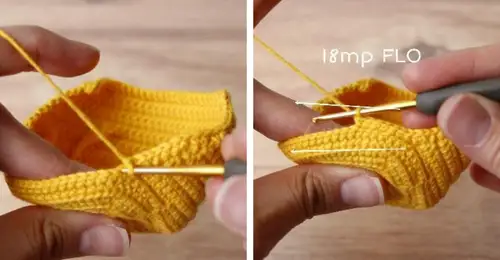
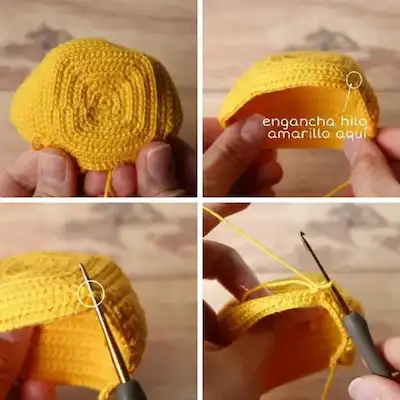
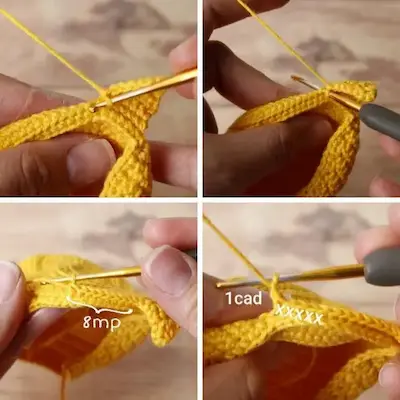
Rnd 33: 8 dec (8). Cut the thread, leaving a not-so-long tail. Close the 8 stitches with a needle and hide the tail inside the head. The closing of the stitches should be facing upwards; sew the body onto Round 2 of the head.

Image 5

*EYE PLACEMENT:
In the first photo below, the pins are placed on Rnd 15 with 12 sc apart, this is where we will place the 12mm safety eyes, once the eyes are secured, it will not look like the second photo.
Another way to accurately position the eyes is: considering that we made increases in a square shape, identify the last round of increases, in this case, it’s Rnd 9, choose the increases from one of the corners and place a pin one stitch after the increase as shown in the photo, and in the same direction as the pin, go up to Rnd 15. The second pin will be placed with a separation of 12 sc in line with the pin from Rnd 15. Refer to the following photos.

Image 6
Arms (make 2)

With the skin color:
Rnd 1: MR 6 sc (6)
Rnd 2: 6 sc (6)
Switch to black color:
Rnd 3 – Rnd 10: 6 sc (6) (8 rounds)
Cut the yarn leaving a long tail to sew the arms to the body.
If you want to articulate Naruto’s arms, pass a galvanized wire over Rnd 27 of the body; the measurement of this depends on the size of the arms. Fold the ends of the wire to prevent it from slipping through the stitches (besides this, I put a little electrical tape) and place the arms to sew them later

Image 7
Hair

The hair of Naruto consists of two parts, a base and the tips of the hair. It’s simple to crochet; to understand it better, refer to the photos.

BASE
Using yellow color.
Rnd 1: MR 8 sc (8)
Rnd 2: 8 inc (16)
Rnd 3: BLO (2 inc, 2 sc) x 4 (24)
Rnd 4: 1 sc, 2 inc, (4 sc, 2 inc) x 3, 3 sc (32)
Rnd 5: BLO 2 sc, 2 inc, (6 sc, 2 inc) x 3, 4 sc (40)
Rnd 6: 3 sc, 2 inc, (8 sc, 2 inc) x 3, 5 sc (48)
Rnd 7: BLO 4 sc, 2 inc, (10 sc, 2 inc) x 3, 6 sc (56)
Rnd 8: 5 sc, 2 inc, (12 sc, 2 inc) x 3, 7 sc (64)
Rnd 9: BLO 64 sc (64)
Rnd 10: 64 sc (64)
From this point, we’ll stop crocheting in a spiral to switch to crocheting in rows. Whenever you finish a row, make a chain and turn the work. Refer to the photos.
CROCHET BLO 6 additional sc (through the back loop) in Rnd 12, CyV.
Row 11 – Row 15: 46 sc (46) (5 rows)
Row 16: 1 dec, 42 sc, 1 dec, CyV (44)
Row 17: 1 dec, 40 sc, 1 dec, CyV (42)
Row 18: 1 dec, 38 sc, 1 dec, CyV (40)
Row 19: 1 dec, 36 sc, 1 dec, CyV (38)
Row 20: 1 dec, 34 sc, 1 dec, CyV (36)
Row 21: 1 dec, 32 sc, 1 dec, CyV (34)
Row 22: 1 dec, 30 sc, 1 dec, CyV (32)
Row 23: 1 dec, 28 sc, 1 dec, CyV (30)
Row 24: 1 dec, 26 sc, 1 dec, CyV (28)
Row 22 – Row 25: 28 sc, CyV (28) (4 rows)
DO NOT cut the yarn and crochet 19 or 20 single crochet stitches along the side (refer to the photos). This step is quite intuitive as it’s 1 sc per row

Image 8

You’ve reached the front part of the hair, crochet: BLO 18 sc.
For all the front loops that we’re leaving unworked, we’ll make the hair tips.

Image 9

After crocheting across the front part, continue crocheting 19 or 20 sc down the side.
Cut the yarn, leaving a long tail to sew the hair to Naruto’s head.

Image 10

TIPS:
Attach yellow yarn to the first front loop of the 18 single crochets that make up the forehead, as shown in the photo. Once you locate yourself there, you will begin working through all the front loops we left unworked when crocheting the base; the hair is made up of tips.

Image 11

The tips of Naruto’s hair are crocheted ALL in the same way.
Below, I’ll give you the pattern for the tip, then I’ll tell you the order of the tips:
Rnd 1: 5sc, chain and turn,
Rnd 2: 5sc, chain and turn,
Rnd 3: 5sc, chain and turn,
Rnd 4: 1dec, 1sc, 1dec, chain and turn,
Rnd 5: 3sc, chain and turn,
Rnd 6: 1 triple decrease, chain and turn,
Rnd 7: 1sc
Then, go down to the base by crocheting 6sc down the side of the tip we just crocheted (1sc per row including the fifth front loop through which we worked the initial 5sc). Refer to the pictures.

Image 12
Image 13

THAT WAS THE PATTERN, ALL THE TIPS ARE CROCHETED THE SAME WAY.
Once you have attached the yarn to the front loop I indicated, crochet:
1 TIP (which is the one we already crocheted), 8sc, 34 TIPS in a row.

Image 14

Do not skip any front loops, the tips are crocheted continuously except for tip 1 and 2, which have an 8sc separation. All the others are continuous; you go down the side of one and immediately start another tip in the next front loops. Refer to the pictures.

Image 15

You will go through all the front loops you left unworked in the base; these front loops will serve as a guide and are like a spiral. When you reach the center is when you’ll be done.
Sew the hair using the long tail you left at the end of the base.

Image 16
Ears (make 2)

Make two identical ones
Using the skin color:
In a Magic Ring (MR), crochet 6 half double crochets (hdc), then pull tight the ring and cut the yarn, leaving a strand for sewing it to Naruto’s face.
Place them at eye level (from the middle downwards), 7 hdc backwards

Ninja Headband

Using black color
Crochet 101 chains, starting from the second chain from the hook:
Rnd 1 – Rnd 2: 20 sc, 60 hdc, 20 sc, Ch 1 and turn (100) (2 rounds)
Rnd 3: 20 sc, 60 hdc, 20 sc (100)
Cut the yarn leaving a small tail, weave in the remaining ends with a needle.

For the symbol, you will need a piece of felt fabric in white color.
Using thin black thread, embroider the shape onto the fabric and then cut it to fit the size of your ninja headband.
Next, glue the felt fabric onto the headband using cold silicone or your preferred adhesive.
Tie the headband onto your Naruto by making a knot at the back of the head.

Image 17
Finishing
  • Embroider with thin black thread the marks on Naruto’s cheeks.
  • Embroider with white thread the line of the jacket.
  • Embroider with black thread the middle of the white stripe you crocheted on the leg and attach a small rectangle of black felt fabric or felt to the side of what you just embroidered.
  • With yellow thread, embroider the sideburns from the middle of the ear upward.
  • Add a bit of blush to Naruto’s cheeks to give them a softer touch.
Image 18

Congratulations! You did it! The Naruto pattern is complete. Thank you for your support! I hope you enjoyed crafting the Amigurumilandia's patterns.

This might interest you

Bella Princess Amigurumi Free Pattern

Bella

Free| Unlimited Access

Size: 18cm| Nivel: Advanced

Free Crochet Rapunzel Doll Pattern

Rapunzel

Free| Unlimited Access

Size: 13cm| Nivel: Basic

Angelica Pickles by Rugrats Free Crochet Pattern

Angelica Pickles

Free| Unlimited Access

Size: 20cm| Nivel: Basic

Tommy Pickles

Free| Unlimited Access

Size: 17cm| Nivel: Basic

Leave a Reply

Your email address will not be published. Required fields are marked *

Share your creations with us!

Send us pictures of your creations and we’ll provide you with our professional opinion!

We value your opinion

Send us a suggestion or comment to amigurumilandia1@gmail.com

© 2024 AmigurumiLandia

All rights reserved

error: The content of this page is protected