Search
Close this search box.

Amigurumilandia PATTERNS

Free patterns for all tastes

Cinderella Amigurumi Crochet Pattern Free Printable

June 14th, 2024

Cinderella Amigurumi Crochet Pattern Free Printable

Designer: @azuliecroche

Dive into the enchanting world of fairy tales with our delightful Cinderella amigurumi crochet pattern free printable, crafted by @azuliecroche. Standing at a graceful 17.5 cm and featuring a medium difficulty level, this project is tailor-made for crochet enthusiasts eager to bring to life one of Disney’s most cherished characters. The Cinderella doll, with her poise and elegance, embodies the timeless allure of classic princesses, and our amigurumi rendition beautifully captures her essence. From her iconic blue gown to her shimmering glass slippers, every detail of this crocheted Cinderella exudes charm and magic.
Crocheting the Cinderella amigurumi isn’t just about creating a doll—it’s about immersing yourself in the whimsical world of fairy tales. With her vibrant yellow dress and delicate blue accents, this amigurumi doll is perfect for adding a touch of enchantment to your home decor, gifting to a fellow Disney aficionado, or simply cherishing as part of your Disney princess amigurumi patterns free collection. With a medium difficulty level, this project offers an exciting opportunity to hone your crochet skills while embarking on a delightful journey through Cinderella’s story.
Whether you’re a seasoned crocheter or a novice, our Cinderella crochet pattern provides detailed instructions and step-by-step photographs to guide you through the creation process with ease. From working in the round to crafting intricate costume details, every stitch brings you closer to capturing the magic of Cinderella’s world.
Add a touch of fairy tale charm to your life with our Cinderella amigurumi in English. Join us on a journey filled with creativity, imagination, and the timeless allure of Disney princesses. With every stitch, you’ll be one step closer to creating a cherished heirloom that celebrates the enduring magic of Cinderella.

¡Let's get started!

Marterials
  • Yarn in the following colors: Light Blue, Skin, Blue, White, and Yellow
  • 12 mm Safety Eyes
  • 2.0 mm Crochet Hook
  • Tapestry Needle
  • Scissors
  • Stuffing
  • Silicone Glue
  • 2 Buttons, approximately 1.5 cm each
  • 2 Mini Pearls
  • White Sewing Thread or thread matching your pearl color.
Abbreviations

Ch: chain
MR: magic ring
Sc: single crochet
Sl st: slip stitch
Inc: increase
Dec: decrease
BLO: back loop only
FLO: front loop only

Some additional tips:
  • The head was designed to be movable, it can be left loose or fixed with thread according to the ARTICULATED HEAD video below.
  • I used buttons on the feet. You can use rigid plastic instead.
  • If you prefer, you can place two small marbles to add weight and help the piece stand upright.

Tips for crocheting Amigurumis 😉

  1. 🧵 Choose Quality Materials: The quality of your materials directly impacts the final result. Opt for soft and durable yarns, and needles that suit your knitting style. Remember, your amigurumis deserve the best!
  2. 📏 Know Your Gauge: Before diving into the project, take time to understand your knitting tension. Making a small test square will help you adjust the size and achieve a perfect amigurumi.
  3. 📖 Dive into the Pattern: Before you start knitting, carefully read through the entire pattern. Familiarize yourself with each step and make sure you understand all the instructions. This prior knowledge will make you feel more confident during the process.
  4. 📍 Use Stitch Markers: Marking the beginning of each round with a stitch marker is key. This not only helps you follow the pattern more easily but also prevents errors and confusion.
  5. 🌈 Explore with Colors: The color palette is your canvas! Don’t be afraid to experiment and play with unexpected combinations. Colorful amigurumis are more fun and expressive.
  6. 🧼 Block Your Creations with Care: After completing your amigurumi, blocking is essential. This process smooths out the details and defines the shape, giving a professional touch to your creations. Remember, crochet is more than a hobby; it’s an art form. Enjoy every stitch and create magic with your own hands! 💖✨ Happy knitting! 🌸🌟
Head

With skin color yarn,
Rnd 1: 8 sc in the magic ring (8)
Rnd 2: Inc in each st around (16)
Rnd 3: (2 inc, 2 sc) 4 times (24)
Rnd 4: 1 sc, 2 inc, (4 sc, 2 inc) 3 times, 3 sc (32)
Rnd 5: 2 sc, 2 inc, (6 sc, 2 inc) 3 times, 4 sc (40)
Rnd 6: 3 sc, 2 inc, (8 sc, 2 inc) 3 times, 5 sc (48)
Rnd 7: 4 sc, 2 inc, (10 sc, 2 inc) 3 times, 6 sc (56)
Rnd 8: 5 sc, 2 inc, (12 sc, 2 inc) 3 times, 7 sc (64)
Rnd 9: 6 sc, 2 inc, (14 sc, 2 inc) 3 times, 8 sc (72)
Rnds 10-23: 72 sc (72) – 14 rounds
Rnd 24: 8 sc, 2 dec, (14 sc, 2 dec) 3 times, 6 sc (64)
Rnd 25: 7 sc, 2 dec, (12 sc, 2 dec) 3 times, 5 sc (56)

Place the eyes between rounds 18 and 19 with 11 sc visible between them.
Stuff as you crochet. Pay attention to the corners to maintain the square shape of the head.
Rnd 26: 6 sc, 2 dec, (10 sc, 2 dec) 3 times, 4 sc (48)
Rnd 27: 5 sc, 2 dec, (8 sc, 2 dec) 3 times, 3 sc (40)
Rnd 28: 4 sc, 2 dec, (6 sc, 2 dec) 3 times, 2 sc (32)
Rnd 29: 3 sc, 2 dec, (4 sc, 2 dec) 3 times, 1 sc (24)
Rnd 30: (2 sc, 2 dec) 4 times (16)
Rnds 31-36: 16 sc (16) – 6 rounds
Finish with sl st. Cut and fasten off the yarn.
Place this tube inside the head.
Edge the nose in round 19.
Edge the eyebrows with brown yarn diagonally, 1 round above the eyes, 5 sc wide.
With pink yarn, edge the cheeks in round 20, at the corner of the eyes with 3 sc wide.

Image 1
Hair

With yellow yarn,
Rnd 1: 8 sc in the magic ring (8)
Rnd 2: Inc in each st around (16)
Rnd 3: (2 inc, 2 sc) 4 times (24)
Rnd 4: 1 sc, 2 inc, (4 sc, 2 inc) 3 times, 3 sc (32)
Rnd 5: 2 sc, 2 inc, (6 sc, 2 inc) 3 times, 4 sc (40)
Rnd 6: 3 sc, 2 inc, (8 sc, 2 inc) 3 times, 5 sc (48)
Rnd 7: 4 sc, 2 inc, (10 sc, 2 inc) 3 times, 6 sc (56)
Rnd 8: 5 sc, 2 inc, (12 sc, 2 inc) 3 times, 7 sc (64)
Rnd 9: 6 sc, 2 inc, (14 sc, 2 inc) 3 times, 8 sc (72)
Rnds 10-12: 72 sc (72) – 3 rounds

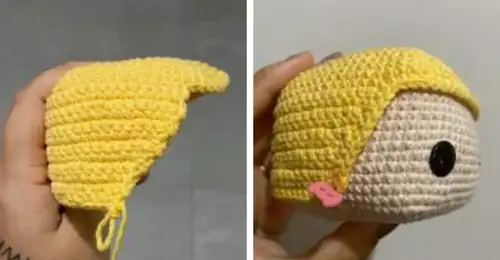
Crochet 6 more sc, ch 1 and turn.
Now we will work in flat crochet, in rows back and forth.
Rnds 13-14: 48 sc (48) – ch, turn
Rnd 15: Dec, 47 sc (47) – ch, turn
Rnd 16: Dec, 46 sc (46) – ch, turn
Rnd 17: Dec, 42 sc, dec (44) – ch, turn
Rnd 18: Dec, 40 sc, dec (42) – ch, turn
Rnd 19: Dec, 38 sc, dec (40) – ch, turn
Rnds 20-22: 40 sc (40)
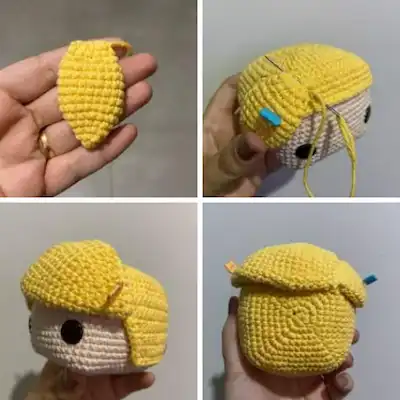
Edge all around the hair with sc, placing 2 sc together at the corners. Finish with sl st, leaving a tail for sewing or glue onto the head.

Image 2
Small bangs

With yellow yarn,
Rnd 1: 6 sc in the magic ring (6)
Rnd 2: 6 sc (6)
Rnd 3: Inc in each st around (12)
Rnd 4: 12 sc (12)
Rnd 5: (1 sc, inc) 6 times (18)
Rnds 6-11: 18 sc (18) – 6 rounds
Rnd 12: (1 sc, dec) 6 times (12)
Rnd 13: 12 sc (12)
No need to place stuffing. Close with 6 sc and leave a long tail for sewing.
Place the bangs on the left side with the tip at the level of row 16, over the eyes.
Sew between rows 7 and 10 and glue the tip.

Large Bangs

With yellow yarn,
Rnd 1: 6 sc in the magic ring (6)
Rnd 2: 6 sc (6)
Rnd 3: Inc in each st around (12)
Rnd 4: 12 sc (12)
Rnd 5: (1 sc, inc) 6 times (18)
Rnds 6-7: 18 sc (18) – 2 rounds
Rnd 8: (2 sc, inc) 6 times (24)
Rnds 9-12: 24 sc (24) – 4 rounds
Rnd 13: (3 sc, inc) 6 times (30)
Rnds 14-17: 30 sc (30) – 4 rounds
Rnd 18: (3 sc, dec) 6 times (24)
Rnd 19: 24 sc (24)
Rnd 20: (2 sc, dec) 6 times (18)
Rnd 21: 18 sc (18)
No need to place stuffing. Close with 8 sc and leave a long tail for sewing.
Place the bangs on the right side with the tip at the level of row 16, over the eyes. Sew between rows 6 and 12 and glue the tip.

Image 3
Bun

With yellow yarn,
Rnd 1: 8 sc in the magic ring (8)
Rnd 2: Inc in each st around (16)
Rnd 3: (1 sc, inc) 8 times (24)
Rnd 4: (3 sc, inc) 6 times (30)
Rnd 5: 2 sc, inc (4 sc, inc) 5 times, 2 sc (36)
Rnd 6: (5 sc, inc) 6 times (42)
Rnd 7: 3 sc, inc (6 sc, inc) 5 times, 3 sc (48)
Rnds 8-12: 48 sc (48) – 5 rounds
Finish with sl st, leave a long tail, and sew between rounds 2 and 10 of the hair, centralized. Don’t forget to add stuffing.

Image 4
Foot and Legs

With light blue yarn,
Rnd 1: 9 sc in magic ring (9)
Rnd 2: Inc in each st around (18)
Rnd 3: 18 sc in the back loop only (18)
Rnd 4-5: 18 sc (18) – 2 rounds
Rnd 6: 3 sc, 6 dec, 3 sc (12)

Switch to skin color yarn
Crochet 12 sc in the back loop and do not count this round.
Rnd 7: 12 sc in the back loop (12)
Rnd 8: 12 sc (12)
Rnd 9: (3 sc, inc) 3 times (15)
Rnd 10: 15 sc (15)

Switch color to light blue
Rnd 11: (4 sc, inc) 3 times (18)
Finish with sl st. Cut the yarn.
Repeat the process to make the second leg.

Legs assembly

Insert the light blue yarn into the tenth single crochet of one leg and join it with a slip stitch in the tenth single crochet of the other leg.
Pay attention to the position of the feet; they should be turned inward, and the rounds should start at the back of the body.
Add stuffing as you crochet the piece.
Rnd 12: 18 sc in each leg (36)
Rnd 13-15: 36 sc (36) – (3 rounds)

Image 5
Body

Switch to blue color
Make 36 slip stitches in the back loop only, and do not count this round.
Rnd 16: 36 single crochet in the back loop only (36)
Rnd 17-18: 36 single crochet (36) – 2 rounds
Rnd 19: (4 sc, dec) 6 times (30)
Rnd 20: 30 single crochet (30)
Switch to skin color.
Rnd 21: 30 single crochet in the back loop only (30)
Rnd 22: (3 sc, dec) 6 times (24)
Rnd 23: (2 sc, dec) 6 times (18)
Rnd 24: (1 sc, dec) 6 times (12)
Rnd 25-30: 12 single crochet (12) – 6 rounds
Rnd 31: Decrease around (6)

Skirt

Insert a new blue yarn into the loops of round 16 of the body and do the following:
Rnd 1: (5 sc, inc) 6 times (42)
Rnd 2: (FLO inc, FLO 2 sc, FLO inc, BLO 1 sc, 1 ch, BLO 1 sc) 7 times (63)
Rnd 3: (FLO 6 sc, BLO 1 sc, skip 1 ch, BLO 1 sc) 7 times (56)
Rnd 4: (FLO inc, FLO 4 sc, FLO inc, BLO 1 sc, 1 ch, BLO 1 sc) 7 times (77)
Rnd 5: (FLO 8 sc, BLO 1 sc, skip 1 ch, BLO 1 sc) 7 times (70)
Rnd 6: (FLO 8 sc, BLO 1 sc, 1 ch, BLO 1 sc) 7 times (77)
Rnd 7: (FLO 8 sc, BLO 1 sc, skip 1 ch, BLO 1 sc) 7 times (70)
Rnd 8: (FLO 8 sc, BLO 1 sc, 1 ch, BLO 1 sc) 7 times (77)
Rnd 9: (FLO 8 sc, BLO 1 sc, skip 1 ch, BLO 1 sc) 7 times (70)
Rnd 10: (FLO 8 sc, BLO 1 sc, 1 ch, BLO 1 sc) 7 times (77)
Rnd 11: (FLO 8 sc, BLO 1 sc, skip 1 ch, BLO 1 sc) 7 times (70)
Rnd 12: (FLO 8 sc, BLO 2 sc) 7 times (70)
Finish this part with a slip stitch.
Insert a white yarn into round 12 in the opposite direction, with the legs up, and make 70 slip stitches.
With black yarn, make the collar by sewing some stitches between rounds 22 and 23 of the body.

Image 6
Arms (make 2)

With light blue yarn,
Rnd 1: 7 sc in the magic ring (7)
Rnd 2 – 8: 7 sc (7) – 7 rounds
Switch to light blue yarn.
Make 7 slip stitches in the back loop and do not count this round.
Rnd 9 – 11: 7 sc (7) – 3 rounds
No need to stuff.
Close with 3 sc and leave a long tail to sew onto round 21 of the body.

Image 7
Neckline

Insert a patina thread into the first loop of round 21 of the body and make: 7 sc, 6 chains over the arm, 11 sc, 6 chains over the other arm, 4 sc.
Finish with a slip stitch and cut the yarn. There should be 4 free loops under each arm.

Image 8
Crown

To make the headband using a knitting spool with a crochet hook, you should watch this video tutorial. If you have a knitting spool machine, you can also use it. The size should be adjusted from one ear to the other. Leave a long tail and sew only the ends, then glue the center near the fringe so the headband is visible in your photos.

Ears

Using the Itaparica yarn, make 5 single crochets inside the magic ring. Leave a long tail and sew the ears between rows 18 and 20 of the head, with a distance of 6 single crochets between the eyes. Using light-colored sewing thread, sew the mini pearls onto the ears.

Image 9

Congratulations! You did it! The Cinderella pattern is complete. Thank you for your support! I hope you enjoyed crafting the Amigurumilandia's patterns.

This might interest you

Bella Princess Amigurumi Free Pattern

Bella

Free| Unlimited Access

Size: 18cm| Nivel: Advanced

Lionel Messi Amigurumi Free Pattern

Lionel Messi

Free| Unlimited Access

Size: 13cm| Nivel: Medium

Goku Amigurumi Free Pattern

Goku

Free| Unlimited Access

Size: 19cm| Nivel: Medium

Harry Potter Amigurumi Free Pattern

Swan

Free| Unlimited Access

Size: 14cm| Nivel: Advanced

Leave a Reply

Your email address will not be published. Required fields are marked *

Share your creations with us!

Send us pictures of your creations and we’ll provide you with our professional opinion!

We value your opinion

Send us a suggestion or comment to amigurumilandia1@gmail.com

© 2024 AmigurumiLandia

All rights reserved

error: The content of this page is protected