
Designer: @eduamigurumis
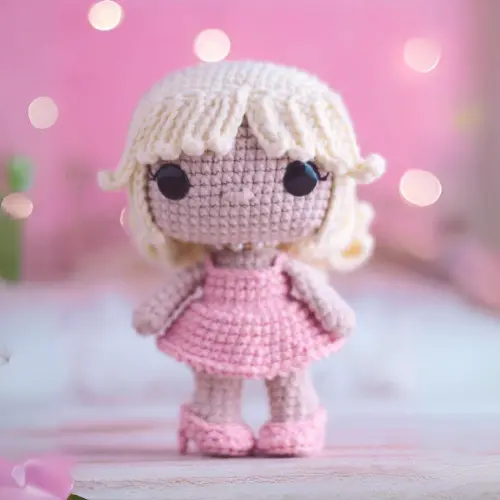
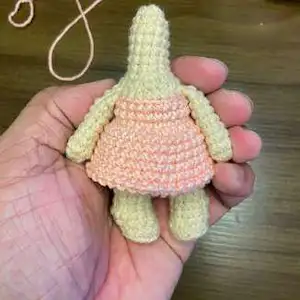
Welcome to Amigurumilandia! Here you’ll find everything you need to create your own crochet Barbie doll (project by: @eduamigurumis), a doll that has been a cultural icon since its creation. Our version of Barbie stands at 15 cm tall and has a medium difficulty level, perfect for those with some crochet experience. Use yellow, pastel pink, and skin-colored yarn to capture the essence of the classic Barbie, with her pastel pink dress and high-heeled shoes, and her loose hair that gives her a touch of simplicity and elegance.
She was created by Ruth Handler and launched by Mattel in 1959. Since then, she has been much more than just a doll: Barbie has represented the evolution of beauty standards and gender roles in society. She has been an astronaut, a doctor, a president, and many other professions, inspiring generations of girls to dream big. Among the most recent and noteworthy is the 2023 movie starring Margot Robbie, where Barbie is expelled from Barbieland and embarks on an adventure in the human world to find true happiness. This movie has rekindled interest in Barbie, presenting her as a symbol of self-acceptance and authenticity.
Our Crochet Barbie Doll captures her classic essence with her pastel pink dress and high-heeled shoes. This project is ideal for fans of all ages, whether as a toy, an ornament for a collection, or a special detail to decorate any space. The Crochet Barbie Doll can be a unique and personalized gift for birthdays, celebrations, or simply to brighten someone’s day.
With our detailed step-by-step tutorial, learn to crochet Barbie easily from the first stitches to the final details, ensuring that every part of your doll is perfectly crafted.
Moreover, crocheting Barbie can be a relaxing and rewarding activity. It’s a perfect gift for any occasion. It’s ideal for girls who love dolls, for Barbie collectors, or simply for someone who appreciates handmade and personalized gifts. Add a special touch to your gift by including additional accessories or customizing Barbie’s dress with different colors and patterns.
In summary, if you’re looking for a crochet project that combines creativity, nostalgia, and the iconic image of Barbie, our pattern is the perfect choice. For those seeking additional benefits, we also offer a premium version of the Pattern available for purchase. This premium version comes in a convenient PDF format, free of ads, and with added advantages such as full support and unlimited access. Get your hands on our Free Barbie Doll Amigurumi Crochet Pattern PDF today at the price of a coffee and start crafting your own Barbie doll masterpiece!. For more information and to find the PDF version, please click here 👈
¡Let's get started!
Marterials
- Cotton yarn in the following colors: Skin, Pastel Pink, and Yellow
- Pins
- Stuffing
- Stitch marker
- Tapestry needle
- 12mm safety eyes
- 2.2mm crochet hook
- 2.5mm crochet hook
- Craft glue
Abbreviations
ch: chain
mr: magic ring
sc: single crochet
dc: double crochet
sl st: slip stitch
hdc: half double crochet
inc: increase
dec: decrease
BLO: back loop only
FLO: front loop only
This pattern takes approximately 5 hours to complete.
Tips for crocheting Amigurumis 😉
- 🧵 Choose Quality Materials: The quality of your materials directly impacts the final result. Opt for soft and durable yarns, and needles that suit your knitting style. Remember, your amigurumis deserve the best!
- 📏 Know Your Gauge: Before diving into the project, take time to understand your knitting tension. Making a small test square will help you adjust the size and achieve a perfect amigurumi.
- 📖 Dive into the Pattern: Before you start knitting, carefully read through the entire pattern. Familiarize yourself with each step and make sure you understand all the instructions. This prior knowledge will make you feel more confident during the process.
- 📍 Use Stitch Markers: Marking the beginning of each round with a stitch marker is key. This not only helps you follow the pattern more easily but also prevents errors and confusion.
- 🌈 Explore with Colors: The color palette is your canvas! Don’t be afraid to experiment and play with unexpected combinations. Colorful amigurumis are more fun and expressive.
- 🧼 Block Your Creations with Care: After completing your amigurumi, blocking is essential. This process smooths out the details and defines the shape, giving a professional touch to your creations. Remember, crochet is more than a hobby; it’s an art form. Enjoy every stitch and create magic with your own hands! 💖✨ Happy knitting! 🌸🌟

Head
Start with the Skin color
Rnd 1: Magic ring with 8 sc [8]
Rnd 2: 8 inc [16]
Rnd 3: 1 sc, 2 inc, (2 sc, 2 inc) x3, 1 sc [24]
Rnd 4: 2 sc, 2 inc, (4 sc, 2 inc) x3, 2 sc [32]
Rnd 5: 3 sc, 2 inc, (6 sc, 2 inc) x3, 3 sc [40]
Rnd 6: 4 sc, 2 inc, (8 sc, 2 inc) x3, 4 sc [48]
Rnd 7: 5 sc, 2 inc, (10 sc, 2 inc) x3, 5 sc [56]
Rnd 8: 6 sc, 2 inc, (12 sc, 2 inc) x3, 6 sc [64]
Rnd 9 to 20: 64 sc [12 rounds of 64 sc]
Rnd 21: 6 sc, 2 dec, (12 sc, 2 dec) x3, 6 sc [56]
Rnd 22: 5 sc, 2 dec, (10 sc, 2 dec) x3, 5 sc [48]
Rnd 23: 4 sc, 2 dec, (2 dec, 8 sc) x3, 4 sc [40]
Insert the 12 mm safety eyes between rounds 15 and 16 with 12 sc between them. Insert the first eye referencing the second pair of increases from round 9, it will be “in the middle of the 2nd increase” (photo 1), then count 12 sc and insert the second eye. (photo 1)
Rnd 24: 3 sc, 2 dec, (6 sc, 2 dec) x3, 3 sc [32]
Rnd 25: 2 sc, 2 dec, (4 sc, 2 dec) x3, 2 sc [24]
Stuff the piece.
Rnd 26: 1 sc, 2 dec, (2 sc, 2 dec) x3, 1 sc [16]
Rnd 27 to 35: 16 sc [9 rounds of 16 sc]
Rnd 28: 8 dec [8]
Close with an inverted magic ring. Embroider the nose between rounds 16 and 17 in a space of 3 sc, centered with the eyes.

Note: Figure 1 indicates where the second pair of increases is located and where the first eye should be inserted, then count 12 sc and insert the second eye (Figure 2). Figure 3 illustrates where both eyes should be positioned.
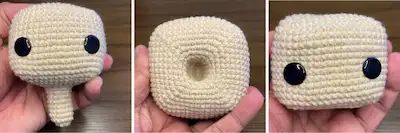
Note: Insert the “pseudo neck” part inside the head, and don’t forget to embroider the nose between rounds 16 and 17, with a distance of 3 sc (Photo 2).
Hair
Start with the Yellow color
Follow the head pattern up to round 6 as usual.
Rnd 7: 5 sc, 2 inc, 10 sc, 2 inc, 10 sc in BLO, 2 inc, 10 sc, 2 inc, 5 sc [56]
Rnd 8: 6 sc, 2 inc, (12 sc, 2 inc) x3, 6 sc [64]
Strands
Rnd 1-3: 1 sl st in the next stitch, chain 10, starting from the 3rd chain, work 8 hdc, skip 1 base sc, and secure with 1 sl st in the next stitch [3 strands]
Rnd 4: Chain 12, starting from the 3rd chain, work 10 hdc, secure with 1 sl st in the next base stitch [1 strand]
Rnd 5-10: Chain 14, starting from the 3rd chain, work 12 hdc, secure with 1 sl st in the next base stitch [6 strands]
Rnd 11-21: Chain 24, starting from the 3rd chain, work 22 hdc, secure with 1 sl st in the next base stitch [11 strands]
Rnd 22-27: Chain 14, starting from the 3rd chain, work 12 hdc, secure with 1 sl st in the next base stitch [6 strands]
Rnd 28: Chain 12, starting from the 3rd chain, work 10 hdc, secure with 1 sl st in the next base stitch [1 strand]
Rnd 29-32: Chain 10, starting from the 3rd chain, work 8 hdc, 1 sl st [4 strands]
Using the loops we left free in round 7, we continue with the hair:
Rnd 33-37: Chain 32, starting from the 3rd chain, work 30 hdc, secure with 1 sl st in the next base stitch. These strands should have the wrong side facing outwards (photo 3) [5 strands of 30 hdc]
The hair should be blocked before being glued or sewn onto the head (photo 3).
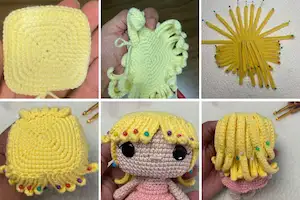
Note: The hair, once finished, must go through blocking before being glued. The first image in box 3 shows the free loops where we should make the strands from rounds 33 to 37.
Legs and Body
LEGS (2 pieces)
Start with the Skin color
Rnd 1: 6 sc in magic ring [6]
Rnd 2: 6 inc [12]
Rnd 3: 12 sc in BLO [12]
Rnd 4: 3 sc, 3 dec, 3 inc [12]
Rnd 5: 12 sc [12]
Rnd 6: 6 sc, 3 dec [9]
Rnd 7: 9 sc [9]
Rnd 8: (2 sc, 1 inc) x3 [12]
Rnd 9 to 10: 12 sc [2 rounds of 12 sc]
Rnd 11: (3 sc, 1 inc) x3 [15]
Stuff the leg, being careful not to deform it.
Finish off the first leg and keep the second one on the hook; we will start crocheting the body from it.
Rnd 1: 6 sc on the second leg and join to the first leg (count 7 to 8 sc after the false sc and join), make 14 more sc on the first leg and 15 sc on the second one [30 sc]
Rnd 2: 30 sc [30]
Rnd 3: (3 sc, 1 dec) x6 [24]
Rnd 4: 24 sc [24]
Change color to Pastel Pink
Rnd 5: 24 sl st in BLO [24]
Rnd 6: 24 sc in BLO [24]
Rnd 7: 24 sc [24]
Rnd 8: 24 sc [24]
Change color to Skin
Rnd 9: 24 sl st in BLO [24]
Stuff the body.
Rnd 10: (2 sc, 1 dec) x6 [18]
Rnd 11: (1 sc, 1 dec) x6 [12]
Rnd 12 to 17: 12 sc [6 rounds of 12 sc]
Finish stuffing.
Rnd 18: 6 dec [6]
Finish with an inverted magic ring.
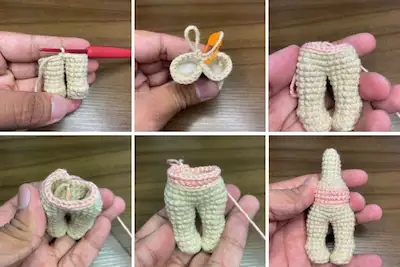
Note: Don’t forget to add the stuffing gradually. Be careful not to put too much stuffing in the little feet so they don’t lose their doll foot shape and don’t make it difficult to put on the shoes later.
Skirt
Start with the Pastel Pink color
Rnd 1: In BLO, using the loops from round 5 of the body, work (1 sc, 1 inc) x12 [36]
Rnd 2 to 4: 36 sc [3 rounds of 36 sc]
Rnd 5: (5 sc, 1 inc) x6 [42]
Rnd 6 to 7: 42 sc [2 rounds of 42 sc]
Rnd 8: (1 sl st, 1 chain) x42
Finish off and weave in the ends.
Arms (make 2)
Start with the Skin color
Rnd 1: Magic ring with 8 sc [8]
Rnd 2-8: 8 sc [7 rounds of 8 sc]
Rnd 9: Fold the piece in half and close with 4 sc [4]
Finish off and leave a long tail for sewing onto the body.
Sew between rounds 8 and 9 on the sides of the body.
Dress straps
Make a slip knot and insert the needle into the first free loop of round 8 of the body. Make slip stitches in the following loops until you reach near the arm. Once there, make 6 chains and passing them over the arm, secure with a slip stitch in the next free loop on the body. Continue making slip stitches, and when you reach the other arm, repeat the same process. Finish with a slip stitch.

Shoes (make 2 pairs)
Start with Pastel Pink color
Rnd 1: 8 sc in magic ring [8]
Rnd 2: 8 inc [16]
Rnd 3: 16 sc in BLO [16]
Rnd 4: 2 sc, 4 dec, 6 sc [12]
Rnd 5: 8 sl st, (1 sc, 1 hdc) in the same stitch, 1 hdc inc, (1 hdc, 1 sc) in the same stitch, 1 sl st, and finish with a false sc [15]
BACK STRAP OF THE SHOE
Rnd 1: Chain up 4 and return making 3 sc, finish off, and sew or glue to the back of the shoe between rounds 4 and 5.
Glue the shoe onto the doll’s feet.
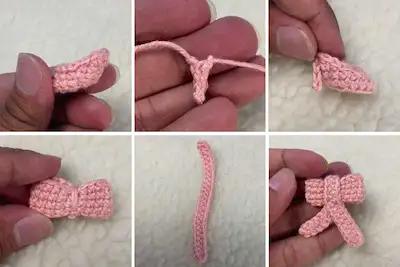
Bow
Start with Pastel Pink color
Rnd 1: Make 18 chains and close in the 1st chain with 1 sc
Rnd 2: Make 18 sc [18]
Rnd 3-4: 18 sc [2 rounds of 18 sc]
Finish with a false sc.
CENTER PART
Rnd 1: Make 24 chains and, starting from the 2nd chain, work 22 sc, 1 triple inc, and on the other side of the chains, make 22 more sc [47]
Fold the bow in half and use this cord of 24 sc to hold it and shape the bow.
Sew or glue the bow to the back of the hair.

Congratulations! You did it! The Free Barbie Doll Amigurumi Crochet Pattern is complete. Thank you for your support! I hope you enjoyed crafting the Amigurumilandia's patterns.
Support us by buying a PDF pattern to keep our free content coming

Barbie Crochet Pattern PDF Version
Unlock the full potential of your crafting journey with the Barbie Crochet Pattern PDF Version, offering convenience and accessibility for your crochet projects.-
Ad-free Experience: Enjoy a distraction-free crafting session with our PDF version, free from the clutter of advertisements commonly found on webpages.
-
Offline Access: Access your pattern anytime, anywhere, even without internet connection, allowing you to craft on-the-go without interruptions.
-
Printable Format: Easily print the pattern for quick reference or mark up your progress directly on the document, enhancing your crafting experience.
-
Lifetime Ownership: Secure your pattern for a one-time payment, ensuring lifetime access without worrying about subscription fees or recurring charges.
-
Dedicated Support: Receive personalized assistance from Amigurumilandia's support team for any access issues or pattern-related inquiries, ensuring a seamless crafting experience.
This might interest you
Share your creations with us!
Send us pictures of your creations and we’ll provide you with our professional opinion!
We value your opinion
Send us a suggestion or comment to amigurumilandia1@gmail.com
© 2024 AmigurumiLandia
All rights reserved