

Designer: @sweetoddityart
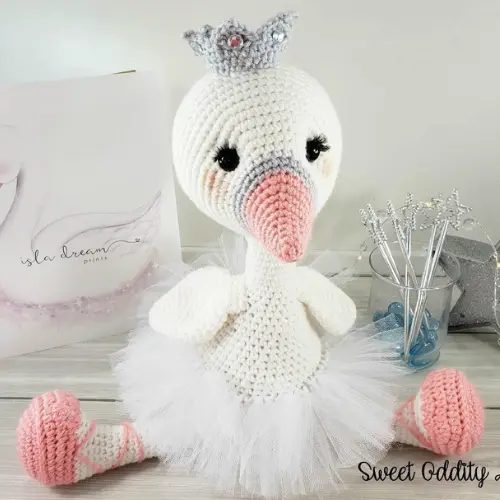
Embark on an enchanting journey into the realm of elegance and grace with our free pattern on how to crochet a swan amigurumi. Created exclusively by @sweetoddityart, this pattern guides you through crafting a stunning swan amigurumi that stands tall at 40cm. This majestic project offers a moderate level of challenge, making it ideal for crochet enthusiasts eager to explore new techniques and create a breathtaking centerpiece. Our white swan captivates with its timeless beauty and refined allure. Adorned with an exquisite white tutu and a regal crown, this swan epitomizes grace and charm. Its ethereal wings and slender neck evoke a sense of regality, while subtle hues of white, pink, and gray infuse it with softness and femininity.
Crocheting this elegant swan is not just a creative endeavor; it’s an immersive experience that invites you to discover the enchanting world of these magnificent creatures. Renowned for their elegance and poise on water, swans are emblematic of grace and serenity, qualities beautifully captured in this amigurumi rendition. With its moderate complexity, this project is perfect for intermediate crocheters seeking a rewarding challenge. Explore techniques such as working in the round and intricate detailing, empowering you to hone your skills and craft a masterpiece.
Begin your crafting odyssey today with our free amigurumi swan pattern, available in Spanish. Immerse yourself in a weaving adventure brimming with beauty and sophistication. With comprehensive instructions and step-by-step visuals, crocheting this swan promises a gratifying journey filled with pride and accomplishment. Let your creativity take flight as you bring this exquisite swan to life, infusing your space with elegance and charm. Start learning how to crochet a swan amigurumi pattern today and transform your crafting experience into a beautiful tale of artistry and grace.
¡Let's get started!
Marterials
- Thread in the following colors: White, Grey, and Pink
- Needle Size: Size D or 3.25mm
- 15mm Safety Eyes
- Scissors
- Sewing Needle
- Stitch Marker
- Fiberfill Stuffing
- White Tulle (optional)
- False Eyelashes (optional)
Abbreviations
MR = Magic Ring
ch = chain
3-inc = 3 sc in the same stitch
BLO = Back Loops Only
sc = single crochet
sl st = slip stitch
dc = double crochet
inc = increase (work 2 sc in the same stitch)
dec = decrease (work a decrease over 2 stitches)
(4 sc, inc) x 6 = repeat what is inside the parentheses 6 times.
40cm from foot to the top of the head using a size 4 weight yarn and a 3.25mm hook
- Do not join rounds unless specified, work in a continuous spiral.
- Use a stitch marker to mark the beginning of each round.
- All stitches are worked in both loops unless otherwise indicated in the pattern.
Tips for crocheting Amigurumis 😉
- 🧵 Choose Quality Materials: The quality of your materials directly impacts the final result. Opt for soft and durable yarns, and needles that suit your knitting style. Remember, your amigurumis deserve the best!
- 📏 Know Your Gauge: Before diving into the project, take time to understand your knitting tension. Making a small test square will help you adjust the size and achieve a perfect amigurumi.
- 📖 Dive into the Pattern: Before you start knitting, carefully read through the entire pattern. Familiarize yourself with each step and make sure you understand all the instructions. This prior knowledge will make you feel more confident during the process.
- 📍 Use Stitch Markers: Marking the beginning of each round with a stitch marker is key. This not only helps you follow the pattern more easily but also prevents errors and confusion.
- 🌈 Explore with Colors: The color palette is your canvas! Don’t be afraid to experiment and play with unexpected combinations. Colorful amigurumis are more fun and expressive.
- 🧼 Block Your Creations with Care: After completing your amigurumi, blocking is essential. This process smooths out the details and defines the shape, giving a professional touch to your creations. Remember, crochet is more than a hobby; it’s an art form. Enjoy every stitch and create magic with your own hands! 💖✨ Happy knitting! 🌸🌟

Head
Let’s start with the head of the swan, working from the front of the nose towards the back of the head. Starting with pink yarn:
Rnd 1: Make 6 sc in a magic ring = 6
Rnd 2: 2 sc, inc x 2, 2 sc = 8
Rnd 3: 3 sc, inc x 2, 3 sc = 10
Rnd 4: 4 sc, inc x 2, 4 sc = 12
Rnd 5: 5 sc, inc x 2, 5 sc = 14
Rnd 6: 6 sc, inc x 2, 6 sc = 16
Rnd 7: 7 sc, inc x 2, 7 sc = 18
Rnd 8: 8 sc, inc x 2, 8 sc = 20
Rnd 9: 9 sc, inc x 2, 9 sc = 22
Rnd 10: 10 sc, inc x 2, 10 sc = 24
Switch to light grey yarn:
Rnd 11: (3 sc, inc) x 6 = 30
Rnd 12: sc in each st around
Switch to white yarn:
Rnd 13: sc in each st around
Work only 6 sc in this round, the last stitch in this round will be the new beginning of rounds from now on.
Rnd 14: (2 sc, inc) x 6, 12 sc = 36
Rnd 15: (3 sc, inc) x 6, 12 sc = 42
Rnd 16: (4 sc, inc) x 6, 12 sc = 48
Rnd 17: (5 sc, inc) x 6, 12 sc = 54
Rnd 18: (6 sc, inc) x 6, 12 sc = 60
Rnd 19: sc in each st around
Place the eyes between rounds 18 and 19, leaving 16 stitches between them. The first eye is placed before the 2nd increase between rounds 18 and 19, the second eye is placed after the 4th increase. If you want the eye sunk, do not place it until round 33.
Rnd 19: (8 sc, dec) x 6 = 54
Rnd 20: sc in each st around
Rnd 21: (7 sc, dec) x 6 = 48
Rnd 22: (6 sc, dec) x 6 = 42
Rnd 23: (5 sc, dec) x 6 = 36
Now for the eyes. Stuff the head firmly. Cut a long piece of yarn and remove the eyes. Place the needle in the holes where the eyes were.
Continuation of the head
Thread the needle and, in a hole next to the eye, go back and forth between the two eye holes. Gently pull the thread after passing through each hole. Do this around 3 times on each side until you achieve the desired look. Refer to the photos for assistance.
Rnd 24: (4 sc, dec) x 6 = 30
Rnd 25: (3 sc, dec) x 6 = 24
Rnd 26: (2 sc, dec) x 6 = 18
Rnd 27: (sc, dec) x 6 = 12
Rnd 28: dec x 6 = 6
Cut the yarn and sew the hole closed.

Body
With white yarn
Rnd 1: Make 6 sc in a magic ring = 6
Rnd 2: Increase in each st around = 12
Rnd 3: (sc, inc) x 6 = 18
Rnd 4: (2 sc, inc) x 6 = 24
Rnd 5: (3 sc, inc) x 6 = 30
Rnd 6: (4 sc, inc) x 6 = 36
Rnd 7: (5 sc, inc) x 6 = 42
Rnd 8: (6 sc, inc) x 6 = 48
Rnd 9: (7 sc, inc) x 6 = 54
Rnd 10: (8 sc, inc) x 6 = 60
Rnd 11: sc in each st around
Rnd 12: (8 sc, dec) x 6 = 54
Rnd 13: sc in each st around
Rnd 14: (7 sc, dec) x 6 = 48
Rnd 15: sc in each st around
Rnd 16: BLO sc in each st around
Rnd 17: (6 sc, dec) x 6 = 42
Rnd 18: sc in each st around
Rnd 19: (5 sc, dec) x 6 = 36
Rnd 20: sc in each st around
Rnd 21: (4 sc, dec) x 6 = 30
Rnd 22: sc in each st around
Rnd 23: (3 sc, dec) x 6 = 24
Rnd 24: sc in each st around
Rnd 25: (2 sc, dec) x 6 = 18
Rnd 26: sc in each st around
Make sure to firmly stuff the neck as you work and leave a long tail for sewing.
Wings (make 2)
With white yarn:
Rnd 1: Make 6 sc in a magic ring = 6
Rnd 2: Increase in each st around = 12
Rnd 3-4: sc in each st around
Rnd 5: (sc, inc) x 6 = 18
Rnd 6: sc in each st around
Rnd 7: (2 sc, inc) x 6 = 24
Rnd 8-9: sc in each st around
Rnd 10: (3 sc, inc) x 6 = 30
Rnd 11-12: sc in each st around
Do not stuff the wings.
Rnd 13: (sc, dec) x 10 = 20
Rnd 14-15: sc in each st around
Rnd 16: Dec x 10 = 10
Rnd 17-18: sc in each st around
Cut the yarn, leaving a long tail for sewing.
Legs (make 2)
With pink yarn
Rnd 1: Increase in the second chain stitch, sc, 6 sc in the last chain stitch, on the other side of the chain: sc, sc, sl st in the first sc = 11
Rnd 2: 1 ch, inc in the same st, 3 sc, inc3, 2 sc, inc3, 3 sc, sc in sl st, sl st in 1 sc = 17
Rnd 3: 1 ch, inc in the same st, 5 sc, inc3, 4 sc, inc3, 5 sc, sc in sl st, sl st in 1 sc = 23
Rnd 4: 1 ch, inc in the same st, 7 sc, inc3, 6 sc, inc3, 7 sc, sc in sl st, sl st in 1 sc = 29
Rnd 5: 1 ch, 2 sc, inc, 7 sc, inc3, 8 sc, inc3, 8 sc, inc, sc in sl st, sl st in 1 sc = 36
Rnd 6: 1 ch, sc around, sc in sl st, sl st in 1st sc = 36
Back Post sc = sc: Insert hook from back to front, right to left around post of indicated st on a previous row. Yarn over and draw up a loop, yarn over and draw through two loops*
Rnd 7: 1 ch, 10 sc, 16 dc, 10 sc, sc in sl st, sl st in 1 sc = 36
Rnd 8: 1 ch, 9 sc, 2 dc, 3 dc tog, 8 dc, 3 dc tog, 2 dc, 9 sc, sc in sl st, sl st in 1 sc = 32
3 dc tog: yarn over, (insert hook in next st, yarn over and draw up a loop) 3 times, yarn over and draw through all 5 loops on hook.
Change to white yarn
Rnd 9: 1 ch, 9 sc, (dc, dec-dc) x 2, 2 dc, (dec-dc, dc) x 2, 9 sc, sc in sl st, sl st in 1 sc = 28
Rnd 10: 1 ch, 8 sc, dec x 6, 8 sc = 22
Do not join anymore, continue in a spiral from now on.
Rnd 11: 6 sc, dec, sc, dec x 3, sc, dec, 6 sc = 18
Rnd 12: (4 sc, dec) x 3 = 15
Rnd 13-15: sc in each st around
Rnd 16: dec, 13 sc = 14
Rnd 17-19: sc in each st around
Rnd 20: dec, 12 sc = 13
Rnd 21-23: sc in each st around
Rnd 24: dec, 11 sc = 12
Rnd 25-27: sc in each st around
Rnd 28: dec, 10 sc = 11
Rnd 29-31: sc in each st around
Rnd 32: dec, 9 sc = 10
Rnd 33-35: sc in each st around
Fasten off and leave a long tail for sewing.
Crown
With gray yarn:
Chain 30
Rnd 1: sl st to join and form a ring, chain 2, dc in each stitch around, sl st to join =
Rnd 2: Repeat round 1
Rnd 3: chain 2, *skip 2, 3 dc in the 3rd stitch, picot stitch, 3 dc in the same stitch, sl st for the next 2 stitches* repeat from * to * around until you have 5 points of the crown
Fasten off and leave a long tail for sewing.
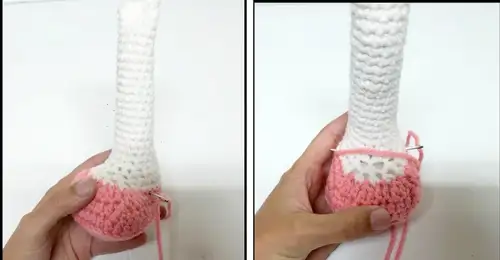
Assembly - Head and Body
- Attach the head and body together for additional support.
- Sew the head to the body.

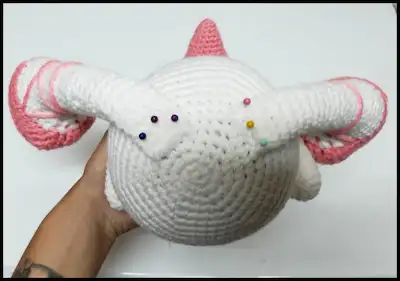
Wings
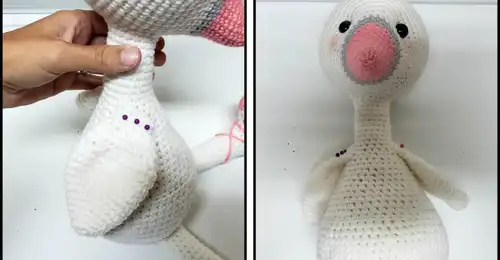
- Attach the wings to the side of the body.
- Sew the wings to the body
Legs
- Embroider some shoe stripes with pink yarn.
- Turn the body upside down with the nose facing away from you.
- Attach the legs to the body and sew them on.
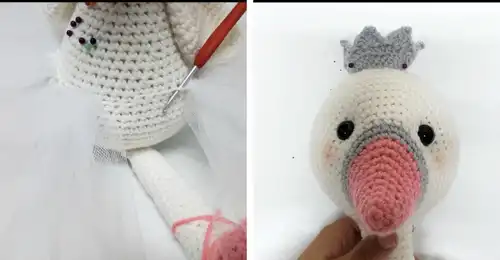
Ornaments
- For the skirt, take some white tulle and cut 48 pieces of 6 inches each.
- Thread the tulle through the loops on the front of row 20 on the body using a crochet hook.
- Once done, cut it to the desired length.
- Place the crown on the head and sew it on. If desired, you can glue some crystals onto the crown.
- Add a bit of blush to the cheeks. Get some false eyelashes from any local pharmacy.
- Take some glue and be careful. Trim the lashes bit by bit to fit the doll’s small eyes. Glue them on and let the glue dry.
Congratulations! You did it! The swan pattern is complete. Thank you for your support! I hope you enjoyed crafting the swan using Amigurumilandia's patterns.
This might interest you
Share your creations with us!
Send us pictures of your creations and we’ll provide you with our professional opinion!
We value your opinion
Send us a suggestion or comment to amigurumilandia1@gmail.com
© 2024 AmigurumiLandia
All rights reserved