Welcome to the wonderful world of crocheted flowers! Today, we are thrilled to introduce the first pattern from our collection: Tulip Crochet Pattern Easy (Project by: @hookokcrochet). Standing tall at 40cm and boasting a beginner-friendly level of difficulty, this Flower pattern crochet is perfect for novices and experts alike. The tulip is an iconic flower known for its elegance and beauty. Originating from Eurasia and cultivated in many parts of the world, this flower has been admired for centuries for its distinctive shape and vibrant colors. In popular culture, tulips symbolize love, passion, and springtime.
Our crochet tulip pattern captures the essence of this iconic flower. Using purple and green yarns, you can recreate the lushness and vitality of a tulip in full bloom. The soft, delicate petals, carefully crafted with love, breathe life into this wonderful creation. But this is no ordinary tulip. Our crocheted version adds a special touch of creativity and craftsmanship. This tulip can become a charming decorative piece for your home, whether as part of a bouquet, in a vase, or as an accent to adorn any space. In addition to the tulip, our collection of step-by-step crochet flowers will feature a wide variety, from roses and sunflowers to lilies and daisies. Each pattern comes with detailed and easy-to-follow instructions, allowing you to explore your creativity and create beautiful crocheted flowers with your own hands. Crocheting flowers is a relaxing and rewarding activity that anyone can enjoy, from beginners to knitting experts. In addition to beautifying your home, these flowers also make excellent handmade gifts for friends and loved ones.
Embark on your journey today with our Stuffed Tulip amigurumi pattern and delve into the wonderful world of easy crocheted flowers. Let the beauty of nature bloom in your hands with our charming creations!
¡Let's get started!
Marterials
Yarn – two-color yarn; purple and green. You can choose your preferred type of yarn for the tulip. Options include cotton or wool yarn.
Crochet Hooks – Size 2.5mm
Scissors
Sewing Needle
Stitch Marker
Iron Wire – 0.4mm
Floral Stem Wire – 16 inches long x 0.08 inches in diameter (40cm x 2mm)
Use a stitch marker to identify the first stitch of each round or row.
Patterns are worked in rounds for the flower part and in rows for the leaf part.
The tulip pattern requires basic crochet stitches such as single crochet (sc), double crochet (dc), slip stitch (sl st), and chains (ch). Familiarize yourself with these stitches before starting.
Adjust the yarn thickness and hook size according to your preference and the desired size of the tulip.
Feel free to customize the colors and yarn options to create unique variations of the tulip.
Weaving in ends as you go will ease the finishing process and give your final project a neater appearance.
Tips for crocheting Amigurumis 😉
🧵 Choose Quality Materials: The quality of your materials directly impacts the final result. Opt for soft and durable yarns, and needles that suit your knitting style. Remember, your amigurumis deserve the best!
📏 Know Your Gauge: Before diving into the project, take time to understand your knitting tension. Making a small test square will help you adjust the size and achieve a perfect amigurumi.
📖 Dive into the Pattern: Before you start knitting, carefully read through the entire pattern. Familiarize yourself with each step and make sure you understand all the instructions. This prior knowledge will make you feel more confident during the process.
📍 Use Stitch Markers: Marking the beginning of each round with a stitch marker is key. This not only helps you follow the pattern more easily but also prevents errors and confusion.
🌈 Explore with Colors: The color palette is your canvas! Don’t be afraid to experiment and play with unexpected combinations. Colorful amigurumis are more fun and expressive.
🧼 Block Your Creations with Care: After completing your amigurumi, blocking is essential. This process smooths out the details and defines the shape, giving a professional touch to your creations. Remember, crochet is more than a hobby; it’s an art form. Enjoy every stitch and create magic with your own hands! 💖✨ Happy knitting! 🌸🌟
Flower
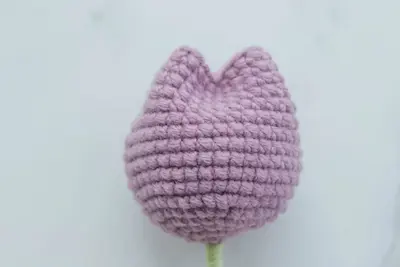
Use a stitch marker to identify the first stitch of each round as we will be working in a spiral. Rnd 1: Begin with 6 sc in the round. (place stitch marker in first stitch) Close loop tightly. Rnd 2:1 ch, (1 inc)*6 times (place stitch marker in first stitch) Remove stitch marker, 1 sl st. Rnd 3: 1 ch, (1 sc, 1 inc)*6 times (place stitch marker in first sc) Remove stitch marker, 1 sl st. Rnd 4:1 ch, (1 sc, 1 inc, 1 sc)*6 times (place stitch marker in first sc) Remove stitch marker, 1 sl st. Rnd 5:1 ch, (3 sc, 1 inc)*6 times, 1 sl st. Rnd 6:1 ch, (2 sc, 1 inc, 2 sc)*6 times, 1 sl st and 1 ch. Rnds 7-17:Work 36 sc in each round. 1 sl st and 1 ch. After completing the rounds, fasten off yarn, leaving a long tail. Thread a tapestry needle with the long tail of yarn.
Image 1
Leaf
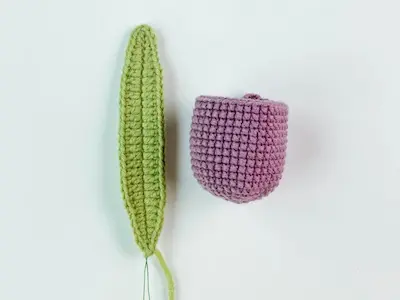
The leaf is formed by working increases and decreases to create a pointed end. Step 1:Begin with 31 chains, from the second stitch on the hook (add wire), 1 sl st. Step 2:For increase, make 2 sc, 3 hdc, 18 dc (place stitch marker in first double crochet) for decrease: 3 hdc, 2 sc. In the same stitch (1 sc, 1 ch, 1 sc). Step 3:Turn. For increase, make 2 sc, 3 hdc, 18 dc (place stitch marker in first double crochet) for decrease: 3 hdc, 2 sc. 1 sl st. Step 4:Turn. 1 sl st, cut and leave a tail.
Image 2
Assembly
To assemble the FLOWER and the LEAF, follow these steps:
Start with the crocheted tulip you have completed following the provided instructions.
Bend the top of the wire to create a hook.
Insert the wire through the center of the tulip.
Use hot glue to secure the wire into the tulip.
Insert fiber filling and fold the tulip in half as shown in the video.
Weave in loose ends of yarn and trim excess yarn.
Wrap the wire with floral tape or green yarn to create a more finished look and provide additional stability to the stem.
Insert the excess wire from the leaf while wrapping the stem with green yarn to cover it and secure the stem end with hot glue.
Image 3
Congratulations! You did it! The Stuffed Tulip pattern is complete. Thank you for your support! I hope you enjoyed crafting the Amigurumilandia's patterns.


