Search
Close this search box.

Amigurumilandia PATTERNS

Free patterns for all tastes

Free Barbie Amigurumi Crochet Pattern

May 22th, 2024

Free Barbie Amigurumi Crochet Pattern

Designer: @papudi_toys

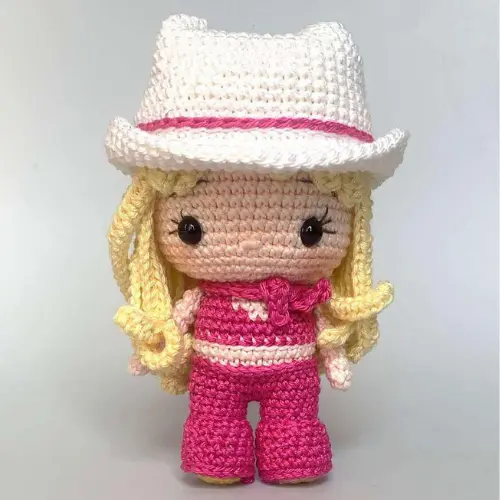
Discover how to crochet Barbie with our free pattern, a charming and iconic crocheted Barbie amigurumi doll. This project, created by @papudi_toys, measures 12 cm in height, including her stylish hat. With a medium difficulty level, it uses beige, pink, white, yellow, and dark yellow yarns.
Our Cowboy Barbie features her signature white hat and a pink outfit, perfectly capturing the distinctive style of the classic Barbie doll. Barbie is not just a doll; she’s a cultural icon that has inspired generations of girls since her creation in 1959 by Ruth Handler. Originally launched by Mattel, Barbie has evolved over the years, embracing numerous professions and styles, reflecting social and cultural changes. The Cowboy Barbie is one of the many facets of this versatile doll.
Barbie has appeared in numerous movies and series, becoming an entertainment icon. One of her most notable films is the 2023 movie “Barbie” starring Margot Robbie. In this film, Barbie is expelled from Barbieland for not being a perfect-looking doll and ventures into the human world in search of true happiness. The movie not only captivates with its exciting and emotional storyline but also addresses themes of self-acceptance and the search for identity. Creating a crocheted Barbie is not only a fun crochet project but also a way to connect with the nostalgia and love for a doll that has marked the childhood of many. This project is ideal for gifting to Barbie fans of all ages, whether as a crocheted toy for kids, a decorative piece for a collection, or a special detail to brighten any space.

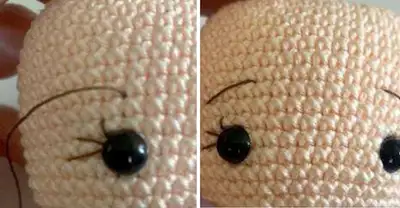
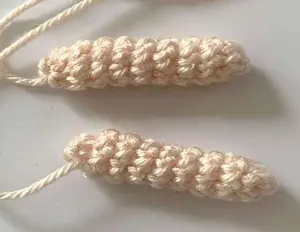
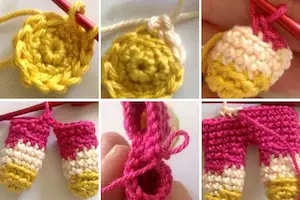
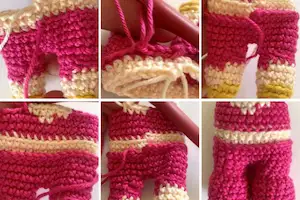
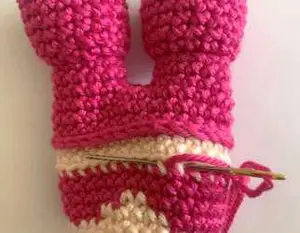
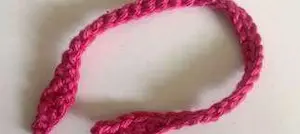
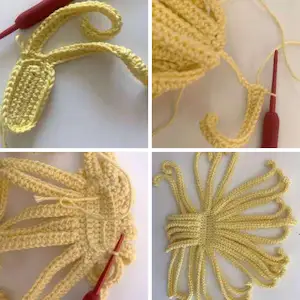
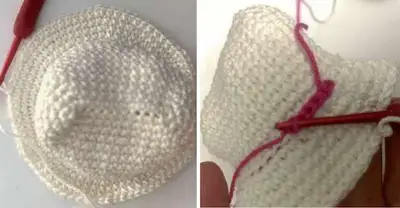
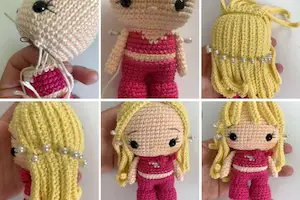
With our step-by-step free pattern in English, you can easily create your own Barbie amigurumi. Our instructions will guide you from the first stitches to the final details of her outfit and hat, ensuring that every part of your Cowboy Barbie is perfectly crocheted. Additionally, we offer tips on how to crochet Barbie’s clothes, allowing you to customize her outfit and add a unique touch.
In summary, if you are looking for a crochet project that combines creativity with the nostalgia of a classic doll, our Cowboy Barbie is the perfect choice. Download our free pattern and dive into the wonderful world of Barbie amigurumi. Don’t wait any longer to create your own crocheted Barbie and add a special touch to your doll collection!

If you prefer, you can optionally acquire the ad-free, printable PDF version of this pattern, which includes additional support and helps us continue creating more wonderful patterns. Your purchase supports Amigurumilandia, ensuring we can keep providing high-quality crochet patterns for enthusiasts around the world. For more information and to find the PDF version, please click here 👈
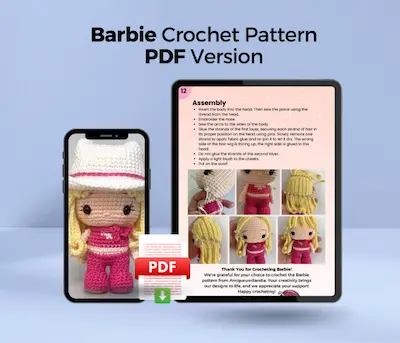
¡Let's get started!

Marterials
  • Yarn in the following colors: Beige, Pink, White, Yellow, and Dark Yellow
  • Crochet hook that matches the size of your yarn (I used a 2.20mm hook and a 2.50mm hook)
  • A pair of safety eyes (I used 8mm)
  • Yarn needle
  • Scissors
  • Stuffing
  • Glue
Abbreviations

MR = Magic Ring
Rnd = Round
ch = Chain
st/s = Stitch(es)
sc = Single Crochet
dc = Double Crochet
hdc = Half Double Crochet
inc = Increase (2 single crochets in 1 stitch)
dec = Decrease (1 single crochet over 2 stitches)
sk = Skip
sl st = Slip Stitch
BLO = Back Loop Only
FLO = Front Loop Only
LO = Loop
X(..) = Repeat (..) times
(….) = A total of (…) stitches in that round

Notes to keep in mind
  • Please note that you can create a smaller or larger doll using this pattern by using thinner or thicker yarn.
  • When choosing the yarn, you should prefer cotton for the doll itself (i.e., for the head, body, legs, and arms) because it will ensure that the fabric is quite stiff and thick.
  • Crochet fabric made with cotton yarn has almost no elasticity and will maintain its shape when stuffed.
  • If you wish, you can use softer and more elastic yarn for the clothing, such as wool or acrylic.
  • I use different hook sizes for different parts of the pattern.
  • When working in rounds, the tension of my stitches is much tighter than when working in rows.
  • If I cover one crochet piece over another (wig over the head, shoe on the foot), I usually use a larger hook for the piece that covers another.

Tips for crocheting Amigurumis 😉

  1. 🧵 Choose Quality Materials: The quality of your materials directly impacts the final result. Opt for soft and durable yarns, and needles that suit your knitting style. Remember, your amigurumis deserve the best!
  2. 📏 Know Your Gauge: Before diving into the project, take time to understand your knitting tension. Making a small test square will help you adjust the size and achieve a perfect amigurumi.
  3. 📖 Dive into the Pattern: Before you start knitting, carefully read through the entire pattern. Familiarize yourself with each step and make sure you understand all the instructions. This prior knowledge will make you feel more confident during the process.
  4. 📍 Use Stitch Markers: Marking the beginning of each round with a stitch marker is key. This not only helps you follow the pattern more easily but also prevents errors and confusion.
  5. 🌈 Explore with Colors: The color palette is your canvas! Don’t be afraid to experiment and play with unexpected combinations. Colorful amigurumis are more fun and expressive.
  6. 🧼 Block Your Creations with Care: After completing your amigurumi, blocking is essential. This process smooths out the details and defines the shape, giving a professional touch to your creations. Remember, crochet is more than a hobby; it’s an art form. Enjoy every stitch and create magic with your own hands! 💖✨ Happy knitting! 🌸🌟
Head

Use beige yarn and a 2.20mm crochet hook.
Make 12 chains. The stitches are worked around both sides of the foundation chain.
Rnd 1: Starting in the second chain from the hook, make an increase in this chain, 9 single crochets, 3 single crochets in the last chain. Continue on the other side of the foundation chain, 10 single crochets (24).
Rnd 2: 2 increases, 9 single crochets, 3 increases, 9 single crochets, 1 increase (30).
Rnd 3: (1 single crochet, 1 increase) x2, 10 single crochets, (1 single crochet, 1 increase) x3, 9 single crochets, 1 increase (36).
Rnd 4: (5 single crochets, 1 increase) x6 (42).
Rnd 5: 2 single crochets, 1 increase, (6 single crochets, 1 increase) x5, 4 single crochets (48).
Rnds 6-19: 48 single crochets (14 rounds) (48).
Rnd 20: (1 single crochet, 1 decrease) x16 (32).
Rnd 21: (2 single crochets, 1 decrease) x8, 1 slip stitch (24).
Cut the yarn leaving a long tail for sewing the head to the body and pull it through the last stitch completely.
Embroider the eyelashes between rounds 15-16 of the head, the space between the eyes is 10 stitches, and place the eyes (Image 1). Embroider the eyebrows. Stuff the head.

Image 1
Arms (make 2)

Use beige yarn and a 2.20mm crochet hook.
Rnd 1: 6 single crochets in a magic ring (6).
Rnds 2-9: 6 single crochets (6) (8 rounds).
Fasten off, cut the yarn leaving a tail for sewing the arms to the body.

Image 2
Legs (make 2)

LEFT LEG
Use dark yellow yarn and a 2.20mm crochet hook.
Rnd 1: 6 single crochets in a magic ring (6).
Rnd 2: 6 increases (12).
Rnd 3: 12 single crochets in BLO (12).
Change to beige yarn.
Rnd 4: 12 single crochets in BLO (12).
Rnd 5-6: 12 single crochets (2 rounds) (12).
Change to pink yarn.
Rnd 7: 12 single crochets (12).
Rnd 8: 12 single crochets in BLO (12).
Rnd 9: 12 single crochets (12).
Fasten off and secure invisibly.

RIGHT LEG
Rnd 1-9: Repeat the left leg, then make 3 single crochets. Do not cut the yarn, chain 2, and join the right leg to the first leg.

Body

Rnd 10: 12 single crochets in the stitches of the left leg. 2 single crochets in the 2 chains, 12 single crochets in the stitches of the right leg, 2 single crochets in the 2 chains (28).
Place a stitch marker in the last stitch you made. This will be the beginning of the next rounds.
Rnd 11: 5 single crochets, 1 increase, 14 single crochets, 1 increase, 7 single crochets (30).
Rnd 12 – Rnd 13: 30 single crochets (2 rounds) (30).
Change to beige yarn and leave the pink yarn outside the body.
Rnd 14: 30 single crochets in BLO (30).
Rnd 15: 30 single crochets (30).

Image 3
Pant details

Use pink yarn.
Work Round 13 (FLO): 30 slip stitches (30).
Fasten off and secure invisibly.

Change to pink yarn.
Rnd 16: 30 single crochets in BLO (30).
Rnd 17: 30 single crochets (30).
Rnd 18: [pink: 14 single crochets], [beige: 2 single crochets], [pink: 14 single crochets] (30).
Rnd 19: [pink: 12 single crochets], [beige: 6 single crochets], [pink: 12 single crochets] (30).
Change to beige yarn.
Rnd 20: (3 single crochets, decrease) * 6 times, 1 slip stitch (24).
Cut the beige and pink yarns and secure them invisibly.

Image 4

Use pink yarn and a 2.20mm crochet hook.
Turn the Barbie’s body upside down and join the pink yarn to the front loops of round 7.
Rnd 1: 12 single crochets (12).
Rnd 2: (3 single crochets, increase) * 3 times (15).
Rnd 3: 15 single crochets (15).
Rnd 4: (4 single crochets, increase) * 3 times (18).
Rnd 5: 18 single crochets (18).
Rnd 6: 18 slip stitches (18).
Fasten off and secure invisibly.
Work similarly on the other leg.

Blouse details

Use pink yarn.
Work between rounds 15 and 16, making the seam as shown in the image with a needle.
Stuff the body.

Image 5
Scarf

Use pink yarn.
Rnd 1: Chain 45. In the second stitch from the hook, make 1 slip stitch in the same stitch, then 1 slip stitch, 1 half double crochet, 1 double crochet, 1 half double crochet, 4 single crochets, 27 slip stitches, 4 single crochets, 1 half double crochet, 1 double crochet, 1 half double crochet, and finally, 2 slip stitches.
Fasten off and secure invisibly.

Image 6
Hair

Use yellow yarn and a 2.20mm crochet hook.
Chain 12. The stitches are worked around both sides of the foundation chain.
Rnd 1: Starting in the second chain from the hook, make an increase in this chain, 9 single crochets, 3 single crochets in the last chain. Continue on the other side of the foundation chain, 10 single crochets (24).
Rnd 2: 2 increases, 9 single crochets, 3 increases, 9 single crochets, 1 increase (30).
Rnd 3: FLO (1 single crochet, 1 increase) x2, 10 single crochets, (1 single crochet, 1 increase) x3, 9 single crochets, 1 increase (36).
Now begin with the hair strands.
For each strand, start in the 2nd chain from the hook.

FIRST LAYER (18 strands)
Work in the back loops of round 3.
S1: 1 slip stitch, chain 30, 29 half double crochets, 1 slip stitch.
S2-S18: Repeat S1 (17 strands).
Do not cut the yarn.

SECOND LAYER (14 strands)
Chain 2, work in the back loops of round 2.
S1: 1 slip stitch, chain 32, 31 half double crochets, 1 slip stitch.
S2-S9: Repeat S1 (8 strands).
S10: 1 slip stitch, chain 15, 14 half double crochets, 1 slip stitch.
S11-S14: Repeat S10 (4 strands).
Fasten off and secure invisibly.

Image 7
Hat

Use white yarn and a 2.50mm crochet hook.
Chain 12. The stitches are worked around both sides of the foundation chain.
Rnd 1: Starting in the second chain from the hook, make an increase in this chain, 9 single crochets, 3 single crochets in the last chain. Continue on the other side of the foundation chain, 10 single crochets (24).
Rnd 2: 2 increases, 9 single crochets, 3 increases, 9 single crochets, 1 increase (30).
Rnd 3: (1 single crochet, 1 increase) x2, 10 single crochets, (1 single crochet, 1 increase) x3, 9 single crochets, 1 increase (36).
Rnd 4: (5 single crochets, 1 increase) x6 (42).
Rnd 5: 2 single crochets, 1 increase, (6 single crochets, 1 increase) x5, 4 single crochets (48).
Rnds 6-14: 48 single crochets (9 rounds) (48).
Rnd 15: BLO (7 single crochets, 1 increase) x6 (54).
Rnd 16: 2 single crochets, 1 increase, (8 single crochets, 1 increase) x5, 6 single crochets (60).
Rnd 17: (9 single crochets, 1 increase) x6 (66).
Rnd 18: 4 single crochets, 1 increase, (10 single crochets, 1 increase) x5, 6 single crochets (72).
Rnd 19: (11 single crochets, 1 increase) x6 (78).
Rnd 20: 78 slip stitches (78).
Fasten off and secure invisibly.

Hat details

Use pink yarn and a 2.50mm crochet hook.
Work between rounds 14 and 15.
Make 48 slip stitches.
Fasten off and secure invisibly.

Image 8
Assembly
  • Insert the body into the head. Then sew the place using the thread from the head.
  • Embroider the nose.
  • Sew the arms to the sides of the body.
  • Glue the strands of the first layer, securing each strand of hair in its proper position on the head using pins. Slowly, remove one strand to apply fabric glue and re-pin it to let it dry. The wrong side of the hair wig is facing up, the right side is glued to the head.
  • Do not glue the strands of the second layer.
  • Apply a light blush to the cheeks.
  • Put on the scarf.
Image 9

Congratulations! You did it! The Free Barbie Amigurumi Crochet Pattern is complete. Thank you for your support! I hope you enjoyed crafting the Amigurumilandia's patterns.

Support us by buying a PDF pattern to keep our free content coming

Barbie Crochet Pattern PDF Version

Unlock the full potential of your crafting journey with the Barbie Crochet Pattern PDF Version, offering convenience and accessibility for your crochet projects.
$9.99
$ 4
99 USD
One-time payment
  • Ad-free Experience: Enjoy a distraction-free crafting session with our PDF version, free from the clutter of advertisements commonly found on webpages.
  • Offline Access: Access your pattern anytime, anywhere, even without internet connection, allowing you to craft on-the-go without interruptions.
  • Printable Format: Easily print the pattern for quick reference or mark up your progress directly on the document, enhancing your crafting experience.
  • Lifetime Ownership: Secure your pattern for a one-time payment, ensuring lifetime access without worrying about subscription fees or recurring charges.
  • Dedicated Support: Receive personalized assistance from Amigurumilandia's support team for any access issues or pattern-related inquiries, ensuring a seamless crafting experience.
Popular
Luffy One Piece Crochet Pattern

Luffy

Free| Unlimited Access

Size: 24cm| Nivel: Medium

Free Naruto Crochet Pattern

Naruto

Free| Unlimited Access

Size: 18cm| Nivel: Medium

Angelica Pickles by Rugrats Free Crochet Pattern

Angelica Pickles

Free| Unlimited Access

Size: 20cm| Nivel: Basic

Tommy Pickles

Free| Unlimited Access

Size: 17cm| Nivel: Basic

Leave a Reply

Your email address will not be published. Required fields are marked *

Share your creations with us!

Send us pictures of your creations and we’ll provide you with our professional opinion!

We value your opinion

Send us a suggestion or comment to amigurumilandia1@gmail.com

© 2024 AmigurumiLandia

All rights reserved

error: The content of this page is protected